HP StorageWorks 4/32 HP StorageWorks DC and DC04 SAN Backbone Director Switche - Page 180
wait one or two minutes and re-enter the command until you can verify that redundancy has been
 |
View all HP StorageWorks 4/32 manuals
Add to My Manuals
Save this manual to your list of manuals |
Page 180 highlights
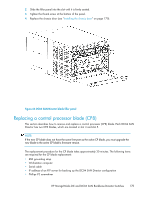
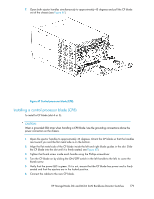
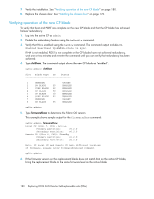
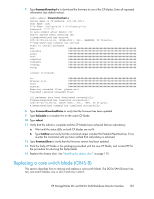
7. Verify the installation. See "Verifying operation of the new CP blade" on page 180. 8. Replace the chassis door. See "Installing the chassis door" on page 170. Verifying operation of the new CP blade To verify that boot and POST are complete on the new CP blade and that the CP blade has achieved failover redundancy: 1. Log into the active CP as admin. 2. Enable the redundancy feature using the haEnable command. 3. Verify that HA is enabled using the haShow command. The command output includes HA Enabled Heartbeat Up and HA-state in sync. If HA is not enabled, POST is not complete or the CP blades have not achieved redundancy, wait one or two minutes and re-enter the command until you can verify that redundancy has been achieved. 4. Type slotShow. The command output shows the new CP blade as "enabled": swDir:admin> slotShow Slot Blade Type ID Status 1 UNKNOWN VACANT 2 SW BLADE 55 ENABLED 3 CORE BLADE 52 ENABLED 4 CP BLADE 50 ENABLED 5 CP BLADE 50 ENABLED 6 CORE BLADE 52 ENABLED 7 UNKNOWN VACANT 8 SW BLADE 55 ENABLED swDir:admin> 5. Type firmwareShow to determine the Fabric OS version. This example shows sample output for the firmwareShow command: swDir:admin> firmwareShow Local CP (Slot 7, CP1): Active Primary partition: v6.2.0 Secondary Partition: v6.2.0 Remote CP (Slot 6, CP0): Standby Primary partition: v6.2.0 Secondary Partition: v6.2.0 Note: If Local CP and Remote CP have different versions of firmware, please retry firmwaredownload command. swDir:admin> 6. If the firmware version on the replacement blade does not match that on the active CP blade, bring the replacement blade to the same firmware level as the active blade. 180 Replacing DC04 SAN Director field-replaceable units (FRUs)
-
 1
1 -
2
-
3
-
4
-
5
-
6
-
7
-
8
-
9
-
10
-
11
-
12
-
13
-
14
-
15
-
16
-
17
-
18
-
19
-
20
-
21
-
22
-
23
-
24
-
25
-
26
-
27
-
28
-
29
-
30
-
31
-
32
-
33
-
34
-
35
-
36
-
37
-
38
-
39
-
40
-
41
-
42
-
43
-
44
-
45
-
46
-
47
-
48
-
49
-
50
-
51
-
52
-
53
-
54
-
55
-
56
-
57
-
58
-
59
-
60
-
61
-
62
-
63
-
64
-
65
-
66
-
67
-
68
-
69
-
70
-
71
-
72
-
73
-
74
-
75
-
76
-
77
-
78
-
79
-
80
-
81
-
82
-
83
-
84
-
85
-
86
-
87
-
88
-
89
-
90
-
91
-
92
-
93
-
94
-
95
-
96
-
97
-
98
-
99
-
100
-
101
-
102
-
103
-
104
-
105
-
106
-
107
-
108
-
109
-
110
-
111
-
112
-
113
-
114
-
115
-
116
-
117
-
118
-
119
-
120
-
121
-
122
-
123
-
124
-
125
-
126
-
127
-
128
-
129
-
130
-
131
-
132
-
133
-
134
-
135
-
136
-
137
-
138
-
139
-
140
-
141
-
142
-
143
-
144
-
145
-
146
-
147
-
148
-
149
-
150
-
151
-
152
-
153
-
154
-
155
-
156
-
157
-
158
-
159
-
160
-
161
-
162
-
163
-
164
-
165
-
166
-
167
-
168
-
169
-
170
-
171
-
172
-
173
-
174
-
 175
175 -
 176
176 -
 177
177 -
 178
178 -
 179
179 -
 180
180 -
 181
181 -
 182
182 -
 183
183 -
 184
184 -
 185
185 -
186
-
187
-
188
-
189
-
190
-
191
-
192
-
193
-
194
-
195
-
196
-
197
-
198
-
199
-
200
-
201
-
202
-
203
-
204
-
205
-
206
-
207
-
208
-
209
-
210
-
211
-
212
-
213
-
214
-
215
-
216
-
217
-
218
-
219
-
220
-
221
-
222
-
223
-
224
-
225
-
226
-
227
-
228
-
229
-
230
-
231
-
232
-
233
-
234
-
235
-
236
-
237
-
238
-
239
-
240
-
241
-
242
-
243
-
244
-
245
-
246
-
247
-
248
-
249
-
250
-
251
-
252
-
253
-
254
-
255
-
256
 |
 |
