HP StorageWorks 4/32 HP StorageWorks DC and DC04 SAN Backbone Director Switche - Page 37
Shelf bracket and clip or retainer nut placement on cabinet rails
 |
View all HP StorageWorks 4/32 manuals
Add to My Manuals
Save this manual to your list of manuals |
Page 37 highlights
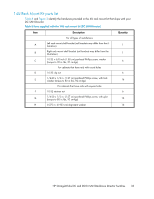
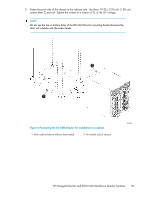
3. Position shelf brackets with adjustable ends on the intake aisle side of the cabinet (see Figure 5). • For rails with round holes: Position the left and right rack mount shelf brackets (items A and B) and attach to the cabinet rails. Use eight screws with lock washers per bracket (four on each end). Tighten the screws to a torque of 92 cm-kgs (80 in.-lbs). • For rails with square holes: Position the left and right rack mount shelf brackets (Items A and B) and attach to the cabinet rails. Use eight screws with and alignment washers per bracket (four on each end). Tighten the screws to a torque of 92 cm-kgs (80 in.-lbs). Figure 5 Shelf bracket and clip or retainer nut placement on cabinet rails 26421a NOTE: Standard EIA rails have holes in sets of three; spaces between the holes are 1.58 cm, 1.58 cm, and 1.27 cm (5/8 in., 5/8 in., and 1/2 in.). If cables are to be routed down through the cable management comb, allow space below the brackets for cable management. 4. Tighten the adjusting screws on the rack mount shelf brackets to a torque of 37 cm-kgs (32 in.-lbs). HP StorageWorks DC and DC04 SAN Backbone Director Switches 37
-
 1
1 -
2
-
3
-
4
-
5
-
6
-
7
-
8
-
9
-
10
-
11
-
12
-
13
-
14
-
15
-
16
-
17
-
18
-
19
-
20
-
21
-
22
-
23
-
24
-
25
-
26
-
27
-
28
-
29
-
30
-
31
-
 32
32 -
 33
33 -
 34
34 -
 35
35 -
 36
36 -
 37
37 -
 38
38 -
 39
39 -
 40
40 -
 41
41 -
 42
42 -
43
-
44
-
45
-
46
-
47
-
48
-
49
-
50
-
51
-
52
-
53
-
54
-
55
-
56
-
57
-
58
-
59
-
60
-
61
-
62
-
63
-
64
-
65
-
66
-
67
-
68
-
69
-
70
-
71
-
72
-
73
-
74
-
75
-
76
-
77
-
78
-
79
-
80
-
81
-
82
-
83
-
84
-
85
-
86
-
87
-
88
-
89
-
90
-
91
-
92
-
93
-
94
-
95
-
96
-
97
-
98
-
99
-
100
-
101
-
102
-
103
-
104
-
105
-
106
-
107
-
108
-
109
-
110
-
111
-
112
-
113
-
114
-
115
-
116
-
117
-
118
-
119
-
120
-
121
-
122
-
123
-
124
-
125
-
126
-
127
-
128
-
129
-
130
-
131
-
132
-
133
-
134
-
135
-
136
-
137
-
138
-
139
-
140
-
141
-
142
-
143
-
144
-
145
-
146
-
147
-
148
-
149
-
150
-
151
-
152
-
153
-
154
-
155
-
156
-
157
-
158
-
159
-
160
-
161
-
162
-
163
-
164
-
165
-
166
-
167
-
168
-
169
-
170
-
171
-
172
-
173
-
174
-
175
-
176
-
177
-
178
-
179
-
180
-
181
-
182
-
183
-
184
-
185
-
186
-
187
-
188
-
189
-
190
-
191
-
192
-
193
-
194
-
195
-
196
-
197
-
198
-
199
-
200
-
201
-
202
-
203
-
204
-
205
-
206
-
207
-
208
-
209
-
210
-
211
-
212
-
213
-
214
-
215
-
216
-
217
-
218
-
219
-
220
-
221
-
222
-
223
-
224
-
225
-
226
-
227
-
228
-
229
-
230
-
231
-
232
-
233
-
234
-
235
-
236
-
237
-
238
-
239
-
240
-
241
-
242
-
243
-
244
-
245
-
246
-
247
-
248
-
249
-
250
-
251
-
252
-
253
-
254
-
255
-
256
 |
 |
