HP StorageWorks 4/32 HP StorageWorks DC and DC04 SAN Backbone Director Switche - Page 77
Installing a Director blade, Director blade FC8-48 shown
 |
View all HP StorageWorks 4/32 manuals
Add to My Manuals
Save this manual to your list of manuals |
Page 77 highlights
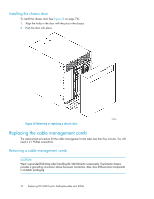
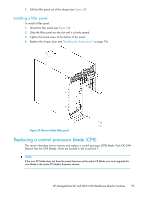
9. FC8-16, FC8-32, FC8-48 Director blades: Adjust the ejectors to the open position. Unscrew the two thumb screws from the top and bottom ejectors on the blade using the Phillips screwdriver. See Figure 28. Unscrew the top thumb screw until it pops out. This initiates a hot-swap request. FC10-6, FR4-18i Director blades: Turn the blade off by sliding the slider switch in the top ejector down, to the off position. This initiates a hot-swap request. 10. Wait for the power LED to turn off in response to the hot-swap request before removing the blade. 11. FC8-16, FC8-32, FC8-48 Director blades: Open the ejectors. Pull the blade out of the chassis using the ejectors. FC10-6 Director blade and FR4-18i Director blades: Unscrew the two thumb screws from the top and bottom ejectors on the blade using the Phillips screwdriver. Open both ejectors simultaneously to approximately 45 degrees and pull the blade out of the chassis. 12. If the blade is not being replaced by another blade, install a filler panel. 26392a Figure 28 Director blade (FC8-48 shown) Installing a Director blade Slots are numbered from 1 through 12, from left to right when facing the port side of the DC SAN Director. Director blades can be installed in slots 1 through 4 and 9 through 12. HP StorageWorks DC and DC04 SAN Backbone Director Switches 77
-
 1
1 -
2
-
3
-
4
-
5
-
6
-
7
-
8
-
9
-
10
-
11
-
12
-
13
-
14
-
15
-
16
-
17
-
18
-
19
-
20
-
21
-
22
-
23
-
24
-
25
-
26
-
27
-
28
-
29
-
30
-
31
-
32
-
33
-
34
-
35
-
36
-
37
-
38
-
39
-
40
-
41
-
42
-
43
-
44
-
45
-
46
-
47
-
48
-
49
-
50
-
51
-
52
-
53
-
54
-
55
-
56
-
57
-
58
-
59
-
60
-
61
-
62
-
63
-
64
-
65
-
66
-
67
-
68
-
69
-
70
-
71
-
 72
72 -
 73
73 -
 74
74 -
 75
75 -
 76
76 -
 77
77 -
 78
78 -
 79
79 -
 80
80 -
 81
81 -
 82
82 -
83
-
84
-
85
-
86
-
87
-
88
-
89
-
90
-
91
-
92
-
93
-
94
-
95
-
96
-
97
-
98
-
99
-
100
-
101
-
102
-
103
-
104
-
105
-
106
-
107
-
108
-
109
-
110
-
111
-
112
-
113
-
114
-
115
-
116
-
117
-
118
-
119
-
120
-
121
-
122
-
123
-
124
-
125
-
126
-
127
-
128
-
129
-
130
-
131
-
132
-
133
-
134
-
135
-
136
-
137
-
138
-
139
-
140
-
141
-
142
-
143
-
144
-
145
-
146
-
147
-
148
-
149
-
150
-
151
-
152
-
153
-
154
-
155
-
156
-
157
-
158
-
159
-
160
-
161
-
162
-
163
-
164
-
165
-
166
-
167
-
168
-
169
-
170
-
171
-
172
-
173
-
174
-
175
-
176
-
177
-
178
-
179
-
180
-
181
-
182
-
183
-
184
-
185
-
186
-
187
-
188
-
189
-
190
-
191
-
192
-
193
-
194
-
195
-
196
-
197
-
198
-
199
-
200
-
201
-
202
-
203
-
204
-
205
-
206
-
207
-
208
-
209
-
210
-
211
-
212
-
213
-
214
-
215
-
216
-
217
-
218
-
219
-
220
-
221
-
222
-
223
-
224
-
225
-
226
-
227
-
228
-
229
-
230
-
231
-
232
-
233
-
234
-
235
-
236
-
237
-
238
-
239
-
240
-
241
-
242
-
243
-
244
-
245
-
246
-
247
-
248
-
249
-
250
-
251
-
252
-
253
-
254
-
255
-
256
 |
 |
