HP Surestore Tape Library Model 6/60 SAN Solution Installation Guide - Page 23
Entering an IP Address Using the SilkWorm, Front Panel
 |
View all HP Surestore Tape Library Model 6/60 manuals
Add to My Manuals
Save this manual to your list of manuals |
Page 23 highlights
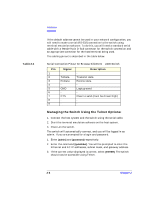
NOTE NOTE Installation Switches • The SilkWorm® 2400 Switch (8-port, serial port configuration) is managed remotely via Telnet, SNMP, Web interface, or a serial connection. This switch does not have a front panel. The Telnet, SNMP, and Web management tools require that the switch be accessible via a network connection. The switch must be configured with an IP address to allow for the network connection. Entering an IP Address Using the SilkWorm® 2800 Front Panel: The switch's front panel display is normally not illuminated. Pressing the front panel buttons activates the display. 1. Select [Configuration Menu] using the right button. 2. Scroll down until [Ethernet IP Address] appears. Select this option using the right button. The switch's default IP address is 10.77.77.77. Enter a valid IP address. 3. Use the arrow keys to change the displayed value. Change from one address segment to the next using the left button. 4. When the values are correctly entered, press the right button to input the changes. 5. Select [YES] to confirm that the new IP address is correct and commit it to flash RAM. Your switch may also require a subnet mask and a gateway address before it will be completely network accessible. Consult your system administrator to determine if these settings are required. If a subnet mask and gateway address are required, repeat the steps above after selecting the appropriate options from the Configuration Menu. Entering an IP Address Using the SilkWorm® 2400: There are two ways to enter an IP address on the 2400. If the default address (10.77.77.77) allows you to connect to the switch using Telnet, see "Managing the Switch using the Telnet Option" on page 2-6. Chapter 2 2-5
-
 1
1 -
2
-
3
-
4
-
5
-
6
-
7
-
8
-
9
-
10
-
11
-
12
-
13
-
14
-
15
-
16
-
17
-
 18
18 -
 19
19 -
 20
20 -
 21
21 -
 22
22 -
 23
23 -
 24
24 -
 25
25 -
 26
26 -
 27
27 -
 28
28 -
29
-
30
-
31
-
32
-
33
-
34
-
35
-
36
-
37
-
38
-
39
-
40
-
41
-
42
-
43
-
44
-
45
-
46
-
47
-
48
-
49
-
50
-
51
-
52
-
53
-
54
-
55
-
56
-
57
-
58
-
59
-
60
-
61
-
62
-
63
-
64
-
65
-
66
-
67
-
68
-
69
 |
 |
