HP t505 ThinPro 4.4 Administrator Guide - Page 21
RDP, RDP client connections, Creating an RDP7 connection, To enable Citrix USB redirection
 |
View all HP t505 manuals
Add to My Manuals
Save this manual to your list of manuals |
Page 21 highlights
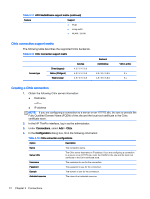
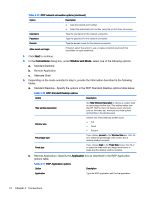
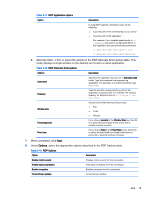
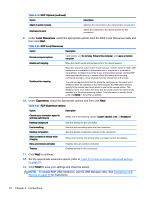
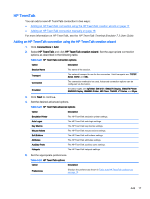
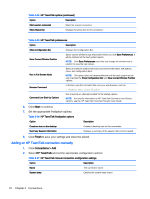
5. When completed, click Next. 6. In the Advanced dialog box, select the appropriate options: Table 3-14 Citrix connection advanced configurations Option Description Fallback connection Select a fallback connection. HP ThinPro attempts to start a fallback connection when the original connection does not start. Autostart priority Determines the connection startup order. 0 means the connection is disabled. The other values determine the startup order. Valid options are: 0, 1, 2, 3, 4, and 5. Wait for Network before connecting Disable this option if your connection does not need the network to start or if you do not want to wait for the network to start the connection. Show icon on desktop Creates a desktop icon for this connection. 7. Click Finish to save your settings and close the wizard. NOTE: To enable Citrix USB redirection, use the USB Manager utility. See Redirecting USB devices on page 36 for instructions. RDP Microsoft Remote Desktop Protocol (RDP) enables Windows-based applications to communicate over network connections. It is installed on all versions of Windows later than Windows NT. RDP client connections The RDP client is based on FreeRDP 1.0 and meets the following requirements for RDP 7.1: ● Hardware-accelerated RemoteFX ● MMR supported when connecting to Windows hosts with the Desktop Experience feature enabled (Windows 7 or Windows Server 2008 R2) ● USBR supported when connecting to Windows 7 Remote Desktop Virtual Hosts ● Bidirectional audio ● True multi-monitor support Creating an RDP7 connection 1. In the HP ThinPro desktop, select Connections and then click Add. 2. Under Add, choose RDP7. 3. In the Connections dialog box, under Network, set the appropriate network connection options as described in the following table. Table 3-15 RDP network connection options Option Description Name Type a name for this network connection. Address Type the IP address for this network connection. Port Under Port, do one of the following: Add 13
-
 1
1 -
2
-
3
-
4
-
5
-
6
-
7
-
8
-
9
-
10
-
11
-
12
-
13
-
14
-
15
-
 16
16 -
 17
17 -
 18
18 -
 19
19 -
 20
20 -
 21
21 -
 22
22 -
 23
23 -
 24
24 -
 25
25 -
 26
26 -
27
-
28
-
29
-
30
-
31
-
32
-
33
-
34
-
35
-
36
-
37
-
38
-
39
-
40
-
41
-
42
-
43
-
44
-
45
-
46
-
47
-
48
-
49
-
50
-
51
-
52
-
53
-
54
-
55
-
56
-
57
-
58
-
59
-
60
-
61
-
62
-
63
-
64
-
65
-
66
 |
 |
