HP t505 ThinPro 4.4 Administrator Guide - Page 52
HPDM Agent, SSHD Manager, ThinState, Con the HP Device Management Agent using this feature.
 |
View all HP t505 manuals
Add to My Manuals
Save this manual to your list of manuals |
Page 52 highlights
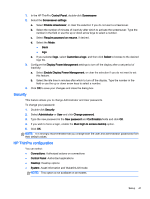
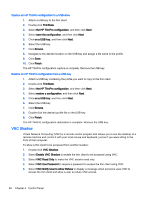
1. Double-click HP Automatic Update. 2. Click Enable HP Automatic Update on system startup if you wish to have this system updated on restarts. 3. If the previous option is enabled, you can click Enable manual configuration if you wish to supply the server address via ftp, http, or https. If you wish to supply the Server, Path, User name, and Password, you may do this in the supplied fields. HPDM Agent Configure the HP Device Management Agent using this feature. 1. Double-click HPDM Agent to access this screen. 2. Use the General tab to set the following: ● Backup Gateway ● Pull Interval ● Log Level ● Delay Scope 3. Set the groups using the Groups tab. You can select preassigned groups from the DHCP tab or you can use static custom groups. 4. Click OK to save your changes. NOTE: Changes will take effect after the HP Device Management Agent is restarted. SSHD Manager To enable secure shell access: 1. Double-click SSHD Manager. 2. Click Enable Incoming Secure Shell Access. 3. Click Enable Non-Administrator Access via Secure Shell, if you wish. 4. Click OK to save your preference and close the dialog box. ThinState ThinState allows you to copy and deploy an HP ThinPro image and settings to another HP Thin Client of identical model and hardware: ● Manage the HP ThinPro image on page 45 ● Manage the HP ThinPro configuration on page 47 Use the captured images and settings to replicate (deploy) on different systems or to restore the current capture back to its original setting after settings are altered. NOTE: HP ThinState is not a standalone tool and can only be accessed by the administrator from within the thin client image. What do I need to have? 44 Chapter 4 Control Panel
-
 1
1 -
2
-
3
-
4
-
5
-
6
-
7
-
8
-
9
-
10
-
11
-
12
-
13
-
14
-
15
-
16
-
17
-
18
-
19
-
20
-
21
-
22
-
23
-
24
-
25
-
26
-
27
-
28
-
29
-
30
-
31
-
32
-
33
-
34
-
35
-
36
-
37
-
38
-
39
-
40
-
41
-
42
-
43
-
44
-
45
-
46
-
 47
47 -
 48
48 -
 49
49 -
 50
50 -
 51
51 -
 52
52 -
 53
53 -
 54
54 -
 55
55 -
 56
56 -
 57
57 -
58
-
59
-
60
-
61
-
62
-
63
-
64
-
65
-
66
 |
 |
