HP t505 ThinPro 4.4 Administrator Guide - Page 29
Logging in to the VMware Horizon View Manager server, Using Kiosk Mode with VMware Horizon View
 |
View all HP t505 manuals
Add to My Manuals
Save this manual to your list of manuals |
Page 29 highlights
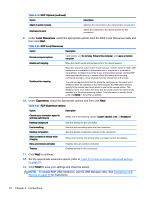
Table 3-31 VMware Horizon View login options Box Description Automatic login Logs in automatically when the connection is established. Allow Smart Card login Allows a locally-connected smart card to provide login credentials. Close after disconnect Closes the VMware Horizon View window after HP ThinPro disconnects from the server. Hide top menu bar Hides the top menu bar. Connection security levels Valid options are: Allow all connections, Warn, and Refuse insecure connections. Command line arguments Enables the command line arguments to be used for the connection. 6. When completed, click Finish. Logging in to the VMware Horizon View Manager server 1. In the VMware Horizon View Client screen, type the following credentials: a. Username b. Password c. Domain 2. Click Connect. NOTE: The client performs the following tasks: ● Contacts the VMware Horizon View Management server. ● Authenticates and retrieves the available desktops from the server If only one desktop is available (or a desktop is configured in the connection settings), the user will automatically be connected to the desktop. Using Kiosk Mode with VMware Horizon View In Kiosk Mode, the client performs an automatic login to a remote desktop using predefined user credentials at startup. If you lose a connection because of a logout, disconnect, or network failure, the connection automatically restores when connectivity returns. To minimize the session and return to the login screen, use the keyboard shortcut Ctrl+Alt+End. To set up a Kiosk mode login: 1. As the administrator, select Connections on the HP ThinPro desktop. 2. Choose a connection and click Edit. 3. Under Network, fill in the following settings: a. Server name (hostname or IP address) b. Username c. Password d. Domain e. Desktop (if applicable) Add 21
-
 1
1 -
2
-
3
-
4
-
5
-
6
-
7
-
8
-
9
-
10
-
11
-
12
-
13
-
14
-
15
-
16
-
17
-
18
-
19
-
20
-
21
-
22
-
23
-
 24
24 -
 25
25 -
 26
26 -
 27
27 -
 28
28 -
 29
29 -
 30
30 -
 31
31 -
 32
32 -
 33
33 -
 34
34 -
35
-
36
-
37
-
38
-
39
-
40
-
41
-
42
-
43
-
44
-
45
-
46
-
47
-
48
-
49
-
50
-
51
-
52
-
53
-
54
-
55
-
56
-
57
-
58
-
59
-
60
-
61
-
62
-
63
-
64
-
65
-
66
 |
 |
