IBM 8487 User Manual - Page 48
IBM ServeRAID Support, Align the drive assembly with the guide rails in the bay.
 |
UPC - 000435687531
View all IBM 8487 manuals
Add to My Manuals
Save this manual to your list of manuals |
Page 48 highlights
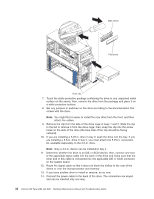
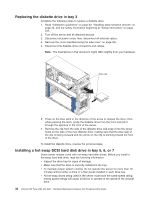
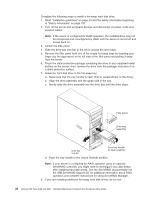
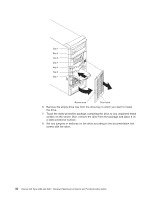
Complete the following steps to install a hot-swap hard disk drive: 1. Read "Installation guidelines" on page 23 and the safety information beginning at "Safety information" on page 107. 2. Turn off the server and peripheral devices and disconnect all power cords and external cables. Note: If the server is configured for RAID operation, the installed drive may not be recognized and reconfigured by RAID until the server is turned off and turned back on. 3. Unlock the side cover. 4. Slide the drive-bay lock bar to the left to access the drive bays. 5. Remove the filler panel from one of the empty hot-swap bays by inserting your finger into the depression at the left side of the filler panel and pulling it away from the server. 6. Touch the static-protective package containing the drive to any unpainted metal surface on the server; then, remove the drive from the package and place it on a static-protective surface. 7. Install the hard disk drive in the hot-swap bay: a. Make sure that the tray handle is open (that is, perpendicular to the drive). b. Align the drive assembly with the guide rails in the bay. c. Gently slide the drive assembly into the drive bay until the drive stops. Filler panel Drive tray assembly Drive bay lock-bar Drive tray handle (in open position) d. Push the tray handle to the closed (locked) position. Note: If your server is configured for RAID operation using an optional ServeRAID controller, you might have to reconfigure your disk arrays after installing hard disk drives. See the ServeRAID documentation on the IBM ServeRAID Support CD for additional information about RAID operation and complete instructions for using ServeRAID Manager. 8. If you are installing additional hot-swap hard disk drives, do so now. 38 xSeries 206 Type 8482 and 8487: Hardware Maintenance Manual and Troubleshooting Guide
-
 1
1 -
2
-
3
-
4
-
5
-
6
-
7
-
8
-
9
-
10
-
11
-
12
-
13
-
14
-
15
-
16
-
17
-
18
-
19
-
20
-
21
-
22
-
23
-
24
-
25
-
26
-
27
-
28
-
29
-
30
-
31
-
32
-
33
-
34
-
35
-
36
-
37
-
38
-
39
-
40
-
41
-
42
-
 43
43 -
 44
44 -
 45
45 -
 46
46 -
 47
47 -
 48
48 -
 49
49 -
 50
50 -
 51
51 -
 52
52 -
 53
53 -
54
-
55
-
56
-
57
-
58
-
59
-
60
-
61
-
62
-
63
-
64
-
65
-
66
-
67
-
68
-
69
-
70
-
71
-
72
-
73
-
74
-
75
-
76
-
77
-
78
-
79
-
80
-
81
-
82
-
83
-
84
-
85
-
86
-
87
-
88
-
89
-
90
-
91
-
92
-
93
-
94
-
95
-
96
-
97
-
98
-
99
-
100
-
101
-
102
-
103
-
104
-
105
-
106
-
107
-
108
-
109
-
110
-
111
-
112
-
113
-
114
-
115
-
116
-
117
-
118
-
119
-
120
-
121
-
122
-
123
-
124
-
125
-
126
-
127
-
128
-
129
-
130
-
131
-
132
-
133
-
134
-
135
-
136
-
137
-
138
-
139
-
140
-
141
-
142
-
143
-
144
-
145
-
146
-
147
-
148
-
149
-
150
-
151
-
152
-
153
-
154
-
155
-
156
-
157
-
158
-
159
-
160
 |
 |
