IBM 867282X Maintenance Manual - Page 53
Working with DIMMs, Installing DIMMs, Your xSeries 300 server supports 128 MB, 256 MB
 |
UPC - 087944650966
View all IBM 867282X manuals
Add to My Manuals
Save this manual to your list of manuals |
Page 53 highlights
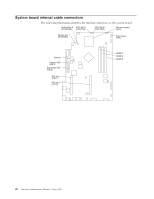
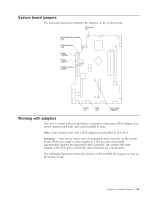
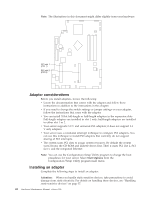
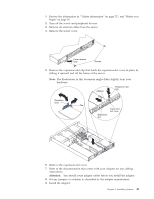
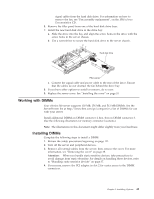
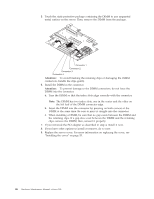
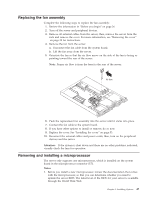
signal cables from the hard disk drive. For information on how to remove the fan, see ″Fan assembly replacement″, on the IBM xSeries Documentation CD. 6. Remove the filler panel from one of the hard disk drive bays. 7. Install the new hard disk drive in the drive bay: a. Slide the drive into the bay and align the screw holes in the drive with the screw holes in the server chassis. b. Use a screwdriver to secure the hard disk drive to the server chassis. Hard disk drive Filler panel c. Connect the signal cable and power cable to the rear of the drive. Ensure that the cables do not obstruct the fan behind the drive bay. 8. If you have other options to install or remove, do so now. 9. Replace the server cover. See "Installing the cover" on page 53. Working with DIMMs Your xSeries 300 server supports 128 MB, 256 MB, and 512 MB DIMMs. See the ServerProven list at http://www.ibm.com/pc/compat for a list of DIMMs for use with your server. Install additional DIMMs in DIMM connector 2 first, then in DIMM connector 3. (See the following illustration for memory connector locations.) Note: The illustrations in this document might differ slightly from your hardware. Installing DIMMs Complete the following steps to install a DIMM: 1. Review the safety precautions beginning on page 111. 2. Turn off the server and peripheral devices. 3. Remove all external cables from the server; then, remove the cover. For more information, see "Removing the cover" on page 38. Attention: When you handle static-sensitive devices, take precautions to avoid damage from static electricity. For details on handling these devices, refer to "Handling static-sensitive devices" on page 37. 4. If necessary, remove the PCI adapter in slot 2 for easier access to the DIMM connectors. Chapter 5. Installing Options 45
-
 1
1 -
2
-
3
-
4
-
5
-
6
-
7
-
8
-
9
-
10
-
11
-
12
-
13
-
14
-
15
-
16
-
17
-
18
-
19
-
20
-
21
-
22
-
23
-
24
-
25
-
26
-
27
-
28
-
29
-
30
-
31
-
32
-
33
-
34
-
35
-
36
-
37
-
38
-
39
-
40
-
41
-
42
-
43
-
44
-
45
-
46
-
47
-
 48
48 -
 49
49 -
 50
50 -
 51
51 -
 52
52 -
 53
53 -
 54
54 -
 55
55 -
 56
56 -
 57
57 -
 58
58 -
59
-
60
-
61
-
62
-
63
-
64
-
65
-
66
-
67
-
68
-
69
-
70
-
71
-
72
-
73
-
74
-
75
-
76
-
77
-
78
-
79
-
80
-
81
-
82
-
83
-
84
-
85
-
86
-
87
-
88
-
89
-
90
-
91
-
92
-
93
-
94
-
95
-
96
-
97
-
98
-
99
-
100
-
101
-
102
-
103
-
104
-
105
-
106
-
107
-
108
-
109
-
110
-
111
-
112
-
113
-
114
-
115
-
116
-
117
-
118
-
119
-
120
 |
 |
