IBM 867282X Maintenance Manual - Page 55
Replacing the fan assembly, Removing and installing a microprocessor
 |
UPC - 087944650966
View all IBM 867282X manuals
Add to My Manuals
Save this manual to your list of manuals |
Page 55 highlights
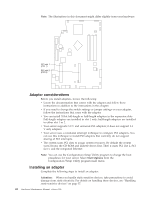
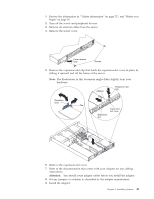
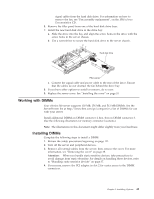
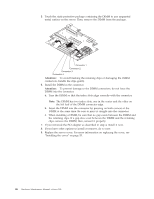
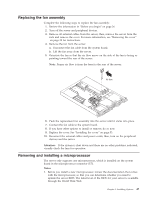
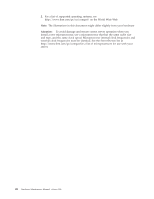
Replacing the fan assembly Complete the following steps to replace the fan assembly: 1. Review the information in "Before you begin" on page 36. 2. Turn off the server and peripheral devices. 3. Remove all external cables from the server; then, remove the server from the rack and remove the cover. For more information, see "Removing the cover" on page 38 for instructions. 4. Remove the fan from the server: a. Disconnect the fan cable from the system board. b. Lift the fan away from the server. 5. Orientate the fan so that the air flow arrow on the side of the fan is facing or pointing toward the rear of the server. Note: Proper air flow is from the front to the rear of the server. Air flow 6. Push the replacement fan assembly into the server until it clicks into place. 7. Connect the fan cable to the system board. 8. If you have other options to install or remove, do so now. 9. Replace the cover. See "Installing the cover" on page 53. 10. Reconnect the external cables and power cords; then, turn on the peripheral devices and the server. Attention: If the system is shut down and there are no other problems indicated, visually check the fans for operation. Removing and installing a microprocessor The server only supports one microprocessor, which is installed on the system board in the microprocessor connector (U5). Notes: 1. Before you install a new microprocessor, review the documentation that comes with the microprocessor, so that you can determine whether you need to update the server BIOS. The latest level of the BIOS for your server is available through the World Wide Web. Chapter 5. Installing Options 47
-
 1
1 -
2
-
3
-
4
-
5
-
6
-
7
-
8
-
9
-
10
-
11
-
12
-
13
-
14
-
15
-
16
-
17
-
18
-
19
-
20
-
21
-
22
-
23
-
24
-
25
-
26
-
27
-
28
-
29
-
30
-
31
-
32
-
33
-
34
-
35
-
36
-
37
-
38
-
39
-
40
-
41
-
42
-
43
-
44
-
45
-
46
-
47
-
48
-
49
-
 50
50 -
 51
51 -
 52
52 -
 53
53 -
 54
54 -
 55
55 -
 56
56 -
 57
57 -
 58
58 -
 59
59 -
 60
60 -
61
-
62
-
63
-
64
-
65
-
66
-
67
-
68
-
69
-
70
-
71
-
72
-
73
-
74
-
75
-
76
-
77
-
78
-
79
-
80
-
81
-
82
-
83
-
84
-
85
-
86
-
87
-
88
-
89
-
90
-
91
-
92
-
93
-
94
-
95
-
96
-
97
-
98
-
99
-
100
-
101
-
102
-
103
-
104
-
105
-
106
-
107
-
108
-
109
-
110
-
111
-
112
-
113
-
114
-
115
-
116
-
117
-
118
-
119
-
120
 |
 |
