IBM 867282X Maintenance Manual - Page 54
the retaining clips. If a gap does exist between the DIMM and the retaining, When installing a DIMM
 |
UPC - 087944650966
View all IBM 867282X manuals
Add to My Manuals
Save this manual to your list of manuals |
Page 54 highlights
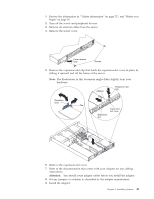
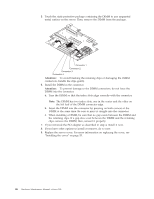
5. Touch the static-protective package containing the DIMM to any unpainted metal surface on the server. Then, remove the DIMM from the package. Connector 1 Connector 2 Connector 3 Connector 4 Attention: To avoid breaking the retaining clips or damaging the DIMM connectors, handle the clips gently. 6. Install the DIMM in the connector. Attention: To prevent damage to the DIMM connectors, do not force the DIMM into the connector. a. Turn the DIMM so that the index slots align correctly with the connector. Note: The DIMM has two index slots, one in the center and the other on the left half of the DIMM connector edge. b. Insert the DIMM into the connector by pressing on both corners of the DIMM at the same time. Be sure to press it straight into the connector. c. When installing a DIMM, be sure that no gap exists between the DIMM and the retaining clips. If a gap does exist between the DIMM and the retaining clips, remove the DIMM; then, reinsert it properly. 7. If you removed the PCI adapter as described in step 4, install it now. 8. If you have other options to install or remove, do so now. 9. Replace the server cover. For more information on replacing the cover, see "Installing the cover" on page 53. 46 Hardware Maintenance Manual: xSeries 300
-
 1
1 -
2
-
3
-
4
-
5
-
6
-
7
-
8
-
9
-
10
-
11
-
12
-
13
-
14
-
15
-
16
-
17
-
18
-
19
-
20
-
21
-
22
-
23
-
24
-
25
-
26
-
27
-
28
-
29
-
30
-
31
-
32
-
33
-
34
-
35
-
36
-
37
-
38
-
39
-
40
-
41
-
42
-
43
-
44
-
45
-
46
-
47
-
48
-
 49
49 -
 50
50 -
 51
51 -
 52
52 -
 53
53 -
 54
54 -
 55
55 -
 56
56 -
 57
57 -
 58
58 -
 59
59 -
60
-
61
-
62
-
63
-
64
-
65
-
66
-
67
-
68
-
69
-
70
-
71
-
72
-
73
-
74
-
75
-
76
-
77
-
78
-
79
-
80
-
81
-
82
-
83
-
84
-
85
-
86
-
87
-
88
-
89
-
90
-
91
-
92
-
93
-
94
-
95
-
96
-
97
-
98
-
99
-
100
-
101
-
102
-
103
-
104
-
105
-
106
-
107
-
108
-
109
-
110
-
111
-
112
-
113
-
114
-
115
-
116
-
117
-
118
-
119
-
120
 |
 |
