Insignia NS-LCD22 User Manual (English) - Page 6
Side control panel, Rear connections, Side connections - manual
 |
View all Insignia NS-LCD22 manuals
Add to My Manuals
Save this manual to your list of manuals |
Page 6 highlights
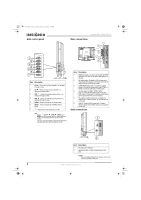
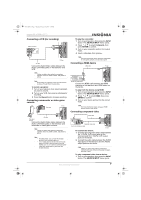
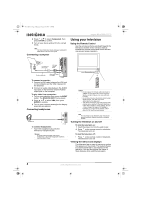
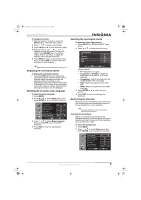
NS-LCD22.fm Page 4 Monday, February 19, 2007 1:39 PM Side control panel Insignia NS-LCD22 LCD TV Rear connections 1 2 1 2 3 4 5 6 7 Item Description 1 CH -Press to scan up a channel or to navigate through a menu. 2 CH -Press to scan down a channel or to navigate through a menu. 3 VOL -Press to make the sound louder or to navigate through a menu. 4 VOL -Press to make the sound quieter or to navigate through a menu. 5 MENU-Press to access the on-screen menu. 6 INPUT-Press to display the SOURCE INPUT menu. 7 -Press to turn the television on or off. Note Power , VOL / , CH / , INPUT, and MENU on the television have the same functions as the corresponding buttons on the remote control. This user manual provides a description based on operating functions with the remote control. 3 4 5 6 Item Description 1 HDMI input jack-Connect a device with an HDMI interface, such as a set top box or DVD player) to this jack. 2 AV output jacks-Connect a VCR to these jacks. Only analog TV programs, AV1 input source can be output through the AV output jacks. 3 COMPONENT input jacks-Connect your DVD player or set top box component video (YPbPr or YCbCr) and audio (L/R) jacks to these jacks. 4 AV input jacks (S-VIDEO, VIDEO, AUDIO L/R)-Connect the AV output jacks of a VCR or DVD player to these jacks. S-video provides better picture quality than the video connection. 5 RF (coaxial antenna input) jack-Connect your cable system, satellite system, or outside antenna to this jack. 6 VGA PIC (Video)/AUDIO input jack-Connect devices with a VGA interface, such as a computer, to this jack. Side connections 1 2 Item Description 1 RS-232 control interface 2 Headphone jack-Connect headphones to this jack. Caution The jack labeled RS-232 is for service only. Do not connect anything to this jack. 4 www.insignia-products.com
-
 1
1 -
 2
2 -
 3
3 -
 4
4 -
 5
5 -
 6
6 -
 7
7 -
 8
8 -
 9
9 -
 10
10 -
 11
11 -
 12
12 -
13
-
14
-
15
-
16
-
17
-
18
-
19
-
20
-
21
-
22
-
23
-
24
-
25
-
26
-
27
-
28
-
29
-
30
-
31
-
32
-
33
-
34
-
35
-
36
-
37
-
38
-
39
-
40
-
41
-
42
-
43
-
44
-
45
-
46
-
47
-
48
-
49
-
50
-
51
-
52
-
53
-
54
-
55
-
56
-
57
-
58
-
59
-
60
-
61
-
62
-
63
-
64
-
65
-
66
-
67
-
68
-
69
-
70
-
71
-
72
-
73
-
74
-
75
-
76
 |
 |
