Invacare M91 Owners Manual - Page 39
Adjusting Seat Position on Seat Frame
 |
View all Invacare M91 manuals
Add to My Manuals
Save this manual to your list of manuals |
Page 39 highlights
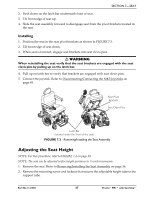
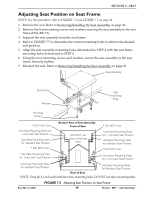
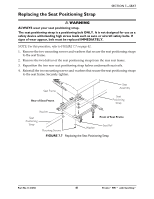
SECTION 7-SEAT Adjusting Seat Position on Seat Frame NOTE: For this procedure, refer to FIGURE 7.5 and FIGURE 7.7 on page 41. 1. Remove the seat. Refer to Removing/Installing the Seat Assembly on page 36. 2. Remove the four mounting screws and washers securing the seat assembly to the seat frame (FIGURE 7.5). 3. Separate the seat assembly from the seat frame. 4. Refer to FIGURE 7.7 to determine the correct mounting holes to achieve the desired seat position. 5. Align the seat assembly mounting holes determined in STEP 4 with the seat frame mounting holes determined in STEP 4. 6. Using the four mounting screws and washers, secure the seat assembly to the seat frame. Securely tighten. 7. Reinstall the seat. Refer to Removing/Installing the Seat Assembly on page 36. Seat Assembly Seat Frame Washer Seat Positioning Strap Mounting Screws * DO NOT Use Use these Mounting Holes for 1-inch-back Seat Position Use these Mounting Holes for Standard Seat Position * DO NOT Use Bottom View of Seat Assembly Front of Seat DO NOT use these mounting holes. * DO NOT Use Use these Mounting Holes for 1-inch-back Seat Position Use these Mounting Holes for Standard Seat Position * DO NOT Use Use these Mounting Holes for 1-inch-back Seat Position Use these Mounting Holes for 1-inch-back Seat Position Use these Mounting Holes for Standard Seat Position Use these Mounting Holes for Standard Seat Position Rear of Seat *NOTE: Only the 22‐inch wide seats have these mounting holes. DO NOT use these mounting holes. FIGURE 7.5 Adjusting Seat Position on Seat Frame Part No 1141450 39 Pronto® M91™ with SureStep®
-
 1
1 -
2
-
3
-
4
-
5
-
6
-
7
-
8
-
9
-
10
-
11
-
12
-
13
-
14
-
15
-
16
-
17
-
18
-
19
-
20
-
21
-
22
-
23
-
24
-
25
-
26
-
27
-
28
-
29
-
30
-
31
-
32
-
33
-
 34
34 -
 35
35 -
 36
36 -
 37
37 -
 38
38 -
 39
39 -
 40
40 -
 41
41 -
 42
42 -
 43
43 -
 44
44 -
45
-
46
-
47
-
48
-
49
-
50
-
51
-
52
-
53
-
54
-
55
-
56
-
57
-
58
-
59
-
60
-
61
-
62
-
63
-
64
-
65
-
66
-
67
-
68
-
69
-
70
-
71
-
72
 |
 |
