Invacare M91 Owners Manual - Page 63
Connecting, Disconnecting
 |
View all Invacare M91 manuals
Add to My Manuals
Save this manual to your list of manuals |
Page 63 highlights
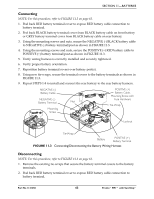
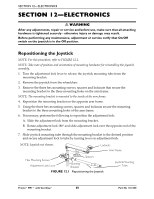
SECTION 11-BATTERIES Connecting NOTE: For this procedure, refer to FIGURE 11.3 on page 63. 1. Peel back RED battery terminal cover to expose RED battery cable connection to battery terminal. 2. Peel back BLACK battery terminal cover from BLACK battery cable on front battery or GREY battery terminal cover from BLACK battery cable on rear battery. 3. Using the mounting screws and nuts, secure the NEGATIVE (‐) BLACK battery cable to NEGATIVE (‐) battery terminal/post as shown in FIGURE 11.3. 4. Using the mounting screws and nuts, secure the POSITIVE (+) RED battery cable to POSITIVE (+) battery terminal/post as shown in FIGURE 11.3. 5. Verify wiring harness is correctly installed and securely tightened. 6. Verify proper battery orientation. 7. Reposition battery terminal covers over battery post(s). 8. Using new tie‐wraps, secure the terminal covers to the battery terminals as shown in FIGURE 11.3. 9. Repeat STEPS 1‐8 to install and connect the rear battery to the rear battery harness. NEGATIVE (-) Battery Cable NEGATIVE (-) Battery Terminal Nut Mounting Screw POSITIVE (+) Battery Cable, Mounting Screw with Fuse Hardware Tie-Wrap Locknut FIGURE 11.3 Tie-Wrap Battery POSITIVE (+) Battery Terminal Connecting/Disconnecting the Battery Wiring Harness Disconnecting NOTE: For this procedure, refer to FIGURE 11.3 on page 63. 1. Remove the existing tie‐wraps that secure the battery terminal covers to the battery terminals. 2. Peel back RED battery terminal cover to expose RED battery cable connection to battery terminal. Part No 1141450 63 Pronto® M91™ with SureStep®
-
 1
1 -
2
-
3
-
4
-
5
-
6
-
7
-
8
-
9
-
10
-
11
-
12
-
13
-
14
-
15
-
16
-
17
-
18
-
19
-
20
-
21
-
22
-
23
-
24
-
25
-
26
-
27
-
28
-
29
-
30
-
31
-
32
-
33
-
34
-
35
-
36
-
37
-
38
-
39
-
40
-
41
-
42
-
43
-
44
-
45
-
46
-
47
-
48
-
49
-
50
-
51
-
52
-
53
-
54
-
55
-
56
-
57
-
 58
58 -
 59
59 -
 60
60 -
 61
61 -
 62
62 -
 63
63 -
 64
64 -
 65
65 -
 66
66 -
 67
67 -
 68
68 -
69
-
70
-
71
-
72
 |
 |
