Invacare M91 Owners Manual - Page 61
Invacare M91 Manual
 |
View all Invacare M91 manuals
Add to My Manuals
Save this manual to your list of manuals |
Page 61 highlights
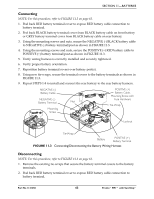
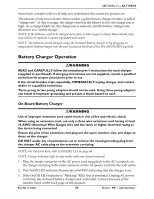
DETAIL "A" - BATTERIES WITH BUILT-IN LIFTING STRAPS Rear Battery Battery Tray Built-in Lifting Straps Front Battery SECTION 11-BATTERIES DETAIL "B" - BATTERIES WITHOUT BUILT-IN LIFTING STRAPS Battery Lifting Straps Battery Terminals/Posts Battery FIGURE 11.1 Batteries with/without Lifting straps 11. Connect the front battery to the controller (RED connector). Refer to FIGURE 11.2. 12. Connect the rear battery to the front battery (RED and BLACK connectors). Refer to FIGURE 11.2. 13. Reinstall the top shroud. Refer to Removing/Installing the Shrouds on page 55. 14. Reinstall the seat. Refer to Removing/Installing the Seat Assembly on page 36. 15. Connect the joystick. Refer to Disconnecting/Connecting the MK5 Joysticks on page 69. NOTE: New battery(ies) MUST be fully charged before using, otherwise the life of the battery(ies) will be reduced. 16. If necessary, charge the battery(ies). Refer to Charging Batteries on page 64. RED Connector from Battery to Controller Front Battery Tie Wrap RED Front POSITIVE (+) Battery Terminal Mounting Screw, Nut and Fuse Hardware (Terminal Cap Shown) RED Battery Connectors RED Rear POSITIVE (+) Battery Terminal Mounting Screw, Nut and Fuse Hardware* Front of Wheelchair Rear of wheelchair RED Controller Connector (Not Shown) BLACK Front NEGATIVE (-) Battery Terminal Mounting Screw, Nut and Fuse Hardware (Terminal Cap Shown) Tie Wrap BLACK Battery Connectors GREY Rear NEGATIVE (-) Battery Terminal Mounting Screw, Nut and Fuse Hardware* Rear Battery *NOTE: Terminal cap shown removed for clarity. Retaining Strap FIGURE 11.2 Installing/Removing the Batteries Part No 1141450 61 Pronto® M91™ with SureStep®
-
 1
1 -
2
-
3
-
4
-
5
-
6
-
7
-
8
-
9
-
10
-
11
-
12
-
13
-
14
-
15
-
16
-
17
-
18
-
19
-
20
-
21
-
22
-
23
-
24
-
25
-
26
-
27
-
28
-
29
-
30
-
31
-
32
-
33
-
34
-
35
-
36
-
37
-
38
-
39
-
40
-
41
-
42
-
43
-
44
-
45
-
46
-
47
-
48
-
49
-
50
-
51
-
52
-
53
-
54
-
55
-
 56
56 -
 57
57 -
 58
58 -
 59
59 -
 60
60 -
 61
61 -
 62
62 -
 63
63 -
 64
64 -
 65
65 -
 66
66 -
67
-
68
-
69
-
70
-
71
-
72
 |
 |
