Invacare M91 Owners Manual - Page 69
Disconnecting/Connecting the MK, Joysticks, Programming the Control Module
 |
View all Invacare M91 manuals
Add to My Manuals
Save this manual to your list of manuals |
Page 69 highlights
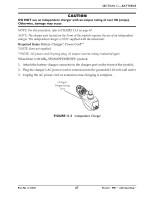
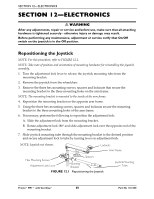
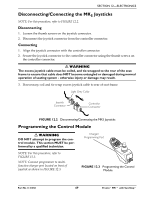
SECTION 12-ELECTRONICS Disconnecting/Connecting the MK5 Joysticks NOTE: For this procedure, refer to FIGURE 12.2. Disconnecting 1. Loosen the thumb screws on the joystick connector. 2. Disconnect the joystick connector from the controller connector. Connecting 1. Align the joystick connector with the controller connector. 2. Secure the joystick connector to the controller connector using the thumb screws on the controller connector. ƽ WARNING The excess joystick cable must be coiled, and tie-wrapped to the rear of the seat frame to ensure that cable does NOT become entangled or damaged during normal operation of seating system - otherwise injury or damage may result. 3. If necessary, coil and tie wrap excess joystick cable to rear of seat frame. Light Grey Collar Joystick Connector Controller Connector FIGURE 12.2 Disconnecting/Connecting the MK5 Joysticks Programming the Control Module ƽ WARNING DO NOT attempt to program the control module. This section MUST be performed by a qualified technician. Charger/ Programming Port NOTE: For this procedure, refer to FIGURE 12.3. NOTE: Connect programmer to multi‐ function charger port located on front of joystick as shown in FIGURE 12.3. FIGURE 12.3 Programming the Control Module Part No 1141450 69 Pronto® M91™ with SureStep®
-
 1
1 -
2
-
3
-
4
-
5
-
6
-
7
-
8
-
9
-
10
-
11
-
12
-
13
-
14
-
15
-
16
-
17
-
18
-
19
-
20
-
21
-
22
-
23
-
24
-
25
-
26
-
27
-
28
-
29
-
30
-
31
-
32
-
33
-
34
-
35
-
36
-
37
-
38
-
39
-
40
-
41
-
42
-
43
-
44
-
45
-
46
-
47
-
48
-
49
-
50
-
51
-
52
-
53
-
54
-
55
-
56
-
57
-
58
-
59
-
60
-
61
-
62
-
63
-
 64
64 -
 65
65 -
 66
66 -
 67
67 -
 68
68 -
 69
69 -
 70
70 -
 71
71 -
 72
72
 |
 |
