Invacare M91 Owners Manual - Page 42
Footboard, Assembly
 |
View all Invacare M91 manuals
Add to My Manuals
Save this manual to your list of manuals |
Page 42 highlights
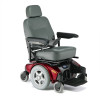
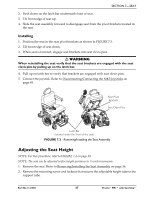
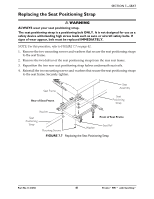
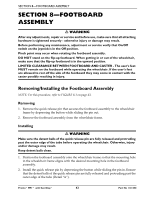
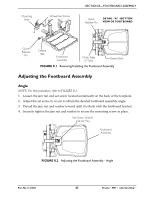
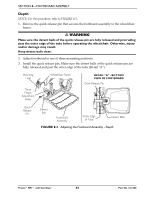
SECTION 8-FOOTBOARD ASSEMBLY SECTION 8-FOOTBOARD ASSEMBLY ƽ WARNING After any adjustments, repair or service and before use, make sure that all attaching hardware is tightened securely - otherwise injury or damage may result. Before performing any maintenance, adjustment or service verify that On/Off switch on the joystick is in the Off position. Pinch point may occur when rotating the footboard assembly. DO NOT stand on the flip-up footboard. When getting in or out of the wheelchair, make sure that the flip-up footboard is in the upward position. LIMITED CLEARANCE BETWEEN FOOTBOARD AND CASTER - The user's feet MUST remain on the footboard while operating the wheelchair. If the user's feet are allowed to rest off the side of the footboard they may come in contact with the caster possibly resulting in injury. Removing/Installing the Footboard Assembly NOTE: For this procedure, refer to FIGURE 8.1 on page 43. Removing 1. Remove the quick release pin that secures the footboard assembly to the wheelchair frame by depressing the button while sliding the pin out. 2. Remove the footboard assembly from the wheelchair frame. Installing ƽ WARNING Make sure the detent balls of the quick release pin are fully released and protruding past the outer edge of the tube before operating the wheelchair. Otherwise, injury and/or damage may result. Keep detent balls clean. 1. Position the footboard assembly onto the wheelchair frame so that the mounting hole in the wheelchair frame aligns with the desired mounting hole in the footboard assembly. 2. Install the quick release pin by depressing the button while sliding the pin in. Ensure that the detent balls of the quick release pin are fully released and protruding past the outer edge of the tube (Detail "A"). Pronto® M91™ with SureStep® 42 Part No 1141450
-
 1
1 -
2
-
3
-
4
-
5
-
6
-
7
-
8
-
9
-
10
-
11
-
12
-
13
-
14
-
15
-
16
-
17
-
18
-
19
-
20
-
21
-
22
-
23
-
24
-
25
-
26
-
27
-
28
-
29
-
30
-
31
-
32
-
33
-
34
-
35
-
36
-
 37
37 -
 38
38 -
 39
39 -
 40
40 -
 41
41 -
 42
42 -
 43
43 -
 44
44 -
 45
45 -
 46
46 -
 47
47 -
48
-
49
-
50
-
51
-
52
-
53
-
54
-
55
-
56
-
57
-
58
-
59
-
60
-
61
-
62
-
63
-
64
-
65
-
66
-
67
-
68
-
69
-
70
-
71
-
72
 |
 |
