Invacare M91 Owners Manual - Page 46
Adjusting Footrest Height - lift
 |
View all Invacare M91 manuals
Add to My Manuals
Save this manual to your list of manuals |
Page 46 highlights
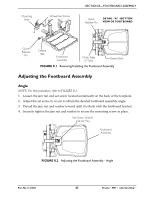
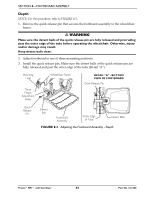
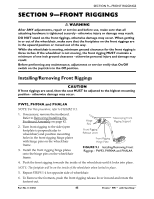
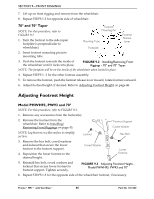
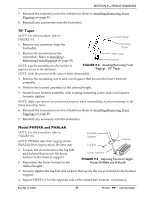
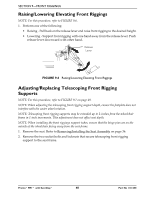
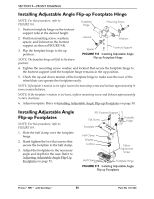
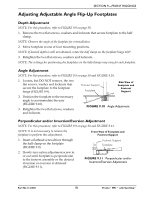
SECTION 9-FRONT RIGGINGS 7. Lift up on front rigging and remove from the wheelchair. 8. Repeat STEPS 1‐2 for opposite side of wheelchair. 70° and 70° Taper NOTE: For this procedure, refer to FIGURE 9.2 1. Turn the footrest to the side (open footplate is perpendicular to wheelchair). Footrest Mounting Pin Mounting Tube Footplate Footrest Release Lever 2. Insert footrest mounting pin into mounting tube. 3. Push the footrest towards the inside of the wheelchair until it locks into place. FIGURE 9.2 Installing/Removing Front Riggings - 70° and 70° Taper NOTE: The footplate will be on the inside of the wheelchair when locked in place. 4. Repeat STEPS 1‐ 3 for the other footrest assembly. 5. To remove the footrest, push the footrest release lever inward, rotate footrest outward. 6. Adjust footrest height, if desired. Refer to Adjusting Footrest Height on page 46. Adjusting Footrest Height Model PHWH93, PW93 and 70° NOTE: For this procedure, refer to FIGURE 9.3. 1. Remove any accessories from the footrest(s). 2. Remove the footrest from the wheelchair. Refer to Installing/ Removing Front Riggings on page 45. Footrest Support Coved Washer NOTE: Lay footrest on a flat surface to simplify section. Locknut Hex Bolt 3. Remove the hex bolt, coved washers and locknut that secure the lower footrest to the footrest support. 4. Reposition the lower footrest to the desired height. Coved Washer Lower Footrest 5. Reinstall hex bolt, coved washers and locknut that secure lower footrest to footrest support. Tighten securely. FIGURE 9.3 Adjusting Footrest Height Model PHWH93, PW93 and 70° 6. Repeat STEPS 1‐5 for the opposite side of the wheelchair footrest, if necessary. Pronto® M91™ with SureStep® 46 Part No 1141450
-
 1
1 -
2
-
3
-
4
-
5
-
6
-
7
-
8
-
9
-
10
-
11
-
12
-
13
-
14
-
15
-
16
-
17
-
18
-
19
-
20
-
21
-
22
-
23
-
24
-
25
-
26
-
27
-
28
-
29
-
30
-
31
-
32
-
33
-
34
-
35
-
36
-
37
-
38
-
39
-
40
-
 41
41 -
 42
42 -
 43
43 -
 44
44 -
 45
45 -
 46
46 -
 47
47 -
 48
48 -
 49
49 -
 50
50 -
 51
51 -
52
-
53
-
54
-
55
-
56
-
57
-
58
-
59
-
60
-
61
-
62
-
63
-
64
-
65
-
66
-
67
-
68
-
69
-
70
-
71
-
72
 |
 |
