Invacare P9000XDT1818 Owners Manual - Page 44
Repositioning the Joystick
 |
View all Invacare P9000XDT1818 manuals
Add to My Manuals
Save this manual to your list of manuals |
Page 44 highlights
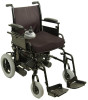
SECTION 9-JOYSTICK Repositioning the Joystick NOTE: For this procedure, refer to FIGURE 9.2. NOTE: Before starting this procedure, it may be necessary to snip the tie-wraps (not shown in FIGURE 9.2) securing the joystick control cord to the wheelchair. Before snipping the tie-wraps, note the way the cord is secured to the chair so that it can be re-secured in the same way at the end of the procedure. 1. Turn the adjustment lock lever to release the joystick mounting tube from the mounting bracket. 2. Remove the joystick from the wheelchair. 3. Remove the three hex screws that secure both halves of the mounting bracket to the arm tube. 4. Reposition mounting bracket on opposite arm tube ensuring the threaded plate of the mounting bracket is on the inside of the arm tube. 5. Using the three hex mounting screws and washers, secure both halves of the mounting bracket to the arm tube. 6. Slide the joystick mounting tube through the mounting bracket to the desired position. 7. Turn the adjustment lock lever to secure the joystick mounting tube into the mounting bracket. 8. If the tie-wraps securing the joystick control cord to the wheelchair were snipped at the beginning of this procedure, re-secure the cord to the wheelchair with new tie-wraps in such a way that the control cord will not be pinched or cut during operation of the wheelchair. Hex Mounting Screws Washers Mounting Bracket (Threaded Plate) Arm Tube Adjustment Lock Lever Mounting Bracket Joystick Mounting Tube Joystick FIGURE 9.2 Repositioning the Joystick P9000™ XDT 44 Part No. 1118386
-
 1
1 -
2
-
3
-
4
-
5
-
6
-
7
-
8
-
9
-
10
-
11
-
12
-
13
-
14
-
15
-
16
-
17
-
18
-
19
-
20
-
21
-
22
-
23
-
24
-
25
-
26
-
27
-
28
-
29
-
30
-
31
-
32
-
33
-
34
-
35
-
36
-
37
-
38
-
 39
39 -
 40
40 -
 41
41 -
 42
42 -
 43
43 -
 44
44 -
 45
45 -
 46
46 -
 47
47 -
 48
48 -
 49
49 -
50
-
51
-
52
-
53
-
54
-
55
-
56
-
57
-
58
-
59
-
60
-
61
-
62
-
63
-
64
-
65
-
66
-
67
-
68
 |
 |
