JVC GV-LS2W Detailed User Guide - Page 10
Flow of Connection/Setup
 |
View all JVC GV-LS2W manuals
Add to My Manuals
Save this manual to your list of manuals |
Page 10 highlights
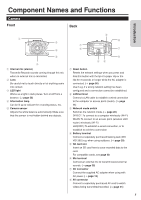
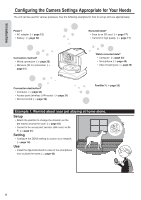
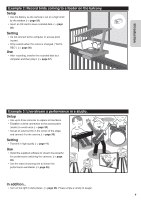
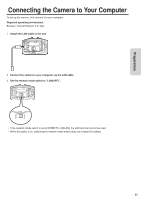
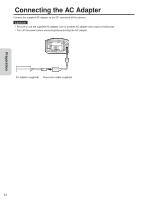
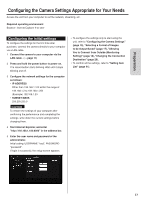
Preparation Flow of Connection/Setup Connect the unit to the computer, and configure the appropriate settings on a browser. Starting shooting 1 Connect the camera to your computer via the supplied LAN cable. ( ➭ page 11) To set up the camera, first connect it to your computer. 2 Connect the AC adapter. ( ➭ page 12) Connect the supplied AC adapter when the connections are complete. 3 Access the unit from a browser to configure the appropriate settings. ( ➭ page 15) Set the password, image quality, connection destination, etc. Configuring the correct settings allows you to view recorded data on a computer or smartphone. 4 Secure the camera to the pantilter. ( ➭ page 25) Secure the camera to the pantilter. • Attach an optional item if necessary. Insert/Attach an SD card ( ➭ page 28), battery ( ➭ page 29), external mic ( ➭ page 30), and AV cord ( ➭ page 31). • See "Establishing a wired connection" (page 27) to connect the unit with the LAN cable. 10
-
 1
1 -
2
-
3
-
4
-
 5
5 -
 6
6 -
 7
7 -
 8
8 -
 9
9 -
 10
10 -
 11
11 -
 12
12 -
 13
13 -
 14
14 -
 15
15 -
16
-
17
-
18
-
19
-
20
-
21
-
22
-
23
-
24
-
25
-
26
-
27
-
28
-
29
-
30
-
31
-
32
-
33
-
34
-
35
-
36
-
37
-
38
-
39
-
40
-
41
-
42
-
43
-
44
-
45
-
46
-
47
-
48
-
49
-
50
-
51
-
52
-
53
-
54
-
55
-
56
-
57
-
58
-
59
-
60
 |
 |
