JVC GV-LS2W Detailed User Guide - Page 7
Front, Bottom
 |
View all JVC GV-LS2W manuals
Add to My Manuals
Save this manual to your list of manuals |
Page 7 highlights
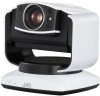
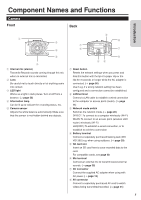
Pantilter When using the pantilter, connect the AC adapter, AV cord, and external mic to the pantilter. Front Back Introduction 1 1 2 2 3 MIC PLUG IN POWER AV EXTEND DC 8 1 Power button Press and hold to power on. To power off, press and hold this button again. 2 Power lamp Indicates the pantilter status. Off: Powered off Lit up: Powered on Blinking: Pantilter error Bottom 456 7 1 Tilt lock (TILT LOCK) Face the pantilter right in front and slide the knob to the left to lock it. Be sure to lock the pantilter when carrying it. 2 Camera fixing screw Secures the camera to the pantilter. 3 Fixing hole for drop prevention Secure the entire unit with a binder or the like. 4 MIC terminal Connect an external mic to transmit/record external sounds. ( ➭ page 30) 5 AV connector Connect a separately purchased AV cord to watch videos being transmitted/recorded. ( ➭ page 31) 6 EXTEND terminal Not used. 7 DC connector Connect the supplied AC adapter when using with AC power. ( ➭ page 26) 8 Pan lock (PAN LOCK) Face the pantilter right in front and slide the knob to the front side to lock it. Be sure to lock the pantilter when carrying it. 1 1 Tripod mounting hole Mount a separately purchased tripod. 7
-
 1
1 -
 2
2 -
 3
3 -
 4
4 -
 5
5 -
 6
6 -
 7
7 -
 8
8 -
 9
9 -
 10
10 -
 11
11 -
 12
12 -
13
-
14
-
15
-
16
-
17
-
18
-
19
-
20
-
21
-
22
-
23
-
24
-
25
-
26
-
27
-
28
-
29
-
30
-
31
-
32
-
33
-
34
-
35
-
36
-
37
-
38
-
39
-
40
-
41
-
42
-
43
-
44
-
45
-
46
-
47
-
48
-
49
-
50
-
51
-
52
-
53
-
54
-
55
-
56
-
57
-
58
-
59
-
60
 |
 |
