JVC GV-LS2W Detailed User Guide - Page 5
Component Names and Functions
 |
View all JVC GV-LS2W manuals
Add to My Manuals
Save this manual to your list of manuals |
Page 5 highlights
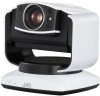
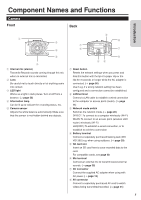
Component Names and Functions Camera Front Back Introduction PLUG IN POWER 1 3 4 5 2 1 Internal mic (stereo) Transmits/Records sounds coming through this mic when no external mic is connected. 2 Lens Be careful not to touch directly or let anything come into contact. 3 LED light Works as a light in dark places. Turn on/off from a browser. ( ➭ page 36) 4 Information lamp Can be lit up to indicate the recording status, etc. 5 Camera sensor Adjusts the white balance automatically. Make sure that this sensor is not hidden behind any objects. 1 2 5 RESET DIRECT WLAN LAN(OFF) ETHERNET MIC DC AV 34 6 7 8 1 Reset button Resets the network settings when you press and hold this button with the tip of a paper clip or the like for 3 seconds or longer while the AC adapter is connected. ( ➭ page 56) Use it e.g. if a wrong network setting has been configured and a connection cannot be established. 2 LAN terminal Connect a LAN cable to establish a wired connection to the computer or access point (router). ( ➭ page 11) 3 Network mode switch Switches the network mode. ( ➭ page 20) DIRECT: To connect to a computer wirelessly (Wi-Fi) WLAN: To connect to an access point (wireless LAN router) wirelessly (Wi-Fi) LAN(OFF): To establish a wired connection, or to establish no wireless connection 4 Battery terminal Connect a separately purchased battery pack (BNVG139U) e.g. when using outdoors. ( ➭ page 29) 5 SD card slot Insert an SD card here to save recorded data to the card. For compatible cards, see page 28. 6 Mic terminal Connect an external mic to transmit/record external sounds. ( ➭ page 30) 7 DC connector Connect the supplied AC adapter when using with AC power. ( ➭ page 12) 8 AV connector Connect a separately purchased AV cord to watch videos being transmitted/recorded. ( ➭ page 31) 5
-
 1
1 -
 2
2 -
 3
3 -
 4
4 -
 5
5 -
 6
6 -
 7
7 -
 8
8 -
 9
9 -
 10
10 -
 11
11 -
12
-
13
-
14
-
15
-
16
-
17
-
18
-
19
-
20
-
21
-
22
-
23
-
24
-
25
-
26
-
27
-
28
-
29
-
30
-
31
-
32
-
33
-
34
-
35
-
36
-
37
-
38
-
39
-
40
-
41
-
42
-
43
-
44
-
45
-
46
-
47
-
48
-
49
-
50
-
51
-
52
-
53
-
54
-
55
-
56
-
57
-
58
-
59
-
60
 |
 |
