Konica Minolta Kodak Ngenuity 9090DB Setup Guide
Konica Minolta Kodak Ngenuity 9090DB Manual
 |
View all Konica Minolta Kodak Ngenuity 9090DB manuals
Add to My Manuals
Save this manual to your list of manuals |
Konica Minolta Kodak Ngenuity 9090DB manual content summary:
- Konica Minolta Kodak Ngenuity 9090DB | Setup Guide - Page 1
- Konica Minolta Kodak Ngenuity 9090DB | Setup Guide - Page 2
15 Color Dropout tab 17 Compression tab 18 Imprinter tab 19 Maintenance tab 21 About tab 21 This guide describes the default ISIS Driver interface of the Kodak Ngenuity 9000 Series Scanners. NOTE: Your application may change the ISIS Driver user interface to better suit its purpose. If your - Konica Minolta Kodak Ngenuity 9090DB | Setup Guide - Page 3
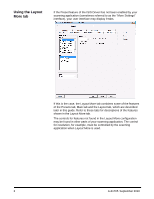
, the Layout More tab combines some of the features of the Presets tab, Main tab and the Layout tab, which are described later in this guide. Refer to these tabs for descriptions of the features shown in the Layout More tab. The controls for features not found in the Layout More - Konica Minolta Kodak Ngenuity 9090DB | Setup Guide - Page 4
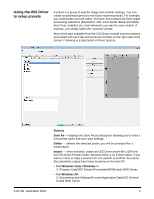
to setup presets A preset is a group of specific image and scanner settings. You can create a customized preset to meet your scanning needs Windows 7: C:\Program Data\ISIS Drivers\Presets\eki9000\Kodak 9000 Series • For Windows XP: C:\Documents and Settings\All users\Application Data\ISIS Drivers - Konica Minolta Kodak Ngenuity 9090DB | Setup Guide - Page 5
side you want to configure. 3. Select the desired electronic image output from the Mode list box. 4. Go through each tab and define the desired scanner and image processing settings. 5. If you have an imprinter installed and you want to set up imprinting options, click the Imprinter tab and make the - Konica Minolta Kodak Ngenuity 9090DB | Setup Guide - Page 6
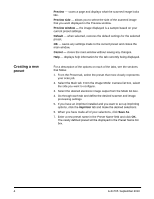
deleted. Preset Name list - lists the available presets. If you want to create a new preset, see the section entitled, "Creating a new preset" later in this guide. Description - allows you to enter descriptive information regarding the currently selected preset. A-61705 September 2010 5 - Konica Minolta Kodak Ngenuity 9090DB | Setup Guide - Page 7
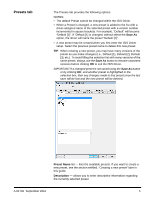
up 8 different output images for each page scanned. The Camera list provides two main functions: • When the checkbox on the left is checked, the scanner will output that image based on the selections made on each tab. • When a camera selection is highlighted (and not checked) the options selected on - Konica Minolta Kodak Ngenuity 9090DB | Setup Guide - Page 8
tab. NOTE: Depending on the Mode selected, some options on other tabs may not be available. Units - select the unit of measurement for the scanner; this includes any size-related options. The Units options are: Inches and Millimeters. Resolution - allows you to select the dots per inch (dpi), which - Konica Minolta Kodak Ngenuity 9090DB | Setup Guide - Page 9
Brightness - if Auto Brightness is not checked, you can manually adjust the brightness level using the slider bar. This option is for black and white or grayscale images only. Auto Brightness - when checked, allows the scanner to dynamically evaluate each document to determine the optimal threshold - Konica Minolta Kodak Ngenuity 9090DB | Setup Guide - Page 10
provides these options. NOTE: For descriptions about Image Mode, Mode and Units, see the "Main tab". Page Size - the default page size is set when a scanner is first selected. You can choose a different page size using the drop-down list. If you select Custom, the Custom Page Width and Custom Page - Konica Minolta Kodak Ngenuity 9090DB | Setup Guide - Page 11
Document Mode - when enabled, this option adjusts the scanner's transport speed to accommodate a long document (more than This option is not available in Pixels mode. • X: the distance from the left end of the scanner to the left-edge of the scanning area. • Y: the position from the top end of the - Konica Minolta Kodak Ngenuity 9090DB | Setup Guide - Page 12
on the edges of the image. Use this option for batches of mixed-sized documents. If you use this option, set your Page Size to Scanner Maximum. Overscan - adds a percentage of border before and after the edge of the image. Overscan is used in applications where automatic feeding of highly skewed - Konica Minolta Kodak Ngenuity 9090DB | Setup Guide - Page 13
Color Background Saturation - using this option for documents or forms with a background color will help produce images with a more uniform background color. This option improves image quality and may reduce file size. • OFF: no background saturation will be performed. • White: smooths the - Konica Minolta Kodak Ngenuity 9090DB | Setup Guide - Page 14
is ignored and the image of the multifed document is retained. - Stop: when a multifeed is detected, the scanner will sound an audible alarm, the Multifeed LED on the scanner will light and the scanner's transport will stop. You can delete or keep the multifed image. If Interactive Error Handling is - Konica Minolta Kodak Ngenuity 9090DB | Setup Guide - Page 15
to feed exception documents that cannot be fed in ADF mode (e.g., multiple forms). When this option is selected, you must feed documents manually into the scanner one at a time. Document Setup • Document Types - allows you to change the transport speed to accommodate the feeding needs of various - Konica Minolta Kodak Ngenuity 9090DB | Setup Guide - Page 16
Gamma tab The Gamma tab provides the following options. Camera Gamma - when the Camera Modes: Gamma is selected, you can use the slider to specify a specific camera gamma (1.0 - 2.5). The camera gamma value can be entered or selected by moving the slider to the desired value. Camera Modes - if the - Konica Minolta Kodak Ngenuity 9090DB | Setup Guide - Page 17
• ICC: select this option to set up scanner cameras to be compatible with the scanner's ICC color correction profile and to cause the scanner's image processor to embed ICC-compatible profile data into the image file. ICC profile data is used by some viewing or printing applications to compensate - Konica Minolta Kodak Ngenuity 9090DB | Setup Guide - Page 18
Color Dropout tab Color Dropout allows you to dropout a form's background so that only the entered data is included in the electronic image (i.e., remove the form's lines and boxes). Select the desired dropout color you want to eliminate from the front/ back side. Selections are: None, Red, Green - Konica Minolta Kodak Ngenuity 9090DB | Setup Guide - Page 19
Compression tab The Compression tab provides the following options. JPEG settings • Good: a fair amount of compression but still produces acceptable image quality. • Better: some compression which produces decent image quality. • Best: minimal compression which produces very good image quality. • - Konica Minolta Kodak Ngenuity 9090DB | Setup Guide - Page 20
installed, you will need to setup your imprinting options using the Imprinter tab. The imprinter provides a vertical print capability and supports alphanumeric characters, date, time, page count and a custom message. Imprinter - select which imprinter side you want to select by highlighting - Konica Minolta Kodak Ngenuity 9090DB | Setup Guide - Page 21
edge of the document. NOTE: The horizontal print position is determined by the location of the print cartridge within the scanner. See the User's Guide for setting print positions. • Font Height - you can select Normal or Large. • Font Width: available character styles: Normal (regular typeface - Konica Minolta Kodak Ngenuity 9090DB | Setup Guide - Page 22
Maintenance tab The Maintenance tab allows you to open the ISIS Driver log. About tab The About tab displays the scanner's version information and copyright information as well as the ISIS Driver version information. A-61705 September 2010 21 - Konica Minolta Kodak Ngenuity 9090DB | Setup Guide - Page 23
-
 1
1 -
 2
2 -
 3
3 -
 4
4 -
 5
5 -
 6
6 -
 7
7 -
8
-
9
-
10
-
11
-
12
-
13
-
14
-
15
-
16
-
17
-
18
-
19
-
20
-
21
-
22
-
23
 |
 |