Kyocera ECOSYS FS-3640MFP FS-C2626MFP/C3640MFP Fax Operation Guide - Page 30
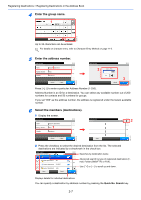
Enter the destination name., Enter the address number., Description
 |
View all Kyocera ECOSYS FS-3640MFP manuals
Add to My Manuals
Save this manual to your list of manuals |
Page 30 highlights
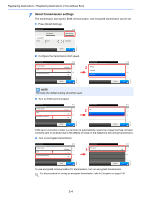
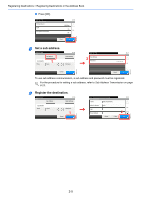
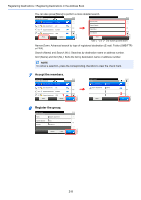
Registering Destinations > Registering Destinations in the Address Book 4 Enter the destination name. 1 GB0057_11 2 Up to 32 characters can be entered. For details on character entry, refer to Character Entry Method on page 11-2. 5 Enter the address number. Select the item that you want to change. Add - Confirmation Name 1 Sales department 1 Address Number Auto FAX E-mail Address Cancel < Back 10:10 1/2 Save Ready to send. Address Number (000 - 250) 10:10 2 3 Cancel OK GB0217_01 GB0078_02 Press [+], [-] or numeric keys to enter a particular Address Number (1-250). Address Number is an ID for a destination. You can select any available number out of 250 numbers for contacts and 50 numbers for groups. If you set "000" as the address number, the address is registered under the lowest available number. 6 Enter the fax number. Select the item that you want to change. Add - Confirmation Name Address Number Sales department 1 1 Auto FAX E-mail Address Cancel < Back 10:10 1/2 Save Ready to send. FAX 2 Pause Sub Address Space 10:10 Detail Settings Backspace 3 Cancel OK GB0075_02 GB0078_02 Key Description Pause Pressing this key adds about three seconds of waiting time during dialing. For example, when dialing the receiving system on an external line, you can use this method to insert a pause before resuming dialing after you dial a specific number. Space Enters a space. Moves the cursor. Backspace To correct the fax number, press [Backspace] on the touch panel, and delete the digits one by one before reentering the fax number. To delete the number entirely, press the Clear key on the operation panel. Enter the fax number of the receiving system using the numeric keys. Up to 32 digits can be entered as the fax number of the receiving system. 2-3
-
 1
1 -
2
-
3
-
4
-
5
-
6
-
7
-
8
-
9
-
10
-
11
-
12
-
13
-
14
-
15
-
16
-
17
-
18
-
19
-
20
-
21
-
22
-
23
-
24
-
 25
25 -
 26
26 -
 27
27 -
 28
28 -
 29
29 -
 30
30 -
 31
31 -
 32
32 -
 33
33 -
 34
34 -
 35
35 -
36
-
37
-
38
-
39
-
40
-
41
-
42
-
43
-
44
-
45
-
46
-
47
-
48
-
49
-
50
-
51
-
52
-
53
-
54
-
55
-
56
-
57
-
58
-
59
-
60
-
61
-
62
-
63
-
64
-
65
-
66
-
67
-
68
-
69
-
70
-
71
-
72
-
73
-
74
-
75
-
76
-
77
-
78
-
79
-
80
-
81
-
82
-
83
-
84
-
85
-
86
-
87
-
88
-
89
-
90
-
91
-
92
-
93
-
94
-
95
-
96
-
97
-
98
-
99
-
100
-
101
-
102
-
103
-
104
-
105
-
106
-
107
-
108
-
109
-
110
-
111
-
112
-
113
-
114
-
115
-
116
-
117
-
118
-
119
-
120
-
121
-
122
-
123
-
124
-
125
-
126
-
127
-
128
-
129
-
130
-
131
-
132
-
133
-
134
-
135
-
136
-
137
-
138
-
139
-
140
-
141
-
142
-
143
-
144
-
145
-
146
-
147
-
148
-
149
-
150
-
151
-
152
-
153
-
154
-
155
-
156
-
157
-
158
-
159
-
160
-
161
-
162
-
163
-
164
-
165
-
166
-
167
-
168
-
169
-
170
-
171
-
172
-
173
-
174
-
175
-
176
-
177
-
178
-
179
-
180
-
181
-
182
-
183
-
184
-
185
-
186
-
187
-
188
-
189
-
190
-
191
-
192
-
193
-
194
-
195
-
196
-
197
-
198
-
199
-
200
-
201
-
202
-
203
-
204
-
205
-
206
-
207
-
208
-
209
-
210
-
211
 |
 |
