Kyocera KM-5530 Scan System D Operation Guide (Functions) - Page 138
Registration Number, Change Password, PC address, Delete, Auxiliary group members
 |
View all Kyocera KM-5530 manuals
Add to My Manuals
Save this manual to your list of manuals |
Page 138 highlights
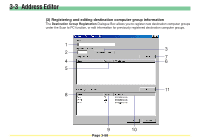
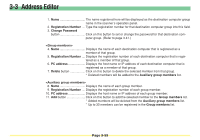
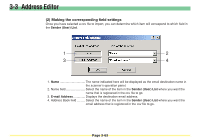
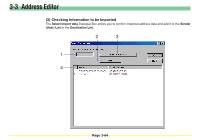
3-3 Address Editor 1. Name The name registered here will be displayed as the destination computer group name in the scanner's operation panel. 2. Registration Number .... Type the registration number for that destination computer group into this field. 3. Change Password button Click on this button to set or change the password for that destination computer group. (Refer to page 3-41.) 4. Name Displays the name of each destination computer that is registered as a member of that group. 5. Registration Number .... Displays the registration number of each destination computer that is registered as a member of that group. 6. PC address Displays the host name or IP address of each destination computer that is registered as a member of that group. 7. Delete button Click on this button to delete the selected member from that group. * Deleted members will be added to the Auxiliary group members list. 8. Name Displays the name of each group member. 9. Registration Number .... Displays the registration number of each group member. 10. PC address Displays the host name or IP address of each group member. 11. Add button Click on this button to add the selected member to the Group members list. * Added members will be deleted from the Auxiliary group members list. * Up to 30 members can be registered in the Group members list. Page 3-59
-
 1
1 -
2
-
3
-
4
-
5
-
6
-
7
-
8
-
9
-
10
-
11
-
12
-
13
-
14
-
15
-
16
-
17
-
18
-
19
-
20
-
21
-
22
-
23
-
24
-
25
-
26
-
27
-
28
-
29
-
30
-
31
-
32
-
33
-
34
-
35
-
36
-
37
-
38
-
39
-
40
-
41
-
42
-
43
-
44
-
45
-
46
-
47
-
48
-
49
-
50
-
51
-
52
-
53
-
54
-
55
-
56
-
57
-
58
-
59
-
60
-
61
-
62
-
63
-
64
-
65
-
66
-
67
-
68
-
69
-
70
-
71
-
72
-
73
-
74
-
75
-
76
-
77
-
78
-
79
-
80
-
81
-
82
-
83
-
84
-
85
-
86
-
87
-
88
-
89
-
90
-
91
-
92
-
93
-
94
-
95
-
96
-
97
-
98
-
99
-
100
-
101
-
102
-
103
-
104
-
105
-
106
-
107
-
108
-
109
-
110
-
111
-
112
-
113
-
114
-
115
-
116
-
117
-
118
-
119
-
120
-
121
-
122
-
123
-
124
-
125
-
126
-
127
-
128
-
129
-
130
-
131
-
132
-
 133
133 -
 134
134 -
 135
135 -
 136
136 -
 137
137 -
 138
138 -
 139
139 -
 140
140 -
 141
141 -
 142
142 -
 143
143 -
144
-
145
-
146
-
147
-
148
-
149
-
150
-
151
-
152
-
153
-
154
-
155
-
156
-
157
-
158
-
159
-
160
-
161
-
162
-
163
-
164
-
165
-
166
-
167
-
168
-
169
-
170
-
171
-
172
-
173
-
174
-
175
-
176
-
177
-
178
-
179
-
180
-
181
-
182
-
183
-
184
-
185
-
186
-
187
-
188
-
189
-
190
-
191
-
192
-
193
-
194
-
195
-
196
-
197
-
198
-
199
-
200
-
201
-
202
-
203
-
204
-
205
-
206
-
207
-
208
-
209
-
210
-
211
-
212
-
213
-
214
-
215
-
216
-
217
-
218
-
219
-
220
-
221
-
222
-
223
-
224
-
225
-
226
 |
 |