Kyocera TASKalfa 3501i File Management Utility Operation Guide Rev 3.01.2013.3 - Page 10
Distribution Rule, Receiving folder ID
 |
View all Kyocera TASKalfa 3501i manuals
Add to My Manuals
Save this manual to your list of manuals |
Page 10 highlights
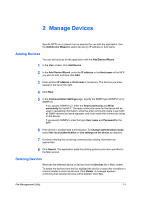
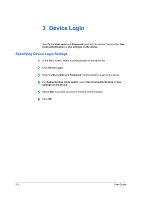
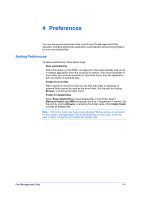
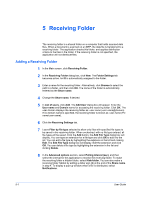
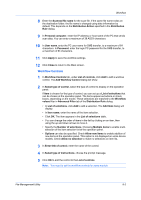
6 Distribution Rule The distribution rules are applied to each file in the receiving folder, and each file that meets the given rule is distributed accordingly. Adding Distribution Rule 1 In the Main screen, click Distribution Rule. 2 In the Distribution Rule dialog box, click New. The Folder Settings tab becomes active. An ID is automatically assigned to the Distribution Rule. 3 Enter a Name for the Distribution Rule. 4 In List of folders, click Add. The Add Folder dialog box displays. Enter the destination for the distribution folder, or click Browse and select the folder path. You cannot specify a folder already used as the receiving folder, deleted folder, or error folder. 5 If the Distribution Rule requires authentication, enter the User name and Password. 6 Click OK to save the distribution folder settings. The distribution folder appears under List of folders. You can enter up to 10 distribution folders. 7 In Basic Filter tab, click Select. The Receiving folder ID dialog will open. Select a receiving folder and click OK. Make settings in Filter by as needed. These settings apply to files scanned from all types of MFP systems. 8 Select the Distribution Actions that are performed when the distribution conditions match. Default If selected, no action is taken. Delete If selected, files are moved to the delete folder. Overwrite If selected, existing files at the destination are overwritten, if they have the same name as the transferred file. Note: If the distribution folder is missing, the files are moved to the error folder. 6-1 User Guide
-
 1
1 -
2
-
3
-
4
-
 5
5 -
 6
6 -
 7
7 -
 8
8 -
 9
9 -
 10
10 -
 11
11 -
 12
12 -
 13
13 -
 14
14 -
 15
15 -
16
-
17
-
18
-
19
-
20
 |
 |