Kyocera TASKalfa 3501i File Management Utility Operation Guide Rev 3.01.2013.3 - Page 15
Workflow Controls
 |
View all Kyocera TASKalfa 3501i manuals
Add to My Manuals
Save this manual to your list of manuals |
Page 15 highlights
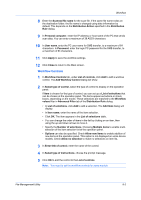
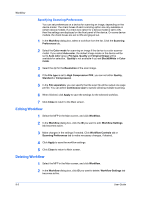
Workflow 8 Enter the Scanned file name for the scan file. If the same file name exists on the destination folder, the file name is changed using date information by default. This depends on the Distribution Action specified in the Distribution Rule dialog. 9 In Personal computer, enter the IP address or host name of the PC that sends scan data. You can enter a maximum of 39 ASCII characters. 10 In User name, enter the PC user name for SMB transfer, to a maximum of 64 characters. In Password, enter the login PC password for the SMB transfer, to a maximum of 64 characters. 11 Click Apply to save the workflow settings. 12 Click Close to return to the Main screen. Workflow Controls 1 In Workflow Controls tab, under List of controls, click Add to add a worklow control. The Add Workflow Control dialog will show. 2 In Select type of control, select the type of control to display on the operation panel. If Item is chosen for the type of control, you can set up a List of selections that can be chosen at the operation panel. The items appear as buttons or check boxes, depending on the model. These selections are matched to the Workflow values filter in Advanced Filter tab of the Distribution Rule dialog. • In List of selections, click Add to add a selection. The Add Item dialog will display. • In Item name, enter the name of the item selection. • Click OK. The item appears in the List of selections table. • You can change the order of items in the list by clicking on an item, then using the up and down arrows to move it. • Specify the Number of selections. Choosing Multiple items to enable multiselection of the item selection list at the operation panel. • Options can also be specified. Check Allow new items to enable addition of new items at the operation panel. This option is not displayed on some device models. Check Allow no selection to make no selections on item list. 3 In Enter title of control, enter the name of the control. 4 In Select type of instructions, choose the prompt message. 5 Click OK to add the control to the List of controls. Note: You need to set the workflow controls for some models. File Management Utility 8-2
-
 1
1 -
2
-
3
-
4
-
5
-
6
-
7
-
8
-
9
-
 10
10 -
 11
11 -
 12
12 -
 13
13 -
 14
14 -
 15
15 -
 16
16 -
 17
17 -
 18
18 -
 19
19 -
 20
20
 |
 |