LG BD390 Owner's Manual (English) - Page 13
Connections to Your TV - audio settings
 |
UPC - 719192175174
View all LG BD390 manuals
Add to My Manuals
Save this manual to your list of manuals |
Page 13 highlights
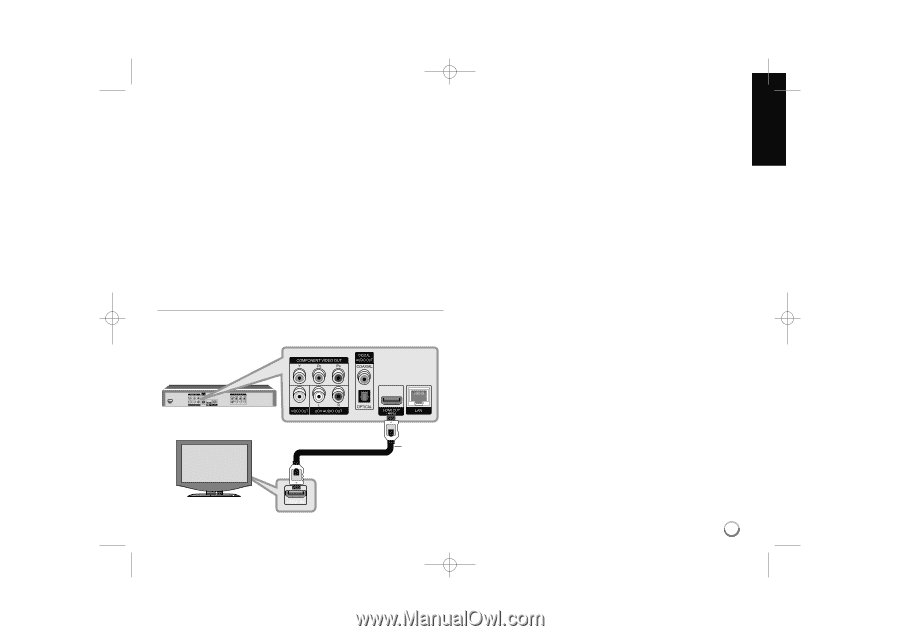
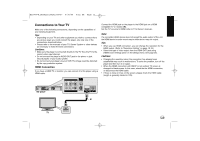
BD390V-N_BUSALLV_MFL62344757 9/30/09 9:52 AM Page 13 Connections to Your TV Make one of the following connections, depending on the capabilities of your existing equipment. Tips: • Depending on your TV and other equipment you wish to connect, there are various ways you could connect the player. Use only one of the connections described below. • Please refer to the manuals of your TV, Stereo System or other devices as necessary to make the best connections. Cautions: • Make sure the player is connected directly to the TV. Tune the TV to the correct video input channel. • Do not connect the player's AUDIO OUT jack to the phono in jack (record player) of your audio system. • Do not connect your player via your VCR. The image could be distorted by the copy protection system. HDMI Connection If you have a HDMI TV or monitor, you can connect it to this player using a HDMI cable. Connect the HDMI jack on the player to the HDMI jack on a HDMI compatible TV or monitor (H). Set the TV's source to HDMI (refer to TV's Owner's manual). Note: If a connected HDMI device does not accept the audio output of the unit, the HDMI device's audio sound may be distorted or may not output. Tips: • When you use HDMI connection, you can change the resolution for the HDMI output. (Refer to "Resolution Setting" on page 18-19.) • Select the type of video output from the HDMI OUT jack using [HDMI Color Setting] option on the [Setup] menu (see page 28). Cautions: • Changing the resolution when the connection has already been established may result in malfunctions. To solve the problem, turn off the player and then turn it on again. • When the HDMI connection with HDCP is not verified, TV screen is changed to black screen. In this case, check the the HDMI connection, or disconnect the HDMI cable. • If there is noise or lines on the screen, please check the HDMI cable (length is generally limited to 15ft). BD player H TV 13
-
 1
1 -
2
-
3
-
4
-
5
-
6
-
7
-
 8
8 -
 9
9 -
 10
10 -
 11
11 -
 12
12 -
 13
13 -
 14
14 -
 15
15 -
 16
16 -
 17
17 -
 18
18 -
19
-
20
-
21
-
22
-
23
-
24
-
25
-
26
-
27
-
28
-
29
-
30
-
31
-
32
-
33
-
34
-
35
-
36
-
37
-
38
-
39
-
40
-
41
-
42
-
43
-
44
-
45
-
46
-
47
-
48
-
49
-
50
-
51
-
52
-
53
-
54
-
55
-
56
-
57
-
58
-
59
-
60
-
61
-
62
-
63
-
64
-
65
-
66
-
67
-
68
-
69
-
70
-
71
-
72
-
73
-
74
-
75
-
76
 |
 |