LG N1910LZ-BF User Manual
LG N1910LZ-BF Manual
 |
View all LG N1910LZ-BF manuals
Add to My Manuals
Save this manual to your list of manuals |
LG N1910LZ-BF manual content summary:
- LG N1910LZ-BF | User Manual - Page 1
English OWNER'S MANUAL NETWORK MONITOR Please read the safety information carefully before using the product. Network Monitor Model N1910LZ www.lg.com - LG N1910LZ-BF | User Manual - Page 2
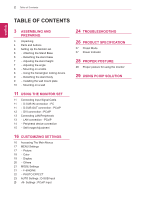
Accessing The Main Menus 17 MENU Settings 17 - Picture 18 - Color 19 - Display 20 - Others 21 MODE Settings 21 - F-ENGINE 22 - PHOTO EFFECT 23 AUTO Settings : D-SUB Input 23 -/ /- Settings : PCoIP Input 24 TROUBLESHOOTING 26 PRODUCT SPECIFICATION 27 Preset Mode 27 Power Indicator 28 PROPER POSTURE - LG N1910LZ-BF | User Manual - Page 3
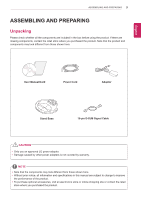
components may look different from those shown here. User Manual/Card Power Cord Adaptor Stand Base 15-pin D-SUB Signal Cable CAUTION yyOnly use an approved LG power adapter. yyDamage caused by other power adapters is not covered by warranty. NOTE yyNote that the components may look different - LG N1910LZ-BF | User Manual - Page 4
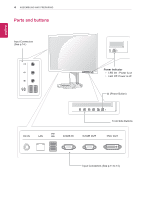
EEngNliGsh 4 ASSEMBLING AND PREPARING Parts and buttons Input Connectors (See p.14 ) Power Indicator yyLED On : Power is on yyLED Off: Power is off (Power Button) Front Side Buttons Input Connectors (See p.11 to 14) - LG N1910LZ-BF | User Manual - Page 5
to the F-ENGINE and PHOTO EFFECT options. To adjust the monitor settings, press the AUTO button on the MONITOR SETUP OSD menu (only supported for analog signal). For optimal screen display, use the following resolution. Optimal Resolution 1280 x 1024 Allows selection of the input signal. yy If - LG N1910LZ-BF | User Manual - Page 6
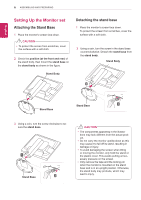
EEngNliGsh 6 ASSEMBLING AND PREPARING Setting Up the Monitor set Attaching the Stand Base 1 Place the monitor's screen face down. CAUTION yyTo protect the screen from scratches, cover the surface with a soft cloth. 2 Check the position (at the front and rear) of the stand body, then mount the - LG N1910LZ-BF | User Manual - Page 7
EEngNliGsh ASSEMBLING AND PREPARING 7 Adjusting the stand height 1 Place the monitor mounted on the stand base in an upright position. 2 Remove the tape attached at the bottom rear of the stand body, then pull out the locking pin. Stand Body Tape Locking Pin Adjusting the angle 1 Place the - LG N1910LZ-BF | User Manual - Page 8
for the Kensington lock is located on the rear of the monitor. For more information on installation and usage, refer to the Kensington lock user manual or visit the website at http://www.kensington.com. Connect the monitor to the table with the Kensington lock cable. 2 Connect the adaptor to the - LG N1910LZ-BF | User Manual - Page 9
the wall mount plate This monitor has a VESA compatible mount on the back. Most mounts will require an LG mounting plate. 1 Place the monitor's screen face down. To protect the screen from scratches, cover the surface on the installation, refer to the wall mount plate's installation guide. - LG N1910LZ-BF | User Manual - Page 10
instructions can be obtained from your local retail store. Please refer to the manual 10 mm yy787.4 mm (31.0 inch) or greater * Use the wall . Please use a LG wall mounting bracket when warranty. NOTE yyUse the screws specified in the VESA standard. yyThe wall mount kit includes the installation guide - LG N1910LZ-BF | User Manual - Page 11
a device to your computer, without having to reconfigure anything or install any manual drivers. D-SUB IN connection - PC D-SUB OUT connection - PCoIP D-SUBRGOBUOTUTcan only mirror the image displayed on the monitor. (it does not support an extended desktop). Connect the monitor to the PC using the - LG N1910LZ-BF | User Manual - Page 12
- PCoIP Transfers digital video signals to another monitor. Connect the monitor using the DVI cable as illustrated below. This connection is used to support an extended monitor or replicate the image displayed on the monitor. CAUTION yyConnect the input signal cable and tighten in the direction of - LG N1910LZ-BF | User Manual - Page 13
EEngNliGsh Connecting LAN/Peripherals LAN connection - PCoIP The LAN connection transmits PCoIP signals to the monitor. Connect the router or switch to the monitor using a LAN cable as illustrated below. USING THE MONITOR SET 13 NOTE yyThe LAN cable is sold separately. yyThe following LAN cable - LG N1910LZ-BF | User Manual - Page 14
EEngNliGsh 14 USING THE MONITOR SET Peripheral device connection Connect peripheral devices to the monitor using USB, headphone, speaker, and microphone ports. NOTE yyPeripheral devices are sold separately. yyThe USB ports on the left and bottom of the monitor can be used to connect the keyboard, - LG N1910LZ-BF | User Manual - Page 15
Self Image Adjustment Press the power button on the front to turn on the monitor. When powered on, the "Self Image Adjustment" function will run automatically (only available for analog [D-SUB input] signals). USING THE MONITOR SET 15 EEngNliGsh NOTE yyWhat is "Self Image Adjustment"? This - LG N1910LZ-BF | User Manual - Page 16
, EXIT yyPCoIP Input: MENU, MODE, , INPUT, EXIT yyThe language of the monitor's OSD menu and that of the OSD menu illustrated in the CD-ROM manual may be different. - LG N1910LZ-BF | User Manual - Page 17
CUSTOMIZING SETTINGS 17 EEngNliGsh MENU Settings Picture 1 Press any button on the front of the monitor to dis- play the MONITOR SETUP OSD menu. MENU PICTURE 2 Press the MENU button to display the options in the OSD menu. BRIGHTNESS 3 Set the options by pressing the buttons on the front of - LG N1910LZ-BF | User Manual - Page 18
18 CUSTOMIZING SETTINGS EEngNliGsh Color 1 Press any button on the front of the monitor to dis- play the MONITOR SETUP OSD menu. 2 Press the MENU button to display the options in the OSD menu. 3 Set the options by pressing the buttons on the front of the monitor. 4 Select EXIT to leave the OSD - LG N1910LZ-BF | User Manual - Page 19
CUSTOMIZING SETTINGS 19 EEngNliGsh Display 1 Press any button on the front of the monitor to dis- play the MONITOR SETUP OSD menu. MENU DISPLAY 2 Press the MENU button - LG N1910LZ-BF | User Manual - Page 20
20 CUSTOMIZING SETTINGS EEngNliGsh Others 1 Press any button on the front of the monitor to dis- play the MONITOR SETUP OSD menu. 2 Press the MENU button to display the options in the OSD menu. 3 Set the options by pressing the buttons on the front of the monitor. 4 Select EXIT to leave the OSD - LG N1910LZ-BF | User Manual - Page 21
CUSTOMIZING SETTINGS 21 EEngNliGsh MODE Settings F-ENGINE 1 Press any button on the front of the monitor to dis- play the MONITOR SETUP OSD menu. 2 Press the MODE button to display the options in the OSD menu. 3 Set the options by pressing the buttons on the front of the monitor. 4 Select EXIT to - LG N1910LZ-BF | User Manual - Page 22
22 CUSTOMIZING SETTINGS EXIT EEngNliGsh PHOTO EFFECT 1 Press any button on the front of the monitor to dis- play the MONITOR SETUP OSD menu. 2 Press the MODE button to display the options in the OSD menu. 3 Set the options by pressing the buttons on the front of the monitor. 4 Select EXIT to leave - LG N1910LZ-BF | User Manual - Page 23
allows the monitor to automatically optimize the screen to the current display mode. If you are not satisfied with the optimized screen, you can manually adjust the position of the display area, frequency, phase and sharpness in the OSD menu. (Only available for D-SUB [analog] signals. Note that the - LG N1910LZ-BF | User Manual - Page 24
EEngNliGsh 24 Troubleshooting TROUBLESHOOTING Nothing is displayed on the screen Is horizontal or vertical frequency range of the monitor. Please see the "Product Specification" section of this manual to set the appropriate frequency. Is the "CHECK SIGNAL CABLE" message is displayed? yy This - LG N1910LZ-BF | User Manual - Page 25
Troubleshooting 25 The image is displayed abnormally. Does the display area appear uncentered? Pressing the AUTO button will automatically optimize the screen to the current display mode. If you are not satisfied with the optimized screen, you can manually may not support certain resolutions. - LG N1910LZ-BF | User Manual - Page 26
Packaging) Stand Angle Adjustment Environment Condition Type 481.9 mm (19 inch) TFT (Thin Film Transistor) LCD (Liquid Crystal Display) to 63 Hz Synchronization Separate Sync/PCoIP 15-pin D-SUB (Analog), RJ45 (PCoIP) 19 V 2.3 A Power Consumption On Mode: 43 W (Typical) Power Saving Mode ≤ - LG N1910LZ-BF | User Manual - Page 27
31.469 60 37.879 60 48.363 60 Polarity (H/V) 63.981 60 +/+ Remark Recommended Mode Power Indicator Mode On Mode Power Saving Off Mode LED Color White Flashing White Off - LG N1910LZ-BF | User Manual - Page 28
eyes. yyUsing the monitor for a prolonged period of time can cause eye fatigue. Take a 10-minute break every hour. yyThe stand is designed to best support the monitor when the optimal conditions are selected. Adjust the angle of the monitor from -5° to 15° to obtain the best view of the screen - LG N1910LZ-BF | User Manual - Page 29
2-3. Selecting one of the options will produce a settings window. Figure 2-3. Network Ready (Detail) Selecting the Connect button initiates a PCoIP or RDP session depending on the session settings. While the PCoIP connection is pending, the OSD local GUI will display a "Connection Pending" message - LG N1910LZ-BF | User Manual - Page 30
yy Network yy Label yy Connection Management yy Discovery yy Session yy RDP yy Language yy OSD yy Reset yy Display yy VMware View Each DNS server. If this option is disabled, the above parameters must be configured manually. yy IP Address The IP Address field contains the IP address of the device - LG N1910LZ-BF | User Manual - Page 31
the host or portal. If there is a domain name, it will be added to the FQDN in the format of PCoIP-host-MAC.domain.local NOTE yyIn order to the host or portal. This field cannot be used in the PCoIP firmware and accessibility is strictly limited to the administrator. yy Generic Tag In the - LG N1910LZ-BF | User Manual - Page 32
EEngNliGsh 32 Using PCoIP Solution Connection Management Tab The Connection Management tab allows the user to enable or disable the connection management and specify the connection manager's IP address. In a managed connection, an external Connection Management Server can communicate with a device - LG N1910LZ-BF | User Manual - Page 33
number of hosts. Figure 2-10. Session Configuration yy Session Type In Session Type, the administrator can configure a portal for the PCoIP session or the RDP session. yy Identify Peer By The Identify Peer By selector allows the administrator to decide whether to identify the peer device by IP, by - LG N1910LZ-BF | User Manual - Page 34
) yy 16 bpp yy 24 bpp yy Terminal Server Port The Terminal Server Port field is used to set the port number to connect the RDP client. Language Tab The Language tab allows the administrator to set the OSD language. NOTE yyThe Language parameters can also be con- figured using the Webpage - LG N1910LZ-BF | User Manual - Page 35
EEngNliGsh Using PCoIP Solution 35 OSD Tab The OSD tab allows the administrator to modify the On Screen Display (OSD) parameters. NOTE yyThe OSD parameters can also be configured using the Webpage Administration Interface. Reset Tab The Reset tab allows the administrator to reset all configurable - LG N1910LZ-BF | User Manual - Page 36
36 Using PCoIP Solution EEngNliGsh Display Tab The Display tab allows the user to configure the EDID function of the monitor. NOTE yyThe Enable display override function can be used when the EDID function of the monitor is not running. yy Enable VMware View The Enable VMware View option allows - LG N1910LZ-BF | User Manual - Page 37
EEngNliGsh Using PCoIP Solution 37 Event Log Tab The Event Log tab allows the administrator to view and delete the event log messages from the portal. NOTE yyThe event log (regardless of the quantity) can also be reset using the Webpage Administration Interface. Session Statistics Tab The Session - LG N1910LZ-BF | User Manual - Page 38
The size of the ping packet. yy Packets yy Sent The number of ping packets sent. yy Received The number of ping packets received. Figure 2-19. PCoIP Processor Configuration - LG N1910LZ-BF | User Manual - Page 39
Information shows the details of the current PCoIP firmware. yy Firmware Version The current PCoIP firmware version yy Firmware Build ID The current PCoIP firmware revision code yy Firmware Build Date The current PCoIP firmware build date User Settings Window In the User Settings window, the - LG N1910LZ-BF | User Manual - Page 40
Tab The Keyboard tab allows the user to modify the OSD and RDP session's keyboard repeat setting. NOTE yyThe OSD keyboard setting does not on using the PCoIP Host Software, refer to the PCoIP Host Software User Guide. Figure 2-23. Keyboard yy Keyboard Repeat Delay The Keyboard Repeat Delay field - LG N1910LZ-BF | User Manual - Page 41
EEngNliGsh Image The Image tab allows a user to change the image settings on the PCoIP system. NOTE yyThe Image parameters can also be configured using the Webpage Administration Interface. Using PCoIP Solution 41 Figure 2-24. Image yy Minimum Image Quality The Minimum Image Quality slider allows - LG N1910LZ-BF | User Manual - Page 42
Make sure to read the Safety Precautions before using the product. Keep the Owner's Manual(CD) in an accessible place for future reference. The model and serial number of the SET is located on the back and one side of the SET. Record it below should you ever need service. MODEL SERIAL
-
 1
1 -
 2
2 -
 3
3 -
 4
4 -
 5
5 -
 6
6 -
 7
7 -
8
-
9
-
10
-
11
-
12
-
13
-
14
-
15
-
16
-
17
-
18
-
19
-
20
-
21
-
22
-
23
-
24
-
25
-
26
-
27
-
28
-
29
-
30
-
31
-
32
-
33
-
34
-
35
-
36
-
37
-
38
-
39
-
40
-
41
-
42
 |
 |

www.lg.com
OWNER'S MANUAL
NETWORK MONITOR
N1910LZ
Please read the safety information carefully before using the product.
Network Monitor Model
English