LG N1910LZ-BF User Manual - Page 23
AUTO Settings : D-SUB Input, -/ /- Settings : PCoIP Input
 |
View all LG N1910LZ-BF manuals
Add to My Manuals
Save this manual to your list of manuals |
Page 23 highlights
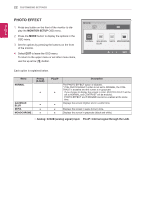
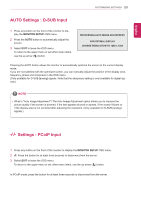
EEngNliGsh CUSTOMIZING SETTINGS 23 AUTO Settings : D-SUB Input 1 Press any button on the front of the monitor to dis- play the MONITOR SETUP OSD menu. 2 Press the AUTO button to automatically adjust the screen. 3 Select EXIT to leave the OSD menu. To return to the upper menu or set other menu items, use the up arrow ( ) button. PROCESSING AUTO IMAGE ADJUSTMENT FOR OPTIMAL DISPLAY CHANGE RESOLUTION TO 1280 x 1024 Pressing the AUTO button allows the monitor to automatically optimize the screen to the current display mode. If you are not satisfied with the optimized screen, you can manually adjust the position of the display area, frequency, phase and sharpness in the OSD menu. (Only available for D-SUB [analog] signals. Note that the sharpness setting is only available for digital signals.) NOTE yyWhat is "Auto Image Adjustment"? The Auto Image Adjustment option allows you to improve the picture quality if the screen is dimmed, if the text appears blurred or spread, if the screen flickers or if the display area is not centered after adjusting the resolution. (Only available for D-SUB [analog] signals.) -/ /- Settings : PCoIP Input 1 Press any button on the front of the monitor to display the MONITOR SETUP OSD menu. 2 Press the button for at least three seconds to disconnect from the server. 3 Select EXIT to leave the OSD menu. To return to the upper menu or set other menu items, use the up arrow ( ) button. In PCoIP mode, press the button for at least three seconds to disconnect from the server.
-
 1
1 -
2
-
3
-
4
-
5
-
6
-
7
-
8
-
9
-
10
-
11
-
12
-
13
-
14
-
15
-
16
-
17
-
 18
18 -
 19
19 -
 20
20 -
 21
21 -
 22
22 -
 23
23 -
 24
24 -
 25
25 -
 26
26 -
 27
27 -
 28
28 -
29
-
30
-
31
-
32
-
33
-
34
-
35
-
36
-
37
-
38
-
39
-
40
-
41
-
42
 |
 |
