Lenovo ThinkPad T400 (English) Hardware Password Manager Deployment Guide - Page 27
Group Permissions, New group, permission, AD Authentication, AD group, >>, Targeted AD groups
 |
View all Lenovo ThinkPad T400 manuals
Add to My Manuals
Save this manual to your list of manuals |
Page 27 highlights
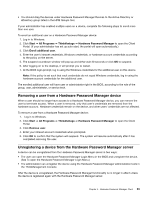
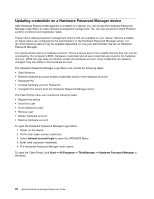
5. Click OK. To assign permissions to a group that can be authenticated through the new authentication, do the following: 1. In the User's tool, click + on the toolbar or right-click Group Permissions, and then click New group permission. 2. Enter a name for the group permission. 3. Select the authentication created previously from the AD Authentication drop-down list. 4. Either find the appropriate group in the tree view or type the name of the group in the AD group field and click Find. 5. Click >> to add the appropriate group to the Targeted AD groups list. 6. Repeat step 5 as needed. 7. Select the role(s) to be assigned to this group permission. 8. Click Save. Now when users log in to the console they need to select the appropriate authentication and enter their credentials. The level of access granted will be determined by the scopes and roles you have just defined. Chapter 3. Managing Hardware Password Manager devices with ThinkManagement Console 19
-
 1
1 -
2
-
3
-
4
-
5
-
6
-
7
-
8
-
9
-
10
-
11
-
12
-
13
-
14
-
15
-
16
-
17
-
18
-
19
-
20
-
21
-
 22
22 -
 23
23 -
 24
24 -
 25
25 -
 26
26 -
 27
27 -
 28
28 -
 29
29 -
 30
30 -
 31
31 -
 32
32 -
33
-
34
-
35
-
36
-
37
-
38
-
39
-
40
-
41
-
42
-
43
-
44
-
45
-
46
-
47
-
48
-
49
-
50
-
51
-
52
-
53
-
54
-
55
-
56
-
57
-
58
-
59
-
60
 |
 |
