Lexmark 7675 Fax Guide - Page 10
Warning-Potential Damage, Ethernet Port - paper jam
 |
UPC - 734646081443
View all Lexmark 7675 manuals
Add to My Manuals
Save this manual to your list of manuals |
Page 10 highlights
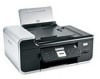
Use the 3 Scanner unit 4 Print cartridge carrier 5 EXT Port To • Access the print cartridges. • Remove paper jams. Install, replace, or remove a print cartridge. Connect additional devices, such as a data/fax modem, telephone, or answering machine, to the printer. This connection method may not be available in all countries or regions. Note: Remove the plug to access the port. EXT 6 LINE Port LINE Connect the printer to an active telephone line to send and receive faxes. The printer must be connected to a telephone line to receive incoming fax calls. Note: Do not connect additional devices to the LINE port, and do not connect a DSL (digital subscriber line), ISDN (integrated services digital network), or cable modem to the printer. 7 Ethernet Port Connect your computer to another computer, a Note: Your printer model may not have networking local network, an external DSL, or cable modem. capability and may not have this port. 8 Internal wireless print server Connect the printer to a wireless network. Note: Your printer model may not have wireless capability and may not have this print server. 9 USB port Connect the printer to a computer using a USB cable. Warning-Potential Damage: Do not touch the USB port except when plugging in or removing a USB cable or installation cable. 10 Power supply with port Connect the printer to a power source. 11 Duplex cover • Print on both sides of a sheet of paper. • Remove paper jams. Understanding the parts of the printer 10
-
 1
1 -
2
-
3
-
4
-
 5
5 -
 6
6 -
 7
7 -
 8
8 -
 9
9 -
 10
10 -
 11
11 -
 12
12 -
 13
13 -
 14
14 -
 15
15 -
16
-
17
-
18
-
19
-
20
-
21
-
22
-
23
-
24
-
25
-
26
-
27
-
28
-
29
-
30
-
31
-
32
-
33
-
34
-
35
-
36
-
37
-
38
-
39
-
40
-
41
-
42
-
43
-
44
-
45
-
46
-
47
-
48
-
49
-
50
-
51
-
52
-
53
-
54
 |
 |
