Lexmark C782 User's Guide - Page 64
Clearing paper jams, Identifying jams - diagram
 |
View all Lexmark C782 manuals
Add to My Manuals
Save this manual to your list of manuals |
Page 64 highlights
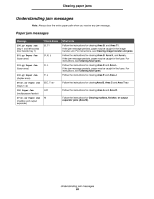
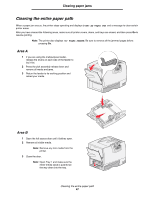
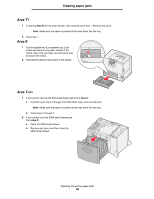
5 Clearing paper jams Identifying jams If the printer jams, the appropriate jam message will be displayed on the printer operator panel. If you select Show areas on the operator panel, you can view one or more images to help you clear the jam. 23.13 Paper jam, 2 pages jammed Continue Show areas Show areas Show duplex Show rear door 1. Open manual feed door. See the diagram on page 65 for an overview of the paper path and areas where jams may occur. The path varies depending on the paper source and output bins. Clearing paper jams 64
-
 1
1 -
2
-
3
-
4
-
5
-
6
-
7
-
8
-
9
-
10
-
11
-
12
-
13
-
14
-
15
-
16
-
17
-
18
-
19
-
20
-
21
-
22
-
23
-
24
-
25
-
26
-
27
-
28
-
29
-
30
-
31
-
32
-
33
-
34
-
35
-
36
-
37
-
38
-
39
-
40
-
41
-
42
-
43
-
44
-
45
-
46
-
47
-
48
-
49
-
50
-
51
-
52
-
53
-
54
-
55
-
56
-
57
-
58
-
 59
59 -
 60
60 -
 61
61 -
 62
62 -
 63
63 -
 64
64 -
 65
65 -
 66
66 -
 67
67 -
 68
68 -
 69
69 -
70
-
71
-
72
-
73
-
74
-
75
-
76
-
77
-
78
-
79
-
80
-
81
-
82
-
83
-
84
-
85
-
86
-
87
-
88
-
89
-
90
-
91
-
92
-
93
-
94
-
95
-
96
-
97
-
98
-
99
-
100
-
101
-
102
-
103
-
104
-
105
-
106
-
107
-
108
-
109
-
110
-
111
-
112
 |
 |

Clearing paper jams
64
5
Clearing paper jams
Identifying jams
If the printer jams, the appropriate jam message will be displayed on the printer operator panel. If you select
Show areas
on the operator panel, you can view one or more images to help you clear the jam.
See the diagram on
page 65
for an overview of the paper path and areas where jams may occur. The path varies
depending on the paper source and output bins.
23.13 Paper jam,
2 pages jammed
Continue
Show areas
1. Open
manual feed
door.
Show areas
Show duplex
Show rear door