Lexmark E330 Service Manual
Lexmark E330 Manual
 |
View all Lexmark E330 manuals
Add to My Manuals
Save this manual to your list of manuals |
Lexmark E330 manual content summary:
- Lexmark E330 | Service Manual - Page 1
Revised: 7/12/05 Lexmark ™ E23x, E33x 4505-100 4505-200 4505-300 4505-310 4505-400 4505-410 • Table of Contents • Start Diagnostics • Safety and Notices • Trademarks • Index Lexmark and Lexmark with diamond design are trademarks of Lexmark International, Inc., registered in the United States and/or - Lexmark E330 | Service Manual - Page 2
inaccuracies or typographical errors. Changes are Lexmark.com. Lexmark may use or distribute any of the information you supply services, except those expressly designated by the manufacturer, are the user's responsibility. Lexmark, Lexmark with diamond design, and MarkVision are trademarks of Lexmark - Lexmark E330 | Service Manual - Page 3
on preventing jams 1-5 Tools 1-6 Types of print media 1-7 Abbreviations 1-8 Diagnostic information 2-1 Start 2-1 POST (power-on self test 2-1 Overview of the operator panel 2-2 Understanding the operator panel lights 2-3 Common light sequences 2-3 Secondary errors 2-6 Operator panel codes - Lexmark E330 | Service Manual - Page 4
4505 Operator panel service check 2-59 Printhead service check 2-61 Paper feed service checks 2-61 Parallel port service check 2-65 Print quality service checks 2-66 Using print quality test pages 2-66 Transfer roll service check 2-79 Diagnostic aids 3-1 Configuration and diagnostic groups - Lexmark E330 | Service Manual - Page 5
4505 Preventive maintenance 6-1 Parts catalog 7-1 How to use this parts catalog 7-1 Index I-1 Part number index I-5 v - Lexmark E330 | Service Manual - Page 6
4505 vi Service Manual - Lexmark E330 | Service Manual - Page 7
in the wavelength region of 770-795 nanometers. The laser system and printer are designed so there is never any human access to laser radiation above a Class I level during normal operation, user maintenance, or prescribed service condition. Laser Der Drucker erfüllt gemäß amtlicher Bestätigung der - Lexmark E330 | Service Manual - Page 8
laser de Classe I. Les produits laser de Classe I sont considérés comme des produits non dangereux. Cette imprimante est équipée d'un laser son système laser sont conçus laser supérieurs à des rayonnements de Classe I . Avvertenze sui prodotti laser 795 nanometri. Il sistema laser e la stampante sono - Lexmark E330 | Service Manual - Page 9
de la Clase I durante su uso normal, el mantenimiento realizado por el usuario o cualquier otra situación de servicio técnico. Declaração sobre Laser A impressora está certificada nos E.U.A. em conformidade com os requisitos da regulamentação DHHS 21 CFR Subcapítulo J para a Classe I (1) de produtos - Lexmark E330 | Service Manual - Page 10
kraven i IEC 60825-1. Laserprodukter i Klass I anses ej hälsovådliga. Skrivaren har en inbyggd laser av Klass IIIb (3b) som består av en laserenhet av gallium-arsenid på 5 milliwatt som arbetar användning, underhåll som utförs av användaren eller annan föreskriven serviceåtgärd. x Service Manual - Lexmark E330 | Service Manual - Page 11
laserprodukt i samsvar med kravene i IEC 60825-1. Klasse I-laserprodukter er ikke å betrakte som farlige. Skriveren inneholder internt en klasse IIIb (3b)-laser, som består av en gallium-arsenlaserenhet som avgir stråling i bølgelengdeområdet 770-795 nanometer. Lasersystemet og skriveren er utformet - Lexmark E330 | Service Manual - Page 12
4505 Japanese Laser Notice Chinese Laser Notice xii Service Manual - Lexmark E330 | Service Manual - Page 13
4505 Korean Laser Notice Laser notices xiii - Lexmark E330 | Service Manual - Page 14
4505 xiv Service Manual - Lexmark E330 | Service Manual - Page 15
is based on testing and approvals of the original design and specific components. The manufacturer is not responsible for safety in the event of use of unauthorized replacement parts. • The maintenance information for this product has been prepared for use by a professional service person and - Lexmark E330 | Service Manual - Page 16
alimentato per eseguire l'intervento. Sicherheitshinweise • Die Sicherheit dieses Produkts basiert auf Tests und Zulassungen des ursprünglichen Modells und bestimmter Bauteile. Bei Verwendung nicht Produkt für die Ausführung der Arbeiten an den Strom angeschlossen sein muß. xvi Service Manual - Lexmark E330 | Service Manual - Page 17
. • PRECAUCIÓN: este símbolo indica que el voltaje de la parte del equipo con la que está trabajando es peligroso. Antes de conectarlo. Informações de Segurança • A segurança deste produto baseia-se em testes e aprovações do modelo original e de componentes específicos. O fabricante não - Lexmark E330 | Service Manual - Page 18
producte. El personal professional ha d'estar-ne assabentat i prendre les mesures convenients. • PRECAUCIÓ: aquest símbol indica que el voltatge de la part de l'equip amb la qual esteu treballant és perillós. Abans de començar, desendolleu l'equip o extremeu les precaucions si, per treballar - Lexmark E330 | Service Manual - Page 19
4505 Safety information xix - Lexmark E330 | Service Manual - Page 20
(FRUs (field replaceable unit)). 3. Diagnostic aids contains tests and checks used to locate or repeat symptoms of printer problems. 4. Repair information provides instructions for making printer adjustments and removing and installing field replaceable units (FRUs). 5. Connector locations uses - Lexmark E330 | Service Manual - Page 21
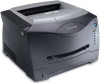
4505 1. General information The Lexmark™ E23x, E33x printers are monochrome laser printers designed for single users or small workgroups. There are four models: • E230, 8MB memory standard, a USB (universal serial bus) port, a parallel port, and prints 18 pages per minute. Note: The optional 550- - Lexmark E330 | Service Manual - Page 22
3, PCL 6, PPDS (personal printer data stream) and Windows/Macintosh/Linux compatibility Connectivity USB and Parallel USB, Parallel, and 10/100 Base-TX Ethernet Toner cartridge 1,500 pages* yield (starter toner cartridge) 2,500 pages Photoconductor 30,000 pages* kit yield * Yield based on - Lexmark E330 | Service Manual - Page 23
Ready Toner Low / Replace PC Kit Load Paper Paper Jam Error • Press and release to resume printing. • Press and release twice quickly to display a secondary error code following an error. • Press and release to cancel the job currently printing. • Press and hold printer. until all of the lights - Lexmark E330 | Service Manual - Page 24
jam light sequence. See "Secondary errors" on page 2-6 for more information. We recommend the entire paper path be cleared when a paper jam occurs. To clear a paper jam: 1. If the paper is feeding from a tray, remove the tray, and then remove any jams. 2. Open the front cover and remove the print - Lexmark E330 | Service Manual - Page 25
stack height. • Push all trays firmly into the printer after loading them. • Make sure the guides in the trays are positioned snugly against the paper or specialty media. • Do not remove paper trays while a job is printing. Wait for a Load Paper light sequence before you remove the tray. • Before - Lexmark E330 | Service Manual - Page 26
4505 Tools The removal and adjustment procedures require the following tools and equipment: • Magnetic tip Phillips screwdrivers, large and small • Volt ohmmeter 1-6 Service Manual - Lexmark E330 | Service Manual - Page 27
g/m2 (16-24 lb) • 250 paper • labels • 50 transparencies Plain paper, transparencies, labels 60-163 g/m2 (16-43 lb) • 550 paper • labels • 50 transparencies • card stock Plain paper, 60-163 g/m2 1 transparencies, (16-43 lb) labels, card stock† 7¾, 9, 10, DL, C5, B5, other Envelopes † Card - Lexmark E330 | Service Manual - Page 28
paper feed) Application Specific Integrated Circuit Complete Bill Of Material Dual In-Line Memory Module External Network Adapter Field Replaceable Unit Host Based Printing High Voltage High Voltage Power Supply International Low Voltage Power Supply Nonvolatile Random Access Memory Printer Control - Lexmark E330 | Service Manual - Page 29
1. All operator panel lights flash irregularly for approximately 10 seconds. 2. If there is a problem in the printer such as a paper jam, the panel lights indicate the problem. See "Common light sequences" on page 2-3 for more information. 3. Otherwise, the light flashes until the fuser comes up to - Lexmark E330 | Service Manual - Page 30
Ready Toner Low / Replace PC Kit Load Paper Paper Jam Error • Press and release to resume printing. • Press and release twice quickly to display a secondary error code (following an error - and lights on). • Press and release to cancel the job currently printing. • Press and hold printer. until - Lexmark E330 | Service Manual - Page 31
or blinking indicate printer conditions such as printer status, intervention, or service. The following tables show the most common light sequences. Note: See "Primary codes" on page 2-8 for more information. ● Light on Light is off ✷ Light blinking x Light blinking slow Common light sequences - Lexmark E330 | Service Manual - Page 32
manual feeder ● Print side two of duplex job ● Toner low ✷ Replace photoconductor kit ✷ ✷ Replace photoconductor kit (printer hard stop) ✷ ● Missing or defective toner cartridge ● ● Unsupported toner cartridge ● ✷ Change cartridge, invalid refill ● ● Invalid engine code - Lexmark E330 | Service Manual - Page 33
4505 Printer condition ✷ ✷ ✷ ✷ ✷ ✷ Service error (see "Service information with secondary and tertiary light patterns" on page 2-29 for more information). ✷ ● Printer error (see "Secondary error codes" on page 2-19 for more information). Diagnostic information 2-5 - Lexmark E330 | Service Manual - Page 34
light sequences mean. Printer condition ● ● Printer error / Secondary error code ● ✷ ● Paper jams in the manual feeder ● ● ● Paper jams as it exits the tray into the printer ● ● ● Paper jams as a printed job exits the printer ● ● ● Complex page ● ✷ ● Insufficient printer - Lexmark E330 | Service Manual - Page 35
4505 Printer condition ● ● ● ● Short paper ● ● ● ● Unformatted flash ● ● ● ● Flash full ● ● ● Invalid engine code ● ✷ ● Invalid network code Paper jam secondary codes ● ● ● ● ● ● ● ● ● ● ● ● ● ● ● ● ● ● ✷ ● 200 Paper jam input sensor 201 Paper jam between - Lexmark E330 | Service Manual - Page 36
sequences, or codes, and secondary error codes, what they mean and how to clear them. Primary codes Ready / Power Saver Light sequence Meaning Action: • Printer ready to receive and process data. • Printer is in Power Saver mode. • Send a print job. • Press to print the menu settings pages for - Lexmark E330 | Service Manual - Page 37
to clear. - Warning: Do not turn the printer off while this message is displayed. • Printing a directory, a font list, menu settings pages, or Print Quality Test Pages: - Wait for the pages to print. The Busy message is displayed as the pages print. The light is on when printing stops. - Press and - Lexmark E330 | Service Manual - Page 38
is active. Action: • Hex Trace helps troubleshoot printing problems. After resolving the problem, turn off the printer to exit Hex Trace. • Or, press and hold to reset the printer. Waiting Light sequence Meaning Action: Printer is waiting until a print timeout occurs, or until it receives - Lexmark E330 | Service Manual - Page 39
printing pages, but the resolution of a page in the current print job is reduced from 600 dots per inch (dpi) to 300 dpi to prevent a memory full error. • Wait until is displayed to print other jobs. • Press and release to cancel print job. • Press and hold to reset printer. Not ready Light - Lexmark E330 | Service Manual - Page 40
door is open. Action: Close the door. Load media Light sequence Meaning The printer is out of media, or the media did not feed properly. Action: • Load media into tray 1 or the optional 550-sheet tray and press to resume printing. • Check that the media is loaded correctly in tray 1 or - Lexmark E330 | Service Manual - Page 41
the manual feeder. • Press to resume printing. • Press and hold to reset printer. Print side two of duplex job Light sequence Meaning Print the other side of duplex print job. Action: • Reinsert print job in tray 1 using the instructions in the driver pop-up menu to orient the pages correctly - Lexmark E330 | Service Manual - Page 42
the life of the cartridge. • Replace the toner cartridge. • Press and hold to reset printer. Note: The light may not come on if the starter toner cartridge is installed in a base printer model. Replace photoconductor kit Light sequence Meaning The photoconductor kit's drum is full and - Lexmark E330 | Service Manual - Page 43
photoconductor kit (printer hard stop) 4505 Light sequence Meaning Action: The photoconductor kit's drum is full and needs replacing. No pages print until the photoconductor kit is replaced. • Replace the photoconductor kit. Toner cartridge error / Toner cartridge is not installed Light - Lexmark E330 | Service Manual - Page 44
/ Invalid network code Light sequence Meaning Action: The code in an internal print server has not been programmed, or the programmed code is not valid. • Download valid network code to the internal print server. • Press twice quickly to see the secondary error code. 2-16 Service Manual - Lexmark E330 | Service Manual - Page 45
or firmware code flash. Action: Wait for the message to clear. When the printer has finished programming the code, it performs a soft reset. Cancel job / Reset printer Light sequence Meaning Action: • The current print job is canceled. • The printer is resetting to the user default settings - Lexmark E330 | Service Manual - Page 46
still blinking, contact the place where printer was purchased. Printer error Light sequence Meaning Action: The printer has one of the following errors: • Memory is full, insufficient to save what is in the buffer, or insufficient to defragment flash memory. • A page is too complex to print or - Lexmark E330 | Service Manual - Page 47
twice quickly to display the secondary error code light sequence. • When the and lights are both on, a paper jam secondary error has occurred. Press and release light sequence. twice to display the secondary error code The following tables show what these light sequences mean and what to do - Lexmark E330 | Service Manual - Page 48
Action: A paper jam has occurred Clear the paper jam. in the manual feeder. Paper jams as it exits the tray into the printer Light sequence Meaning Action: A paper jam has occurred as the paper is exiting the paper tray and entering the printer. Clear the paper jam. 2-20 Service Manual - Lexmark E330 | Service Manual - Page 49
Paper jams as a printed job exits the printer 4505 Light sequence Meaning Action: A paper jam has occurred Clear the paper jam. as the paper is exiting the printer. Complex page Light sequence Meaning Action: The page may not print correctly because the print information on the page is too - Lexmark E330 | Service Manual - Page 50
and hold to reset the printer. • To avoid this error in the future: - Simplify the print job. Reduce the complexity of the page by reducing the amount of text or graphics on the page and deleting unnecessary downloaded fonts or macros. • Install additional printer memory. 2-22 Service Manual - Lexmark E330 | Service Manual - Page 51
Font error 4505 Light sequence Meaning Action: The printer has received a request for a PPDS font which is not installed. • Press and release to cancel the print job. • Press and hold to reset the printer. • Press and release to clear the message and continue printing. Defective flash Light - Lexmark E330 | Service Manual - Page 52
flash memory. Action: • Delete fonts, macros, and other data in RAM. • Install additional printer memory. Network interface errors Light sequence Meaning The printer cannot establish communication with the network. Action: Press to clear the message and continue printing (the job may not print - Lexmark E330 | Service Manual - Page 53
the print job. • Press and hold to reset the printer. • To avoid this error in the future: - Simplify the print job. Reduce the complexity of the page by reducing the amount of text or graphics on the page and deleting unnecessary downloaded fonts or macros. • Install additional printer memory - Lexmark E330 | Service Manual - Page 54
. • Press to clear the message and continue printing. - Downloaded fonts and macros not previously stored in flash memory are deleted. • Install flash memory with more storage capacity. • Press and release to cancel the print job. • Press and hold to reset the printer. 2-26 Service Manual - Lexmark E330 | Service Manual - Page 55
on Lexmark's Web site for more information. • If the error message remains, the flash memory may be defective and should be replaced. Light sequence Meaning Action: The code in an internal print server has not been programmed, or the programmed code is not valid. Download valid engine code to - Lexmark E330 | Service Manual - Page 56
4505 Invalid network code Light sequence Meaning Action: The code in an internal print server has not been programmed, or the programmed code is not valid. Download valid network code to the internal print server. 2-28 Service Manual - Lexmark E330 | Service Manual - Page 57
CliDckouble CliDckouble Primary Codes Secondary Codes Tertiary Codes Note: All lights flashing simultaneously, as a result of sending data to the printer, may indicate a code problem. Call the next level of support. ● Light on Light off ✷ Light blinking x Light blinking slow Diagnostic - Lexmark E330 | Service Manual - Page 58
4505 Secondary error codes Lights Primary code Secondary codes 90x 91x 92x 93x 94x 95x 96x 97x 98x 99x Continue ✷ Ready ✷ Toner Low / Replace PC Kit ✷✷ ✷ Load Paper ✷✷✷✷ ✷ Paper Jam ✷✷ ✷✷ ✷ ✷ ✷ ✷ ✷ ✷ Error Software DC motor or transfer roll Fuser or toner sensor Printhead, - Lexmark E330 | Service Manual - Page 59
from the error. Note: All service errors are initially communicated by all lights flashing which is the primary indication or code. For brevity, this indication is not repeated in the following codes. 1. Controller software error/illegal trap (90x) Call the next level of support for a 900 error. For - Lexmark E330 | Service Manual - Page 60
904 905 906 Tertiary codes ✷ Toner Low / Replace PC Kit Load Paper Paper Jam Error Secondary code ✷✷✷ ✷✷ ✷ ✷ ✷ ✷ RIP interface driver error General engine software error Faulty engine code flash or programming failed Contact next level of support or 1-800-539-6275 2-32 Service Manual - Lexmark E330 | Service Manual - Page 61
roll circuit. Check the continuity from the cable connection on the HVPS (high voltage power supply) to the right side of the transfer roll. Lights ✷ Continue Ready Tertiary code ✷ 917 Toner Low / Replace PC Kit ✷ Load Paper ✷ Paper Jam ✷ ✷ Error Secondary code Diagnostic information 2-33 - Lexmark E330 | Service Manual - Page 62
fuser (see "Fuser service check" on page 2-53 for more information), a stalled fan motor or a faulty toner sensor or toner cartridge. Lights Tertiary codes 920 921 922 923 924 925 926 927 928 929 ✷ Continue Ready Toner Low / Replace PC Kit ✷✷ Load Paper ✷✷✷✷ ✷ Paper Jam ✷✷ ✷✷ Error - Lexmark E330 | Service Manual - Page 63
4505 Printhead, transport motor or RIP/engine communication error Codes 930 through 935 indicate a problem with the printhead. Check cables to the printhead. Replace the printhead as necessary. Codes 936 and 937 indicate a problem in the drive system. Diagnostic information 2-35 - Lexmark E330 | Service Manual - Page 64
Code Tertiary codes 930 931 932 933 934 935 936 937 939 ✷ Continue Ready ✷ Toner Low / Replace PC Kit Load Paper ✷✷✷✷ ✷ Paper Jam ✷✷ ✷✷ ✷ Error ✷ ✷ ✷ ✷✷ Secondary code /engine communication error Transport motor lost lock Transport motor initial lock failure 2-36 Service Manual - Lexmark E330 | Service Manual - Page 65
4505 RIP to engine communication failure (controller card). This indicates fuser control in the LVPS has failed or the wrong LVPS has been installed. Code Continue Ready Tertiary codes ✷ ✷ 940 Toner Low / Replace PC Kit ✷ Load Paper Paper Jam Error Secondary code Diagnostic information 2-37 - Lexmark E330 | Service Manual - Page 66
4505 NVRAM failure Error codes 950-954 indicate a problem in the NVRAM (nonvolatile random access memory). Replace the operator panel assembly. Codes 955-959 indicate a failed controller card assembly. Replace the controller card. 2-38 Service Manual - Lexmark E330 | Service Manual - Page 67
950 951 952 954 955 956 957 958 959 ✷ Continue Ready Toner Low / Replace PC Kit ✷✷ ✷ Load Paper ✷✷✷✷ Paper Jam ✷ ✷✷ ✷ ✷ Error ✷ ✷ ✷ Secondary code NVRAM data does not match secure NVRAM RIP firmware cannot communicate with secure NVRAM NVRAM chip failure NVRAM CRC failure SRAM - Lexmark E330 | Service Manual - Page 68
Check margin alignments after replacing the operator panel assembly. See "Printhead service check" on page 2-61 for more information. If margin errors are unacceptable, corrections can only be made through software. Contact the next level of support or Lexmark at 1-800-539-6275. 2-40 Service Manual - Lexmark E330 | Service Manual - Page 69
and POR the printer. If the error persists, replace the card. If the error subsides, check each DIMM independently. Replace faulty DIMM. Code Tertiary codes 960 961 962 963 ✷ Continue Ready ✷ ✷ ✷ ✷ Toner Low / Replace PC Kit ✷ Load Paper ✷ Paper Jam Error Secondary code ✷ ✷ ✷ ✷ RAM in - Lexmark E330 | Service Manual - Page 70
Ready Toner Low / Replace PC Kit ✷✷ ✷ Load Paper ✷✷✷ ✷ Paper Jam ✷✷ ✷ ✷ ✷ ✷ ✷ ✷ Error Secondary code Unrecognizable network port Unrecoverable software error in network port Bad checksum while programming port Flash parts failed while programming port 2-42 Service Manual - Lexmark E330 | Service Manual - Page 71
Tray 2, if installed. Remove Tray 2 and recheck. If the error does not recur, replace Tray 2. If the error recurs, replace the controller card assembly Code Tertiary codes 980 981 982 983 984 ✷ Continue Ready ✷ ✷ ✷ ✷ ✷ ✷ Toner Low / Replace PC Kit ✷ Load Paper Paper Jam ✷ ✷ Error - Lexmark E330 | Service Manual - Page 72
59. See "Operator panel service check" on page 2-59. See "Main motor service check" on page 2-58. See "Cooling fan service check" on page 2-48. See "Cold fuser service check" on page 2-47. See "Hot fuser service check" on page 2-56. See "Paper feed service checks" on page 2-61. 2-44 Service Manual - Lexmark E330 | Service Manual - Page 73
Fuser parts melted Fuser lamp doesn't light Toner not fused to the paper Paper jams Main motor noisy or not moving Paper skew Printer not communicating with host Front access cover will not close Operator panel button not responding Operator panel lights are off or very dim Blank page Black page - Lexmark E330 | Service Manual - Page 74
or bent Action See "White or black lines or bands" on page 2-72. See "Toner on back of page" on page 2-72. See "Paper never picks" on page 2-63. See "Paper picks during POST and/or continuously" on page 2-62. See "Paper "trees," wrinkles, stacks poorly or curls" on page 2-65. 2-46 Service Manual - Lexmark E330 | Service Manual - Page 75
diagram" on page 5-4 for more information. Cold fuser service check Make sure the correct voltage lamp is installed. The voltage rating is stamped on one of the lamp contacts. FRU Fuser AC cables LVPS/HVPS Fuser Action If the fuser lamp comes on and a fuser failure light error code displays, be - Lexmark E330 | Service Manual - Page 76
. Note: The fan speed is controlled by a module on the PCB. Between +8 V and +24 V dc are constantly supplied at pin 2 (J19). Pin 1 is ground while pin 3 receives feedback from the fan motor. • If voltage is not present, see "Controller board" on page 5-3 for more information. 2-48 Service Manual - Lexmark E330 | Service Manual - Page 77
off. • Disconnect the LVPS/HVPS cable from the controller card at J7. See "Controller board" on page 5-3 for more information. • Turn the printer on. Verify +24 V dc from the cable connector of J9, pin 8. Verify that pin 7 on both the cable and the card connectors is ground. • If - Lexmark E330 | Service Manual - Page 78
. Note: Settings for U.S. versus non-U.S. and the printer configuration ID can be changed. See "Configuration and diagnostic groups" on page 3-1 for more information. If some lights are on or flashing, see "Common light sequences" on page 2-3 to determine action required. 2-50 Service Manual - Lexmark E330 | Service Manual - Page 79
Cover interlock switch service check Note: Make sure a print cartridge assembly is installed and the cover and 3 are ground. • If voltage or ground is not present, see "Controller card service check" on page 2-49 for more information. Verify discontinuity between pins 2 and 3 whether the door is - Lexmark E330 | Service Manual - Page 80
fuse opens again, see "LVPS/ HVPS service check" on page 2-57 for more information • If not open, unplug the cables at CN102 and CN201 (fuser and controller card respectively). Plug LVPS/HVPS card. See "Controller board" on page 5-3 for more information. Verify grounds. 2-52 Service Manual - Lexmark E330 | Service Manual - Page 81
When toner is partially fused to the paper, it is usually caused by low fuser temperature. Warning: Avoid handling the lamp as much as possible as it is easily broken. Be careful not to touch the glass housing with bare hands because skin acids can weaken the glass. The lamp is not a service part - Lexmark E330 | Service Manual - Page 82
match the line voltage. • If line voltage is not present, see "LVPS/HVPS service check" on page 2-57 for more information. Make sure the fuser thermistor is correctly connected to the controller board. If the problem persists, disconnect the thermistor cable at J15 and check for less than +5 V dc - Lexmark E330 | Service Manual - Page 83
Fuser service check (continued) 4505 FRU Fuser (continued) Action Disconnect the thermistor cable from J15 on the controller card. Measure the resistance across the ends of the thermistor cable. See "Connector locations" on page 5-1 for more information. Replace the fuser assembly if the - Lexmark E330 | Service Manual - Page 84
4505 Hot fuser service check Note: Ensure correct lamp is installed. FRU Fuser AC cables LVPS/HVPS Fuser Action Measure the resistance of the thermistor. The resistance measures from approximately 1K ohms immediately after printing or POR to approximately 240K ohms when thermistor reaches room - Lexmark E330 | Service Manual - Page 85
the printer. Check continuity on the fuses. If either fuse has opened, replace the card. Ensure the switch is off and plug the power cord into . HVPS portion of board Problems with the HVPS are exhibited in the print quality. See "Print quality service checks" on page 2-66 for more information. - Lexmark E330 | Service Manual - Page 86
wire, call next level of service. - If continuity does not exist on one or more of the wires, replace the motor cable. • If these voltages are not correct, see the "LVPS/HVPS service check" on page 2-57 or replace the controller card. Note: The main motor is not a service part. 2-58 Service Manual - Lexmark E330 | Service Manual - Page 87
is plugged in securely. Run POST and check each light for proper operation. Operator panel service check FRU Operator panel Action Buttons Open controller card . If margin errors are unacceptable, corrections can only be made through software. Contact the next level of support or Lexmark at 1-800- - Lexmark E330 | Service Manual - Page 88
• Check for +5 V dc at J16, pin 5 See "Controller card service check" on page 2-49 or page 5-3 for more information. • If these voltages are not correct, replace the controller card. • If these voltages are correct, replace the operator panel. If more than one light does not turn on or an individual - Lexmark E330 | Service Manual - Page 89
check" on page 2-49 for more information. • If voltages are correct, replace the printhead (comes with cables). Paper feed service checks Paper jam error indication during POST FRU Exit sensor Input sensor Input sensor #1 (under print cartridge assembly) and Input sensor #2 (manual) Action If - Lexmark E330 | Service Manual - Page 90
. Replace the ACM clutch assembly if necessary. Check the manual feed clutch for the same damage. Paper picks but stops half way through the printer FRU Input sensor #1 (under print cartridge assembly) and Input sensor #2 (manual) Action Make sure the input sensors are working properly. Check - Lexmark E330 | Service Manual - Page 91
Paper never picks FRU Paper feed (pick tires) 4505 Action Open the left cover and verify the solenoid and clutch are functioning when an attempt is made to feed the paper. Make sure the rubber tires are installed and clean. Replace if necessary. Diagnostic information 2-63 - Lexmark E330 | Service Manual - Page 92
sheets to feed. Do not mix paper types. Check the tires in the ACM assembly for signs of wear or damage. Replace the tires as necessary. Open left cover and observe the solenoid and clutch actions at the ACM and manual feed shafts as a print job is attempted. Replace the faulty part. Disconnect the - Lexmark E330 | Service Manual - Page 93
is set up correctly. 4. If the internal print test page prints correctly, the user Program/printer driver is set up correctly and the correct bidirectional parallel cable is installed, but the printer still fails to print on command from the host computer, replace the controller card. Diagnostic - Lexmark E330 | Service Manual - Page 94
the output bin, the printer returns to the home state (four top lights on). 7. Use the test pages to isolate problems such as light or toner streaks. See "Symptom tables" on page 2-44 for solutions to these problems. 8. To exit print quality test pages, turn the printer off. 2-66 Service Manual - Lexmark E330 | Service Manual - Page 95
and gently shake it to evenly distribute the toner. Check for cartridge damage. Blank pages can be caused by a defective printhead assembly, LVPS/HVPS, or controller card. • Printhead errors typically result in printer service errors. • Blank pages typically are caused by the PC roll not being - Lexmark E330 | Service Manual - Page 96
4505 Black page Note: Incorrect laser exposure or incorrect charging of the photoconductor causes an all black page. Always verify the same results from a different print cartridge assembly and developer before proceeding. FRU Toner electrodes (not a FRU) LVPS/HVPS board Controller card Action - Lexmark E330 | Service Manual - Page 97
toner cartridge and PC Kit are installed correctly, try a new PC Kit first and then toner cartridge. Check the contacts for correct installation and contamination where contact is made between the print cartridge assembly, and LVPS/HVPS board. Clean as necessary. If this does not correct the problem - Lexmark E330 | Service Manual - Page 98
the toner. If toner cartridge is low, try a new one. Make sure recommended paper is being used. Variation in image density horizontally across page FRU PC Kit (not a FRU) Transfer roll Action The charge roll may have an unbalanced pressure against the Photoconductor (PC) drum. Try a new PC Kit - Lexmark E330 | Service Manual - Page 99
the toner to the paper. See"Hot fuser service check" on page 2-56 for more information. Make sure recommended paper is being used. Action Make sure the toner cartridge and PC Kit are installed correctly and that the toner cartridge is not low on toner. If the problem continues, install a new toner - Lexmark E330 | Service Manual - Page 100
in the speed of the paper as it feeds through the printer especially in the developer and transfer process. Inspect the toner cartridge and paper feed components, especially the drive coupler and drive gears for debris, binds or damage. FRU PC Kit (not a FRU) Fuser Transfer roll Action Inspect the - Lexmark E330 | Service Manual - Page 101
Solving print quality problems 4505 Problem Light or blurred characters. Toner smudges appear on the front or back of the page. Action Light print The toner cartridge may be getting low on toner: • Remove the toner cartridge and print cartridge assembly. • Shake it from side to side to - Lexmark E330 | Service Manual - Page 102
paper type in the printer driver. • Change the media texture setting. If the setting is not in your driver, you can download the correct Lexmark setup utility from the Lexmark Web site at www.lexmark.com. • The light does not come on if the standard 1,500 page toner cartridge is installed - Lexmark E330 | Service Manual - Page 103
best quality. • Replace the toner cartridge. • The print cartridge may be out of toner or defective. Replace the cartridge. • You may have a software error. Try turning the printer off and back on. • Check the printhead. See "Paper feed service checks" on page 2-61 for more information. Diagnostic - Lexmark E330 | Service Manual - Page 104
4505 Problem The printer is on, but nothing prints. Toner Low light is on and printing stops. The Error light is on. The Toner Low light is blinking, and the Error light is on. Action • Make sure the toner cartridge assembly is installed properly. • Make sure the parallel or USB cable is not - Lexmark E330 | Service Manual - Page 105
in the media types and sizes chart in the User's Reference). • Remove the paper from Tray 1 and fan the paper. • Make sure Tray 1 is selected from the printer driver. • Do not overfill the tray. • Check the condition of the rubber on the paper feed rolls. • Verify clutch for ACM is not slipping - Lexmark E330 | Service Manual - Page 106
Data and Error lights are blinking). While using manual duplex, the printer gets a paper jam. Action • Clear all jams. • Press and release or open and close the printer cover to restart the printer. • Make sure the print cartridge assembly is installed properly. • Ensure correct printer driver is - Lexmark E330 | Service Manual - Page 107
4505 Transfer roll service check FRU Transfer roll Action Check transfer roll area for debris and clean as necessary. Verify continuity between the spring below the left side bearing - Lexmark E330 | Service Manual - Page 108
4505 2-80 Service Manual - Lexmark E330 | Service Manual - Page 109
user. Generally, the options made available in this menu group are used to configure a printer. page 3-2 for more information. Diagnostic The diagnostic group contains menu settings and operations that are useful in the manufacturing of the printer. It also features other aids in diagnosing problems - Lexmark E330 | Service Manual - Page 110
light is 4. Turn on the printer. Hold the selected button until the lights cycle on the operator panel. 5. Close the cover and wait for the printer to activate the drive. 6. Print menus by pressing and holding until the lights flash (see menu samples on page 3-4 and page 3-5). 3-2 Service Manual - Lexmark E330 | Service Manual - Page 111
settings configuration" on page 3-4 and "Printer diagnostics" on page 3-5, are similar to the instructions printed by following steps 1-6 on page 3-2. These menu items are designated by the non-indented items listed along the left edge of the page. (Bottom as printed from printer.) These items are - Lexmark E330 | Service Manual - Page 112
4505 Printer settings configuration 3-4 Service Manual - Lexmark E330 | Service Manual - Page 113
Printer diagnostics 4505 Diagnostic aids 3-5 - Lexmark E330 | Service Manual - Page 114
selections Utilities Use the Utilities menu to troubleshoot printer problems. Setting Reset Factory Defaults Hex Trace Print Quality Test Pages Use setting to: Values Return the printer settings to factory default values. Sometimes resetting the printer to the original settings solves formatting - Lexmark E330 | Service Manual - Page 115
4505 Setting Reset Photoconductor Counter * Factory default Use setting to: Values Return the photoconductor counter to zero. The replace photoconductor message should be cleared only when the photoconductor kit has been replaced. Setup Use the Setup menu to configure how the printer formats - Lexmark E330 | Service Manual - Page 116
. On-The printer processes raw binary PostScript print jobs from computers using the Macintosh operating system. This setting often causes Windows print jobs to fail. Auto*-The printer processes print jobs from computers using either Windows or Macintosh operating systems. 3-8 Service Manual - Lexmark E330 | Service Manual - Page 117
4505 USB Use the USB menu to change printer settings on jobs sent through a USB port. Menu item NPA Mode MAC Binary PS * Factory default Use setting to: Values Send print jobs to the printer and query printer status information simultaneously. Off On Auto* Configure the printer to process - Lexmark E330 | Service Manual - Page 118
. On-The printer processes raw binary PostScript print jobs from computers using the Macintosh operating system. This setting often causes Windows print jobs to fail. Auto*-The printer processes print jobs from computers using either Windows or Macintosh operating systems. 3-10 Service Manual - Lexmark E330 | Service Manual - Page 119
detect the connection speed of your network. This setting can be disabled to set the speed manually. Values Auto* - the printer detects current network speed. 10Mbps, half duplex- forces the printer to try to connect to the network only at 10Mbps, half duplex. 10Mbps, full duplex- forces - Lexmark E330 | Service Manual - Page 120
pages containing cross lines, printer information and margin settings. Press to stop. Print history of errors. Change sizes and designations to metric. U.S.* Non-U.S. Allow the printer's ID to match the label's ID after the controller card is replaced. 000101* 000189 3-12 Service Manual - Lexmark E330 | Service Manual - Page 121
cable. (Parallel mode 2 only is supported and can be turned off in the error code to the user each time it occurs. The default (modified) internally resets the posting but records it in the crash history. A substantial number of consecutive errors result in posting 976. Modified* Every time Print - Lexmark E330 | Service Manual - Page 122
4505 3-14 Service Manual - Lexmark E330 | Service Manual - Page 123
the toner cartridge and paper tray before removing other printer parts. The toner cartridge should be protected from light while out of the printer. 2. We recommend all external cables be disconnected from the printer to prevent damage during service. 3. Unless otherwise stated, re-install the parts - Lexmark E330 | Service Manual - Page 124
than when the door is fully open. Otherwise, the link extension may cause the cartridge coupler to become dislodged. 5. Carefully lift the cover free from the printer frame. 6. Use your left hand to hold the fuser link at the cover joint while rotating the right side of the cover slightly away - Lexmark E330 | Service Manual - Page 125
the top rear of the cover over the pivot point and drop the cover away from the printer. Rear cover removal (See "Covers" on page 7-2.) 1. Remove the right side cover. See "Right side cover removal" on page 4-3 for more information. 2. Remove the left side cover. See "Left side cover removal" on - Lexmark E330 | Service Manual - Page 126
. Controller card removal (See "Electronics" on page 7-4.) Warning: - Always touch a ground before touching the printer which secure the USB and parallel ports to the metal frame. 5. Remove five screws holding the card to the metal side frame. 6. Carefully lift the card and remove. 4-4 Service Manual - Lexmark E330 | Service Manual - Page 127
drive coupling assembly removal (See "Frame" on page 7-6.) 1. Remove the left side cover. 2. Carefully place the printer on its right side. Protect the cover from marring. 3. Remove four screws in the gear train metal cover. 4. Remove the developer gear, the conical spring, and the coupling assembly - Lexmark E330 | Service Manual - Page 128
Exit sensor removal (on the fuser) (See "Electronics" on page 7-4.) 1. Remove the paper exit guide assembly. See "Paper exit guide assembly removal" on page 4-12 for more information. 2. Remove the controller card cover. See "Controller card removal" on page 4-4 for more information. 3. Unplug the - Lexmark E330 | Service Manual - Page 129
4505 Feed rollers (auto comp tires) removal (See "Frame" on page 7-6.) 1. Remove the paper tray. 2. Remove the toner cartridge. 3. Tilt the printer onto its back. 4. Remove old tires. 5. Ensure the new tires are captured between the rims of the plastic hub. Fuser idle gear links removal (See "Frame" - Lexmark E330 | Service Manual - Page 130
out far enough to expose and disconnect the AC cable connections. 6. Extract the fuser power cable. Fuser removal (See "Electronics" on page 7-4.) 1. Remove the paper exit guide assembly. See "Paper exit guide assembly removal" on page 4-12 for more information. 2. Remove the two screws (one on each - Lexmark E330 | Service Manual - Page 131
place the printer on its top. 5. Using a small shank screwdriver, remove the screw behind the paper pick pivot which holds the paper sensor in place. 6. Remove the sensor and the attached cable, flag, and spring. 7. Re-install the sensor so that the flag is spring loaded against the pages as it - Lexmark E330 | Service Manual - Page 132
the cable is captured and away from the paper path. LVPS / HVPS card assembly removal (See "Electronics" on page 7-4.) 1.Remove the cover extender (if installed) and the rear cover. See "Rear cover removal" on page 4-3 for more information. 2. Place the printer onto its top, with the back and bottom - Lexmark E330 | Service Manual - Page 133
extract the cable. Note: The card may not have to be completely removed to disconnect the cable. Manual feed clutch assembly removal (See "Frame" on page 7-6.) 1. Remove the left side cover. 2. Place the printer on its right side. Protect the cover from being marred. 3. Remove the four screws in the - Lexmark E330 | Service Manual - Page 134
more information. 2. Remove the three screws holding the exit guide. 3. Remove the paper exit guide assembly. Reinstallation note: It may be necessary to rotate the gears to mesh with the fuser and drive gear. Printhead removal (See "Electronics" on page 7-4.) 1. Remove the top cover. See "Top cover - Lexmark E330 | Service Manual - Page 135
. 3. Unsnap the toner level sensor from the frame and remove through the inside of the printer. Transfer roll removal (See "Frame" on page 7-6.) 1. Open the access cover. 2. At the right side of the transfer roll, squeeze the holder arms with the left hand while lifting with the right. Stop when the - Lexmark E330 | Service Manual - Page 136
the cable through the side frame leaving it free at the opening above the LVPS/HVPS. 6.Remove the fuser. See "Fuser removal" on page 4-8 for more information. 7.Extract the cable through the hole and from its retainers. 8.Unplug the cable at the motor and install the new cable. 4-14 Service Manual - Lexmark E330 | Service Manual - Page 137
4505 5. Connector locations Front and rear views Connector locations 5-1 - Lexmark E330 | Service Manual - Page 138
CN102 4505 Power supply board 5-2 Service Manual CN203 CN202 1 CN201 - Lexmark E330 | Service Manual - Page 139
4505 Controller board Connector locations 5-3 - Lexmark E330 | Service Manual - Page 140
Service Manual Toner Cartridge Smart Chip Dr. Blade TAR Developer 12 12 Spade Connector HVPS LVPS CN203 CN202 CN201 123 12 12345678 123 12 12345678 Photoconductor Kit Photoconductor Charge Roller E23X, E33X Wiring Diagram Transfer Roll Manual 88 21 Paper 43 65 Feed MPF Solenoid - Lexmark E330 | Service Manual - Page 141
4505 6. Preventive maintenance The Lexmark E23x, E33x do not require preventive maintenance. Preventive maintenance 6-1 - Lexmark E330 | Service Manual - Page 142
4505 6-2 Service Manual - Lexmark E330 | Service Manual - Page 143
catalog SIMILAR ASSEMBLIES: If two assemblies contain a majority of identical parts, they are shown on the same list. Common parts are shown by one index number. Parts peculiar to one or the other of the assemblies are listed separately and identified by description. • NS: (Not Shown) in the Asm - Lexmark E330 | Service Manual - Page 144
4505 Assembly 1: Covers 7-2 Service Manual - Lexmark E330 | Service Manual - Page 145
7 7 7 7 7 8 8 9 10 10 P/N 56P2079 56P2087 56P2098 56P1821 56P2093 56P2089 56P2090 main (white) Cover, logo plate E332n Cover, logo plate E330 Cover, logo plate E232 Cover, logo plate E230 Cover, logo plate (white) E230 Cover, logo plate (white) E330 Cover, logo plate (white) E232 Cover, logo plate - Lexmark E330 | Service Manual - Page 146
4505 Assembly 2: Electronics 7-4 Service Manual - Lexmark E330 | Service Manual - Page 147
Print assembly, laser/mirror E232 Print assembly, laser/mirror E330/E332n/E234/E234n Print assembly, laser/mirror E230 Fuser assembly, 110 V Fuser assembly, 220 V Fuser assembly, 100 V Sensor, exit Cable assemblies, miscellaneous • Toner sensor • LVPS/HVPS to controller • Main drive motor (E23x/E330 - Lexmark E330 | Service Manual - Page 148
4505 Assembly 3: Frame 7-6 Service Manual - Lexmark E330 | Service Manual - Page 149
9 56P2074 10 56P2648 11 56P2073 12 56P2082 2 Paper feed, rubber tires 1 Springs, front door and ACM 1 Clutch CBM, ACM 1 Link CBM, door-fuser idle gear 1 Clutch CBM, manual feed 2 Rings, plastic snap 1 Coupling assembly, developer drive 1 Latch CBM, access cover Parts catalog - Lexmark E330 | Service Manual - Page 150
4505 Assembly 4: Miscellaneous This page intentionally left blank. 7-8 Service Manual - Lexmark E330 | Service Manual - Page 151
foot (straight) Power cord, Switzerland, 6 foot Power cord, South Africa, 6 foot Power cord, Italy, 6 foot (straight) Power cord, Danish, 6 foot (straight) Power cord, Brazil, 6 foot (straight) Power cord, PRC, 1.77M (straight) Software, Optra Forms Software, Optra Forms director Parts catalog 7-9 - Lexmark E330 | Service Manual - Page 152
4505 7-10 Service Manual - Lexmark E330 | Service Manual - Page 153
utilities 3-6 configuration menus parallel MAC binary PS 3-8, 3-10 mode 2 3-8 NPA mode 3-8, 3-10, 3-11 protocol 3-8 setup auto CR after LF 3-7 auto LF after CR 3-7 USB MAC binary PS 3-9 NPA mode 3-9 utilities Hex Trace 3-6 print quality test pages 3-6 reset factory defaults 3-6 D diagnostic aids - Lexmark E330 | Service Manual - Page 154
2-11 print side two of duplex job 2-13 printer error 2-18 programming engine code 2-17 programming system code 2-17 ready/power saver 2-8 replace photoconductor kit 2-14 service error 2-18 toner cartridge error 2-15 toner cartridge not installed 2-15 toner low 2-14 waiting 2-10 I-2 Service Manual - Lexmark E330 | Service Manual - Page 155
code 2-27 invalid network code 2-28 memory full 2-25 network interface errors 2-24 paper jams as it exits tray 2-20 paper jams as printed job ex- its 2-21 short paper 2-26 unformatted flash 2-27 secondary errors 2-6 service check 2-59 understanding lights 2-3 overview operator panel 1-3 P paper jams - Lexmark E330 | Service Manual - Page 156
67 short paper 2-26 heavy background 2-69 unformatted flash 2-27 image density 2-70 service light print 2-71 information 2-29 partial blank image 2-70 secondary error codes 2-30 poor fusing of image 2-71 secondary light patterns 2-29 toner on back of page 2-72 tertiary error codes 2-31 - Lexmark E330 | Service Manual - Page 157
4505 Part number index P/N Description Page 1038693 Cable, serial, 50 foot (PSO 7-9 11D0330 Power cord, Argentina 7-9 12A2405 Cable, packaged USB 7-9 1329605 1339520 1339528 1339529 1339530 1339531 1339532 1339533 1339534 1339548 Cable, packaged parallel 7-9 Power cord, Spain, 8 foot ( - Lexmark E330 | Service Manual - Page 158
220 V 7-5 Paper feed, rubber tires 7-7 Cover, right 7-3 Cover, legal extender 7-7 Transfer, roll, bearings, gear 7-7 Sensor, input #1 7-5 Sensor, input #2 (manual 7-5 Sensor, exit 7-5 Sensor, cover open 7-5 Print assembly, laser/mirror E330 / E332n 7-5 Print assembly, laser/mirror E230 - Lexmark E330 | Service Manual - Page 159
and ACM 7-3, 7-7 Rings, plastic snap 7-7 Cover, logo plate E234 7-3 Card, controller E230 7-5 Card, controller E232 7-5 Card, controller E330, E234 7-5 Card, controller E332n, E234n 7-5 Software, Optra Forms 7-9 Software, Optra Forms director 7-9 Package assembly, field relocation 7-9 I-7 - Lexmark E330 | Service Manual - Page 160
4505 I-8 Service Manual - Lexmark E330 | Service Manual - Page 161
-
 1
1 -
 2
2 -
 3
3 -
 4
4 -
 5
5 -
 6
6 -
 7
7 -
8
-
9
-
10
-
11
-
12
-
13
-
14
-
15
-
16
-
17
-
18
-
19
-
20
-
21
-
22
-
23
-
24
-
25
-
26
-
27
-
28
-
29
-
30
-
31
-
32
-
33
-
34
-
35
-
36
-
37
-
38
-
39
-
40
-
41
-
42
-
43
-
44
-
45
-
46
-
47
-
48
-
49
-
50
-
51
-
52
-
53
-
54
-
55
-
56
-
57
-
58
-
59
-
60
-
61
-
62
-
63
-
64
-
65
-
66
-
67
-
68
-
69
-
70
-
71
-
72
-
73
-
74
-
75
-
76
-
77
-
78
-
79
-
80
-
81
-
82
-
83
-
84
-
85
-
86
-
87
-
88
-
89
-
90
-
91
-
92
-
93
-
94
-
95
-
96
-
97
-
98
-
99
-
100
-
101
-
102
-
103
-
104
-
105
-
106
-
107
-
108
-
109
-
110
-
111
-
112
-
113
-
114
-
115
-
116
-
117
-
118
-
119
-
120
-
121
-
122
-
123
-
124
-
125
-
126
-
127
-
128
-
129
-
130
-
131
-
132
-
133
-
134
-
135
-
136
-
137
-
138
-
139
-
140
-
141
-
142
-
143
-
144
-
145
-
146
-
147
-
148
-
149
-
150
-
151
-
152
-
153
-
154
-
155
-
156
-
157
-
158
-
159
-
160
-
161
 |
 |

4505-100
4505-200
4505-300
4505-310
4505-400
4505-410
Lexmark ™ E23x, E33x
Lexmark and Lexmark with diamond
design are trademarks of Lexmark
International, Inc., registered in the
United States and/or other countries.
• Table of Contents
• Index
• Safety and Notices
• Trademarks
• Start Diagnostics
Revised: 7/12/05