Lexmark MX810 Quick Reference - Page 24
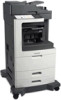
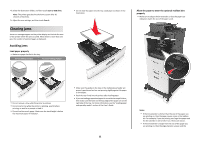
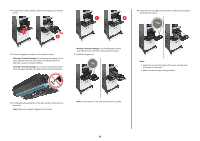
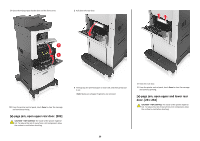
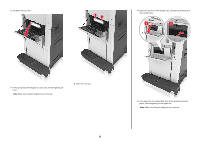
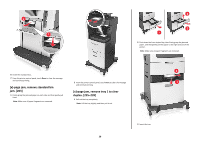
jam, lift front cover to remove, cartridge. [200-201] - imaging unit
 |
View all Lexmark MX810 manuals
Add to My Manuals
Save this manual to your list of manuals |
Page 24 highlights
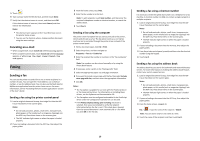
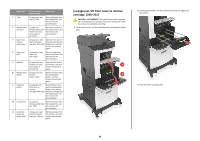
Area name Printer control panel message What to do 3 Trays [x]‑page jam, open tray [x]. [24x] Remove all paper from the standard bin, and then remove the jammed paper. 4 Staple finisher [x]‑page jam, Open the rear door of rear door remove paper, open the staple finisher, and finisher rear door. then remove the Leave paper in jammed paper. bin. [451] 5 Upper door and rear duplex area [x]‑page jam, open upper and lower rear door. [231-234] Open the rear door of the printer and the rear duplex area, and then remove the jammed paper. 6 Upper rear door [x]‑page jam, open upper rear door. [202] Open the upper rear door of the printer, and then remove the jammed paper. 7 Mailbox [x]‑page jam, open mailbox rear door. Leave paper in bin. [4yy.xx] Open the rear door of the mailbox, and then remove the jammed paper. 8 Multipurpose [x]‑page jam, clear Remove all paper from feeder manual the multipurpose feeder. [250] feeder, and then remove the jammed paper. 9 Inside the printer [x]‑page jam, lift front cover to remove cartridge. [200-201] Open the front cover and the multipurpose feeder, then remove the toner cartridge and the imaging unit, and then remove the jammed paper. 10 Standard bin [x]‑page jam, remove standard bin jam. [203] Remove all paper from the standard bin, and then remove the jammed paper. 11 Automatic document feeder (ADF) [x]‑page jam, open automatic feeder top cover. [28y.xx] Remove all paper from the ADF tray, and then remove the jammed paper. [x]‑page jam, lift front cover to remove cartridge. [200-201] CAUTION-HOT SURFACE: The inside of the printer might be hot. To reduce the risk of injury from a hot component, allow the surface to cool before touching. 1 Lift the front cover, and then pull down the multipurpose feeder door. 1 2 2 Lift the green handle, and then pull out the toner cartridge from the printer. 3 Place the toner cartridge aside. 24
-
 1
1 -
2
-
3
-
4
-
5
-
6
-
7
-
8
-
9
-
10
-
11
-
12
-
13
-
14
-
15
-
16
-
17
-
18
-
 19
19 -
 20
20 -
 21
21 -
 22
22 -
 23
23 -
 24
24 -
 25
25 -
 26
26 -
 27
27 -
 28
28 -
 29
29 -
30
-
31
-
32
-
33
 |
 |