Lexmark MX810 Quick Reference - Page 3
Accessing the Embedded Web Server, Customizing the home screen, Understanding the different
 |
View all Lexmark MX810 manuals
Add to My Manuals
Save this manual to your list of manuals |
Page 3 highlights
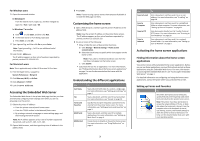
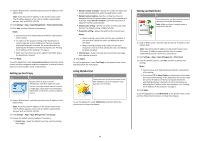
For Windows users 1 Open the command window. In Windows 8 From the Search charm, type run, and then navigate to: Apps list > Run > type cmd > OK In Windows 7 or earlier a Click or click Start, and then click Run. b In the Start Search or Run dialog, type cmd. c Press Enter, or click OK. 2 Type ipconfig, and then click Go or press Enter. Note: Type ipconfig /all to see additional useful information. 3 Look for IP Address. The IP address appears as four sets of numbers separated by periods, such as 123.123.123.123. For Macintosh users Note: This is applicable only in Mac OS X version 10.5 or later. 1 From the Apple menu, navigate to: System Preferences > Network 2 Click Ethernet, Wi‑Fi, or AirPort. 3 Click Advanced > TCP/IP. 4 Look for IPv4 Address. Accessing the Embedded Web Server The Embedded Web Server is the printer Web page that lets you view and remotely configure printer settings even when you are not physically near the printer. 1 Obtain the printer IP address: • From the printer control panel home screen • From the TCP/IP section in the Network/Ports menu • By printing a network setup page or menu settings page, and then finding the TCP/IP section Note: An IP address appears as four sets of numbers separated by periods, such as 123.123.123.123. 2 Open a Web browser, and then type the printer IP address in the address field. 3 Press Enter. Note: If you are using a proxy server, then temporarily disable it to load the Web page correctly. Customizing the home screen 1 Open a Web browser, and then type the printer IP address in the address field. Note: View the printer IP address on the printer home screen. The IP address appears as four sets of numbers separated by periods, such as 123.123.123.123. 2 Do one or more of the following: • Show or hide the icons of basic printer functions. a Click Settings > General Settings > Home screen customization. b Select the check boxes to specify which icons appear on the home screen. Note: If you clear a check box beside an icon, then the icon does not appear on the home screen. c Click Submit. • Customize the icon for an application. For more information, see "Finding information about the home screen applications" on page 3 or see the documentation that came with the application. Understanding the different applications Use Card Copy Fax Forms and Favorites Multi Send MyShortcut To Scan and print both sides of a card on a single page. For more information, see "Setting up Card Copy" on page 4. Scan a document, and then send it to a fax number. For more information, see "Faxing" on page 19. Quickly find and print frequently used online forms directly from the printer home screen. For more information, see "Setting up Forms and Favorites" on page 3. Scan a document, and then send it to multiple destinations. For more information, see "Setting up Multi Send" on page 4. Create shortcuts directly on the printer home screen. For more information, see "Using MyShortcut" on page 4. 3 Use Scan to E‑mail Scan to Computer Scan to FTP Scan to Network To Scan a document, and then send it to an e‑mail address. For more information, see "E-mailing" on page 18. Scan a document, and then save it to a predefined folder on a host computer. For more information, see "Setting up Scan to Computer" on page 21. Scan documents directly to a File Transfer Protocol (FTP) server. For more information, see "Scanning to an FTP address" on page 20. Scan a document, and then send it to a network shared folder. For more information, see "Setting up Scan to Network" on page 5. Activating the home screen applications Finding information about the home screen applications Your printer comes with preinstalled home screen applications. Before you can use these applications, you must first activate and set up these applications using the Embedded Web Server. For more information on accessing the Embedded Web Server, see "Accessing the Embedded Web Server" on page 3. For detailed information on configuring and using the home screen applications, contact the place where you purchased the printer. Setting up Forms and Favorites Use To Streamline work processes by letting you quickly find and print frequently used online forms directly from the printer home screen. Note: The printer must have permission to access the network folder, FTP site, or Web site where the bookmark is stored. From the computer where the bookmark is stored, use sharing, security, and firewall settings to allow the printer at least a read access. For help, see the documentation that came with your operating system.
-
 1
1 -
 2
2 -
 3
3 -
 4
4 -
 5
5 -
 6
6 -
 7
7 -
 8
8 -
 9
9 -
10
-
11
-
12
-
13
-
14
-
15
-
16
-
17
-
18
-
19
-
20
-
21
-
22
-
23
-
24
-
25
-
26
-
27
-
28
-
29
-
30
-
31
-
32
-
33
 |
 |