Lexmark T642 User's Guide - Page 111
Toner Darkness, Brightness, Contrast, Print Resolution, - ink cartridges
 |
UPC - 734646722001
View all Lexmark T642 manuals
Add to My Manuals
Save this manual to your list of manuals |
Page 111 highlights
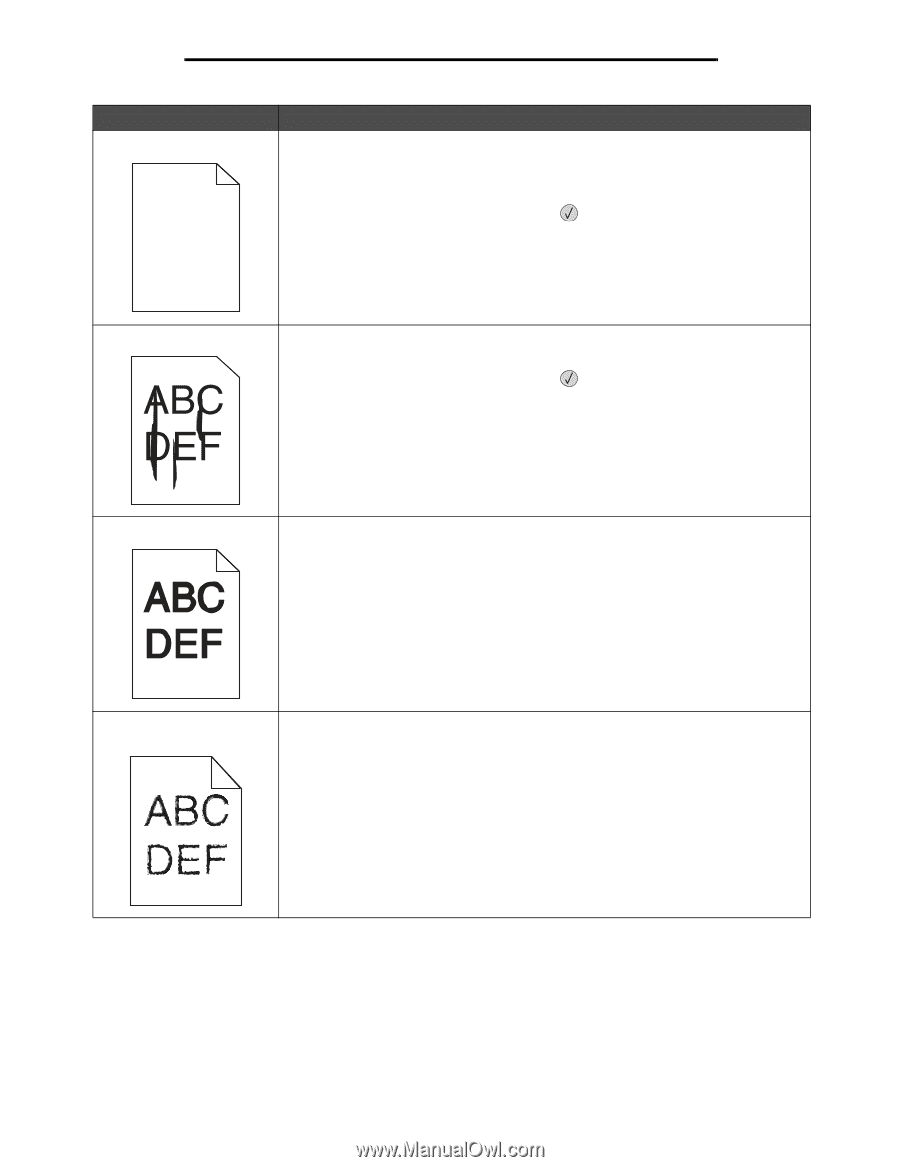
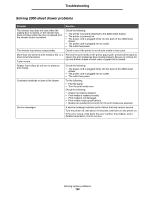
Troubleshooting Problem Entire page is white. Action • Make sure the packaging material is removed from the print cartridge. • Check the print cartridge to be sure it is installed correctly. • The toner may be low. To utilize the remaining toner, remove the cartridge by gripping the handles with both hands. With the cartridge arrows pointing downward, firmly shake the print cartridge side-to-side and front-to-back several times to redistribute the toner. Reinstall the cartridge and then press . Repeat this procedure multiple times until the print remains faded. When the print remains faded replace the print cartridge. Streaks appear on the page. • The toner may be low. To utilize the remaining toner, remove the cartridge by gripping the handles with both hands. With the cartridge arrows pointing downward, firmly shake the print cartridge side-to-side and front-to-back several times to redistribute the toner. Reinstall the cartridge and then press . Repeat this procedure multiple times until the print remains faded. When the print remains faded replace the print cartridge. • If you are using preprinted forms, make sure the ink can withstand temperatures of 230°C (446°F). Printing is too dark. • Change the Toner Darkness setting in the Quality menu. • Change the Brightness setting in the Quality menu. • Change the Contrast setting in the Quality menu. Note: Macintosh computer users should make sure the lines per inch (lpi) setting is not set too high in the software application. Characters have jagged or uneven edges. • Change the Print Resolution setting in the Quality menu to 600 dpi, 1200 Image Q, 1200 dpi, or 2400 Image Q. • Enable Enhance Fine Lines. See the tables on page 113 for more settings information. • If you are using downloaded fonts, verify the fonts are supported by the printer, the host computer, and the software application. Solving print quality problems 111
-
 1
1 -
2
-
3
-
4
-
5
-
6
-
7
-
8
-
9
-
10
-
11
-
12
-
13
-
14
-
15
-
16
-
17
-
18
-
19
-
20
-
21
-
22
-
23
-
24
-
25
-
26
-
27
-
28
-
29
-
30
-
31
-
32
-
33
-
34
-
35
-
36
-
37
-
38
-
39
-
40
-
41
-
42
-
43
-
44
-
45
-
46
-
47
-
48
-
49
-
50
-
51
-
52
-
53
-
54
-
55
-
56
-
57
-
58
-
59
-
60
-
61
-
62
-
63
-
64
-
65
-
66
-
67
-
68
-
69
-
70
-
71
-
72
-
73
-
74
-
75
-
76
-
77
-
78
-
79
-
80
-
81
-
82
-
83
-
84
-
85
-
86
-
87
-
88
-
89
-
90
-
91
-
92
-
93
-
94
-
95
-
96
-
97
-
98
-
99
-
100
-
101
-
102
-
103
-
104
-
105
-
 106
106 -
 107
107 -
 108
108 -
 109
109 -
 110
110 -
 111
111 -
 112
112 -
 113
113 -
 114
114 -
 115
115 -
 116
116 -
117
-
118
-
119
-
120
-
121
-
122
-
123
-
124
-
125
 |
 |