Lexmark T642 User's Guide - Page 86
the jam, and make sure the stack of print media is neat and aligned., Elevator button
 |
UPC - 734646722001
View all Lexmark T642 manuals
Add to My Manuals
Save this manual to your list of manuals |
Page 86 highlights
Clearing jams 3 Open any optional trays beginning at the top, and remove any jammed media. Pull the print media either up or down. If it does not pull easily one way, try the other way. 4 If you have an optional 2000-sheet feeder, open the front door, press the elevator button to lower the tray, remove the jam, and make sure the stack of print media is neat and aligned. 5 Press . Elevator button Clearing printer jams 86
-
 1
1 -
2
-
3
-
4
-
5
-
6
-
7
-
8
-
9
-
10
-
11
-
12
-
13
-
14
-
15
-
16
-
17
-
18
-
19
-
20
-
21
-
22
-
23
-
24
-
25
-
26
-
27
-
28
-
29
-
30
-
31
-
32
-
33
-
34
-
35
-
36
-
37
-
38
-
39
-
40
-
41
-
42
-
43
-
44
-
45
-
46
-
47
-
48
-
49
-
50
-
51
-
52
-
53
-
54
-
55
-
56
-
57
-
58
-
59
-
60
-
61
-
62
-
63
-
64
-
65
-
66
-
67
-
68
-
69
-
70
-
71
-
72
-
73
-
74
-
75
-
76
-
77
-
78
-
79
-
80
-
 81
81 -
 82
82 -
 83
83 -
 84
84 -
 85
85 -
 86
86 -
 87
87 -
 88
88 -
 89
89 -
 90
90 -
 91
91 -
92
-
93
-
94
-
95
-
96
-
97
-
98
-
99
-
100
-
101
-
102
-
103
-
104
-
105
-
106
-
107
-
108
-
109
-
110
-
111
-
112
-
113
-
114
-
115
-
116
-
117
-
118
-
119
-
120
-
121
-
122
-
123
-
124
-
125
 |
 |

Clearing printer jams
86
Clearing jams
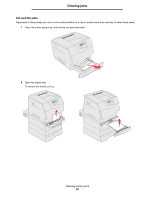
3
Open any optional trays beginning at the top, and remove any jammed media.
Pull the print media either up or down. If it does not pull easily one way, try the other way.
4
If you have an optional 2000-sheet feeder, open the front door, press the elevator button to lower the tray, remove
the jam, and make sure the stack of print media is neat and aligned.
5
Press
.
Elevator button