Nikon Coolpix S1 User Manual - Page 62
Printing Via Direct USB Connection, Mass storage
 |
UPC - 410000220092
View all Nikon Coolpix S1 manuals
Add to My Manuals
Save this manual to your list of manuals |
Page 62 highlights
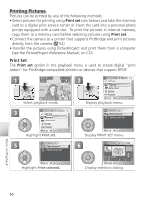
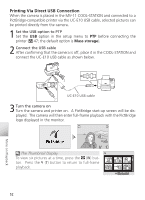
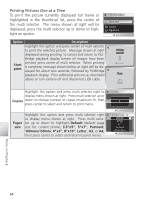
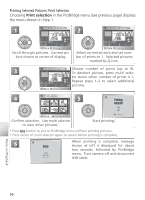
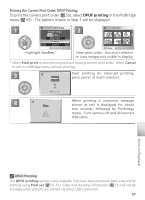
Printing Via Direct USB Connection When the camera is placed in the MV-11 COOL-STATION and connected to a PictBridge-compatible printer via the UC-E10 USB cable, selected pictures can be printed directly from the camera. 1 Set the USB option to PTP Set the USB option in the setup menu to PTP before connecting the printer ( 47; the default option is Mass storage). 2 Connect the USB cable After confirming that the camera is off, place it in the COOL-STATION and connect the UC-E10 USB cable as shown below. More on Playback UC-E10 USB cable 3 Turn the camera on Turn the camera and printer on. A PictBridge start-up screen will be displayed. The camera will then enter full-frame playback with the PictBridge logo displayed in the monitor. 1/ 1 The Thumbnail Display To view six pictures at a time, press the (W) button. Press the (T) button to return to full-frame playback. Start print 52
-
 1
1 -
2
-
3
-
4
-
5
-
6
-
7
-
8
-
9
-
10
-
11
-
12
-
13
-
14
-
15
-
16
-
17
-
18
-
19
-
20
-
21
-
22
-
23
-
24
-
25
-
26
-
27
-
28
-
29
-
30
-
31
-
32
-
33
-
34
-
35
-
36
-
37
-
38
-
39
-
40
-
41
-
42
-
43
-
44
-
45
-
46
-
47
-
48
-
49
-
50
-
51
-
52
-
53
-
54
-
55
-
56
-
 57
57 -
 58
58 -
 59
59 -
 60
60 -
 61
61 -
 62
62 -
 63
63 -
 64
64 -
 65
65 -
 66
66 -
 67
67 -
68
-
69
-
70
-
71
-
72
-
73
-
74
-
75
-
76
-
77
-
78
-
79
-
80
-
81
-
82
-
83
-
84
-
85
-
86
-
87
-
88
-
89
-
90
-
91
-
92
-
93
-
94
-
95
-
96
-
97
-
98
-
99
-
100
-
101
-
102
-
103
-
104
-
105
-
106
-
107
-
108
-
109
-
110
 |
 |
