Olympus SP-610UZ SP-610UZ Instruction Manual (English) - Page 58
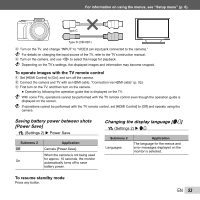
To cancel printing, When the message [Remove USB Cable] is
 |
View all Olympus SP-610UZ manuals
Add to My Manuals
Save this manual to your list of manuals |
Page 58 highlights
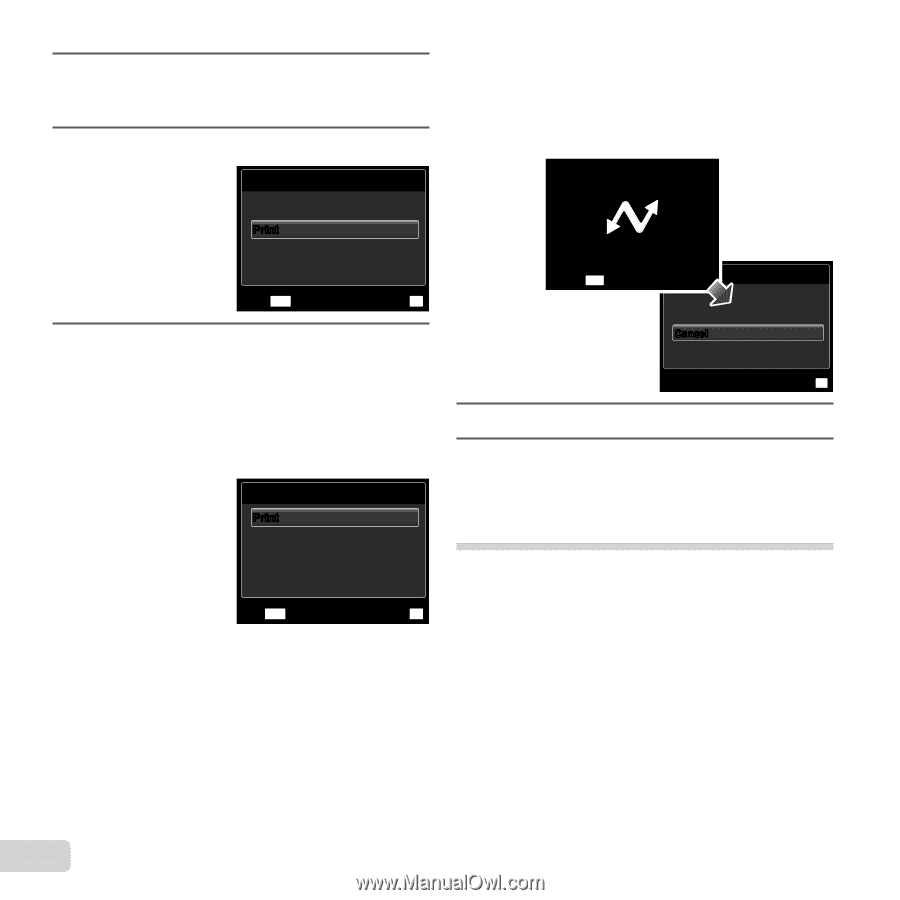
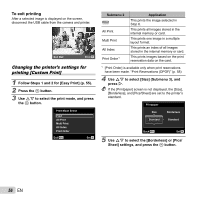
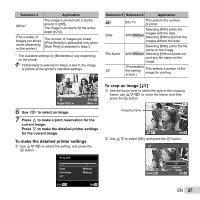
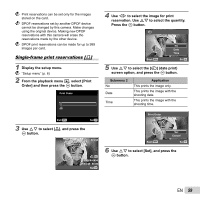
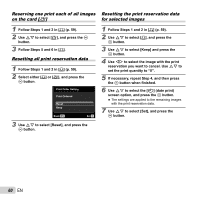
8 If necessary, repeat Steps 6 and 7 to select the image to be printed, make the detailed settings, and set [Single Print]. 9 Press the A button. Print To cancel printing 1 Press the m button while [Do Not Remove USB Cable] is displayed. 2 Select [Cancel] using FG and then press the A button. Print Cancel Back MENU Set OK 10 Use FG to select [Print], and press the A button. ● Printing starts. ● When [Option Set] is selected in [All Print] mode, [Print Info] screen is displayed. ● When printing is finished, the [Print Mode Select] screen is displayed. Print Mode Select Print All Print Multi Print All Index Print Order Exit MENU Set OK Do Not Remove USB Cable Cancel MENU Print Continue Cancel Set OK 11 Press the m button. 12 When the message [Remove USB Cable] is displayed, disconnect the USB cable from the camera and printer. Print Reservations (DPOF*1) In print reservations, the number of prints and date imprint option are saved in the image on the card. This enables easy printing at a printer or print shop supporting DPOF by using only the print reservations on the card without a computer or a camera. *1 DPOF is a standard for storing automatic printout information from digital cameras. 58 EN
-
 1
1 -
2
-
3
-
4
-
5
-
6
-
7
-
8
-
9
-
10
-
11
-
12
-
13
-
14
-
15
-
16
-
17
-
18
-
19
-
20
-
21
-
22
-
23
-
24
-
25
-
26
-
27
-
28
-
29
-
30
-
31
-
32
-
33
-
34
-
35
-
36
-
37
-
38
-
39
-
40
-
41
-
42
-
43
-
44
-
45
-
46
-
47
-
48
-
49
-
50
-
51
-
52
-
 53
53 -
 54
54 -
 55
55 -
 56
56 -
 57
57 -
 58
58 -
 59
59 -
 60
60 -
 61
61 -
 62
62 -
 63
63 -
64
-
65
-
66
-
67
-
68
-
69
-
70
-
71
-
72
-
73
-
74
-
75
-
76
-
77
-
78
-
79
-
80
-
81
-
82
-
83
-
84
 |
 |