Panasonic 55 Professional Display for Entry-Level Digital Signage Operating In - Page 42
Saving profiles
 |
View all Panasonic 55 Professional Display for Entry-Level Digital Signage manuals
Add to My Manuals
Save this manual to your list of manuals |
Page 42 highlights
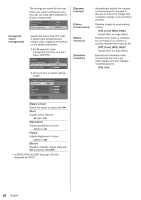
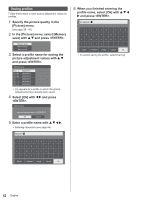
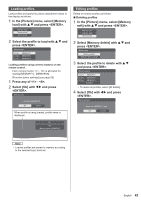
Saving profiles Follow these steps to save picture adjustment values as profiles. 1 Specify the picture quality in the [Picture] menu. (see page 38 - 40) 2 In the [Picture] menu, select [Memory save] with and press . Memory save Memory load Memory edit 3 Select a profile name for saving the picture adjustment values with and press . Memory save 1. [ ] 2. [ ] 3. [ ] 4. [ ] 5. [ ] 6. [ ] MEMORY1 MEMORY2 MEMORY3 MEMORY4 MEMORY5 MEMORY6 ● [*] appears for a profile in which the picture adjustments have already been saved. 4 Select [Ok] with . and press Memory save Save the adjusted value in "MEMORY1" Ok Cancel 5 Enter a profile name with . ● Entering characters (see page 95) MEMORY1█ 1234567890 abcde f gh i j k l mn o p q r s t u vwx y z . -_ Delete All delete a/A/@ Cancel Ok 6 When you finished entering the profile name, select [Ok] with and press . MY MEMORY1█ 1234567890 abcde f gh i j k l mn o p q r s t u vwx y z . -_ Delete All delete a/A/@ Cancel Ok ● To cancel saving the profile, select [Cancel]. 42 English
-
 1
1 -
2
-
3
-
4
-
5
-
6
-
7
-
8
-
9
-
10
-
11
-
12
-
13
-
14
-
15
-
16
-
17
-
18
-
19
-
20
-
21
-
22
-
23
-
24
-
25
-
26
-
27
-
28
-
29
-
30
-
31
-
32
-
33
-
34
-
35
-
36
-
 37
37 -
 38
38 -
 39
39 -
 40
40 -
 41
41 -
 42
42 -
 43
43 -
 44
44 -
 45
45 -
 46
46 -
 47
47 -
48
-
49
-
50
-
51
-
52
-
53
-
54
-
55
-
56
-
57
-
58
-
59
-
60
-
61
-
62
-
63
-
64
-
65
-
66
-
67
-
68
-
69
-
70
-
71
-
72
-
73
-
74
-
75
-
76
-
77
-
78
-
79
-
80
-
81
-
82
-
83
-
84
-
85
-
86
-
87
-
88
-
89
-
90
-
91
-
92
-
93
-
94
-
95
-
96
-
97
-
98
-
99
-
100
-
101
-
102
-
103
-
104
-
105
-
106
-
107
-
108
 |
 |
