Panasonic HDC-SX5 Hd Video Camera - Multi Language - Page 105
Connecting with the component cable supplied and the AV, cable supplied, COMPONENT OUT] desired
 |
UPC - 037988255771
View all Panasonic HDC-SX5 manuals
Add to My Manuals
Save this manual to your list of manuals |
Page 105 highlights
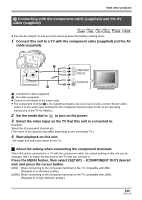
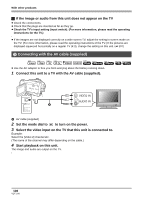
With other products 2 Connecting with the component cable (supplied) and the AV cable (supplied) ̝̙ ̝̙ ̝̙ ̝̙ VIDEO PHOTO ≥ Use the AC adaptor to free you from worrying about the battery running down. 1 Connect this unit to a TV with the component cable (supplied) and the AV cable (supplied). A Component cable (supplied) B AV cable (supplied) ≥ Connect to terminals of the same color. ≥ The component terminal C is for outputting images only so be sure to also connect the AV cable. (Insert it in the audio input terminal for the component terminal input. Refer to the operating instructions of the TV for details.) 2 Set the mode dial to to turn on the power. 3 Select the video input on the TV that this unit is connected to. Example: Select the [Component] channel etc. (The name of the channel may differ depending on the connected TV.) 4 Start playback on this unit. The image and audio are output on the TV. ª About the setting when connecting the component terminals When this unit is connected to a TV with the component cable, the output setting on this unit can be changed. Set it to match the terminal on the TV that you connect to. Press the MENU button, then select [SETUP] > [COMPONENT OUT] desired item and press the cursor button. [480i]: When connecting to the component terminal on the TV compatible with 480i. (Playback is in standard quality.) [1080i]: When connecting to the component terminal on the TV compatible with 1080i. (Playback is in high definition quality.) 105 VQT1J42
-
 1
1 -
2
-
3
-
4
-
5
-
6
-
7
-
8
-
9
-
10
-
11
-
12
-
13
-
14
-
15
-
16
-
17
-
18
-
19
-
20
-
21
-
22
-
23
-
24
-
25
-
26
-
27
-
28
-
29
-
30
-
31
-
32
-
33
-
34
-
35
-
36
-
37
-
38
-
39
-
40
-
41
-
42
-
43
-
44
-
45
-
46
-
47
-
48
-
49
-
50
-
51
-
52
-
53
-
54
-
55
-
56
-
57
-
58
-
59
-
60
-
61
-
62
-
63
-
64
-
65
-
66
-
67
-
68
-
69
-
70
-
71
-
72
-
73
-
74
-
75
-
76
-
77
-
78
-
79
-
80
-
81
-
82
-
83
-
84
-
85
-
86
-
87
-
88
-
89
-
90
-
91
-
92
-
93
-
94
-
95
-
96
-
97
-
98
-
99
-
 100
100 -
 101
101 -
 102
102 -
 103
103 -
 104
104 -
 105
105 -
 106
106 -
 107
107 -
 108
108 -
 109
109 -
 110
110 -
111
-
112
-
113
-
114
-
115
-
116
-
117
-
118
-
119
-
120
-
121
-
122
-
123
-
124
-
125
-
126
-
127
-
128
-
129
-
130
-
131
-
132
-
133
-
134
-
135
-
136
-
137
-
138
-
139
-
140
-
141
-
142
-
143
-
144
-
145
-
146
-
147
-
148
-
149
-
150
-
151
-
152
-
153
-
154
-
155
-
156
-
157
-
158
-
159
-
160
-
161
-
162
-
163
-
164
-
165
-
166
-
167
-
168
-
169
-
170
-
171
-
172
 |
 |
