Panasonic HDC-SX5 Hd Video Camera - Multi Language - Page 49
Adjusting LCD monitor/viewfinder, LCD SET] or
 |
UPC - 037988255771
View all Panasonic HDC-SX5 manuals
Add to My Manuals
Save this manual to your list of manuals |
Page 49 highlights
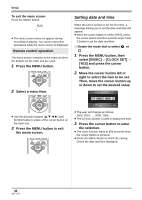
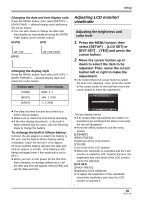
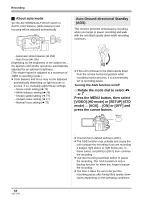
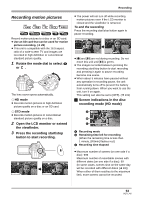
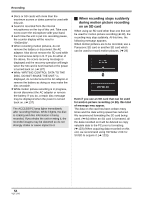
Setup Changing the date and time display style Press the MENU button, then select [SETUP] # [DATE/TIME] # desired display style and press the cursor button. ≥ You can also show or change the date and time display by repeatedly pressing the DATE/ TIME button on the remote control. [DATE] [D/T] JAN 1 2008 [OFF] JAN 1 2008 12:34PM Changing the display style Press the MENU button, then select [SETUP] # [DATE FORMAT] # desired display style and press the cursor button. Display style Screen display [Y/M/D] 2008. 1. 1 [M/D/Y] JAN 1 2008 [D/M/Y] 1. 1.2008 Adjusting LCD monitor/ viewfinder Adjusting the brightness and color level 1 Press the MENU button, then select [SETUP] # [LCD SET] or [EVF SET] # [YES] and press the cursor button. 2 Move the cursor button up or down to select the item to be adjusted. Then, move the cursor button left or right to make the adjustment. ≥ (HD mode) Move the cursor button to select the item to be adjusted. Then, press the center of the cursor button to set and then move the cursor button to make the adjustment. ≥ The date and time function are driven by a built-in lithium battery. ≥ Make sure to check the time before recording. ≥ If the time display becomes [- -], the built-in lithium battery has run down. Use the following steps to charge the battery. To recharge the built-in lithium battery: Connect the AC adaptor or attach the battery to the unit, and the built-in lithium battery will be recharged. Leave the unit as it is for approx. 24 hours and the battery will save the date and time for approx. 6 months. (The battery is still being recharged even if the mode dial is set to OFF.) ≥ When you turn on the power for the first time after charging, a message asking you to set the date and time will appear. Select [YES] and set the date and time. The bar display moves. ≥ (HD mode) After adjustments are made if no operations are performed for about 2 seconds, the bar will disappear. ≥ Press the MENU button to exit the menu screen. [LCD SET] [BRIGHTNESS]: Brightness of the LCD monitor [COLOR]: Color level of the LCD monitor ≥ When the viewfinder is extended and the LCD monitor is rotated by 180° towards the lens, the brightness and color level of the LCD monitor cannot be adjusted. [EVF SET] [BRIGHTNESS]: Brightness of the viewfinder ≥ To adjust the brightness of the viewfinder, extend the viewfinder and close the LCD monitor to activate it. 49 VQT1J42
-
 1
1 -
2
-
3
-
4
-
5
-
6
-
7
-
8
-
9
-
10
-
11
-
12
-
13
-
14
-
15
-
16
-
17
-
18
-
19
-
20
-
21
-
22
-
23
-
24
-
25
-
26
-
27
-
28
-
29
-
30
-
31
-
32
-
33
-
34
-
35
-
36
-
37
-
38
-
39
-
40
-
41
-
42
-
43
-
 44
44 -
 45
45 -
 46
46 -
 47
47 -
 48
48 -
 49
49 -
 50
50 -
 51
51 -
 52
52 -
 53
53 -
 54
54 -
55
-
56
-
57
-
58
-
59
-
60
-
61
-
62
-
63
-
64
-
65
-
66
-
67
-
68
-
69
-
70
-
71
-
72
-
73
-
74
-
75
-
76
-
77
-
78
-
79
-
80
-
81
-
82
-
83
-
84
-
85
-
86
-
87
-
88
-
89
-
90
-
91
-
92
-
93
-
94
-
95
-
96
-
97
-
98
-
99
-
100
-
101
-
102
-
103
-
104
-
105
-
106
-
107
-
108
-
109
-
110
-
111
-
112
-
113
-
114
-
115
-
116
-
117
-
118
-
119
-
120
-
121
-
122
-
123
-
124
-
125
-
126
-
127
-
128
-
129
-
130
-
131
-
132
-
133
-
134
-
135
-
136
-
137
-
138
-
139
-
140
-
141
-
142
-
143
-
144
-
145
-
146
-
147
-
148
-
149
-
150
-
151
-
152
-
153
-
154
-
155
-
156
-
157
-
158
-
159
-
160
-
161
-
162
-
163
-
164
-
165
-
166
-
167
-
168
-
169
-
170
-
171
-
172
 |
 |
