Panasonic PT52LCX66 Service Manual - Page 40
Power P.C.B., Power PCB Mount Metal, spacer, C1810, High voltage, generated., approx. 400 V - pt 52lcx66 parts
 |
View all Panasonic PT52LCX66 manuals
Add to My Manuals
Save this manual to your list of manuals |
Page 40 highlights
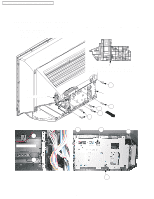
PT-52LCX66 / PT-56LCX66 / PT-61LCX66 / PT-52LCX16 / PT-56LCX16 2) Remove the Power P.C.B. by removing the 5 Screws (479) and release from the spacer. 479 479 479 479 479 Power P.C.B. spacer Power PCB Mount Metal Fig. D4-2 CAUTION: High voltage exists on the Power P.C.B. While removing Power P.C.B., do not touch any parts on the board. Hold the edge of the board when removing it. C1810: High voltage generated. (approx. 400 V) 40
-
 1
1 -
2
-
3
-
4
-
5
-
6
-
7
-
8
-
9
-
10
-
11
-
12
-
13
-
14
-
15
-
16
-
17
-
18
-
19
-
20
-
21
-
22
-
23
-
24
-
25
-
26
-
27
-
28
-
29
-
30
-
31
-
32
-
33
-
34
-
 35
35 -
 36
36 -
 37
37 -
 38
38 -
 39
39 -
 40
40 -
 41
41 -
 42
42 -
 43
43 -
 44
44 -
 45
45 -
46
-
47
-
48
-
49
-
50
-
51
-
52
-
53
-
54
-
55
-
56
-
57
-
58
-
59
-
60
-
61
-
62
-
63
-
64
-
65
-
66
-
67
-
68
-
69
-
70
-
71
-
72
-
73
-
74
-
75
-
76
-
77
-
78
-
79
-
80
-
81
-
82
-
83
 |
 |

Fig. D4-2
2)
Remove the Power P.C.B. by removing the 5 Screws (479) and release from the spacer.
479
479
479
479
479
Power P.C.B.
Power PCB Mount Metal
spacer
C1810:
High voltage
generated.
(approx. 400 V)
High voltage exists on the Power P.C.B. While removing Power P.C.B., do not touch any
parts on the board. Hold the edge of the board when removing it.
CAUTION:
PT-52LCX66 / PT-56LCX66 / PT-61LCX66 / PT-52LCX16 / PT-56LCX16
40