Panasonic PT52LCX66 Service Manual - Page 47
Measurements and Adjustments - pt 52lcx66 won t turn on
 |
View all Panasonic PT52LCX66 manuals
Add to My Manuals
Save this manual to your list of manuals |
Page 47 highlights
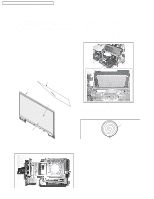
9 Measurements and Adjustments 9.1. Adjustment Procedures 1 PT-52LCX66 / PT-56LCX66 / PT-61LCX66 / PT-52LCX16 / PT-56LCX16 WHEN INSTALLING THE PROJECTION UNIT OR THE BASE BODY UNIT INTO THE UNIT AT THE USER'S LOCATION: The following ADJUSTMENT of the Projection Unit must be performed. a. Focus Adjustment Note: The Focus Adjustment is not normally necessary when reinstalling. However, the Focus Adjustment should be performed when replacing the new Projection Unit or new Base Body Unit. b. Mechanical Picture Position Adjustment c. Electrical Picture Position Adjustment Adjustment Preparation: 1. Install all parts except the Front Cover Unit Then, remove the Optical Cover by removing the Screw and 2 latch tabs. Optical Cover Screw C-COR/GAM/W-BAL PUSH RECALL(VCR) WORK MODE Fig. M1-2 4. Press the VCR key to go to VCR mode, then the RECALL key on the remote for more than 1 second. "FACTORY ADJUST" will appear on the screen. FACTORY ADJUST M:1.020 I:10 VIDEO ADJ SOUND FAN OTHER PARTIAL DT BOARD 1/1 DEFAULT SET F:11 00 00 00 Fig. M1-3 5. Press the TV key to return to TV mode, then press the CH UP/DOWN key on the remote to select "OTHER" on menu and press the OK key. "OTHER" menu will appear. *** Other YMAX 0000 1/1 OPT HPOSI F6 OPT VPOSI 02 FILTER DET 60 LCD EEP STATE 71FD CEC THEATER LINK ON GC:06030301 Projection Unit (With Front Cover Unit and Optical Cover removed) Fig. M1-1 (OTHER menu 1/1) Fig. M1-4 6. Press the VOLUME UP/DOWN key on the remote. (Focus screen will appear.) Note: When the rear cover is disassembled, the screen can be moved back and forth, which could affect the video display vertical position. This could also cause the vertical adjust to be at or near its limit. Only try the picture position adjustment with the rear cover assembled! 2. Turn the power on. 3. Press and hold the VOLUME DOWN button on the unit and the RECALL key on the remote for more than 5 seconds in power on condition. "WORK MODE" will appear on the screen. OPT OPT HPOSI VPOSI F6 02 To release this mode: 1. After completing the ADJUSTMENT, press the CH UP/ DOWN key on the remote to return to the OTHER menu. 2. Press RECALL key twice to return to Work Mode, and press and hold the VOLUME DOWN button on the unit and the RECALL key on the remote for more than 5 seconds. Or, turn off the power. 3. Install the Optical Cover with the Screw and the Front Cover Unit. 47
-
 1
1 -
2
-
3
-
4
-
5
-
6
-
7
-
8
-
9
-
10
-
11
-
12
-
13
-
14
-
15
-
16
-
17
-
18
-
19
-
20
-
21
-
22
-
23
-
24
-
25
-
26
-
27
-
28
-
29
-
30
-
31
-
32
-
33
-
34
-
35
-
36
-
37
-
38
-
39
-
40
-
41
-
 42
42 -
 43
43 -
 44
44 -
 45
45 -
 46
46 -
 47
47 -
 48
48 -
 49
49 -
 50
50 -
 51
51 -
 52
52 -
53
-
54
-
55
-
56
-
57
-
58
-
59
-
60
-
61
-
62
-
63
-
64
-
65
-
66
-
67
-
68
-
69
-
70
-
71
-
72
-
73
-
74
-
75
-
76
-
77
-
78
-
79
-
80
-
81
-
82
-
83
 |
 |
