Panasonic PT52LCX66 Service Manual - Page 48
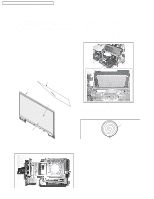
Mechanical Picture Position Adjustment Tilt, Focus Adjustment
 |
View all Panasonic PT52LCX66 manuals
Add to My Manuals
Save this manual to your list of manuals |
Page 48 highlights
PT-52LCX66 / PT-56LCX66 / PT-61LCX66 / PT-52LCX16 / PT-56LCX16 a. Focus Adjustment 1) Confirm that each of the pixels in the nine portions are clearly visible. b. Mechanical Picture Position Adjustment (Tilt) 1) Loosen the 4 Screws on the Projection Unit. OPT OPT HPOSI VPOSI F6 02 Screw Screw Twist Twist Screw Screw 2) If not, loosen the Knob on the Projection Lens until the Knob can be moved. Tighten Knob Loosen Fig. M1-5 2) Adjust the Projection Lens by twisting so that the long line "g" and the long line "h" are within 4 dots. (The long line "g" and the long line "h" will be almost aligned horizontally.) OPT OPT HPOSI VPOSI F6 02 Up "G" "H" long line "g" long line "h" Down Fig. M1-6 3) Adjust the Knob by moving up or down so that each of the pixels in the nine portions is clearly visible to obtain the best focus. 4) Tighten the Knob. "G" within 4 dots "H" Note: If the Projection Lens is twisted left, the Focus Screen twists left. If the Projection Lens is twisted right, the Focus Screen twists right. 3) Tighten the 4 Screws while fixing the Projection Lens. 48
-
 1
1 -
2
-
3
-
4
-
5
-
6
-
7
-
8
-
9
-
10
-
11
-
12
-
13
-
14
-
15
-
16
-
17
-
18
-
19
-
20
-
21
-
22
-
23
-
24
-
25
-
26
-
27
-
28
-
29
-
30
-
31
-
32
-
33
-
34
-
35
-
36
-
37
-
38
-
39
-
40
-
41
-
42
-
 43
43 -
 44
44 -
 45
45 -
 46
46 -
 47
47 -
 48
48 -
 49
49 -
 50
50 -
 51
51 -
 52
52 -
 53
53 -
54
-
55
-
56
-
57
-
58
-
59
-
60
-
61
-
62
-
63
-
64
-
65
-
66
-
67
-
68
-
69
-
70
-
71
-
72
-
73
-
74
-
75
-
76
-
77
-
78
-
79
-
80
-
81
-
82
-
83
 |
 |
