Panasonic SDRS150 SDRS150 User Guide - Page 71
size setting., Use the cursor button to select
 |
UPC - 037988254460
View all Panasonic SDRS150 manuals
Add to My Manuals
Save this manual to your list of manuals |
Page 71 highlights
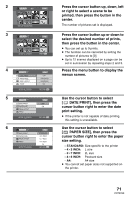
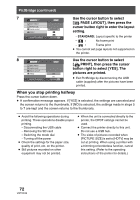
2 PictBridge 0 SETUP ENTER 3 PictBridge 1/24 2 SETUP ENTER PRINT MENU 4 PictBridge DATE PRINT PAPER SIZE PAGE LAYOUT PRINT OFF STANDARD STANDARD NO SETUP ENTER RETURN MENU 5 PictBridge DATE PRINT OFF PAPER SIZE ON PAGE LAYOUT PRINT SETUP ENTER RETURN MENU 6 PictBridge DATE PRINT PAPER SIZE PAGE LAYOUT PRINT SETUP ENTER STANDARD 4k5 INCH 5k7 INCH 4k6 INCH A4 RETURN MENU Press the cursor button up, down, left or right to select a scene to be printed, then press the button in the center. The number of pictures set is displayed. Press the cursor button up or down to select the desired number of prints, then press the button in the center. ≥ You can set up to 9 prints. ≥ The function can be canceled by setting the number of pictures to [0]. ≥ Up to 12 scenes displayed on a page can be set in succession by repeating steps 2 and 3. Press the menu button to display the menus screen. Use the cursor button to select [ DATE PRINT], then press the cursor button right to enter the date print setting. ≥ If the printer is not capable of date printing, this setting is unavailable. Use the cursor button to select [ PAPER SIZE], then press the cursor button right to enter the paper size setting. - STANDARD: Size specific to the printer - 4k5 INCH: L size - 5k7 INCH: 2L size - 4k6 INCH: Postcard size - A4: A4 size ≥ You cannot set paper sizes not supported on the printer. 71 VQT0X39
-
 1
1 -
2
-
3
-
4
-
5
-
6
-
7
-
8
-
9
-
10
-
11
-
12
-
13
-
14
-
15
-
16
-
17
-
18
-
19
-
20
-
21
-
22
-
23
-
24
-
25
-
26
-
27
-
28
-
29
-
30
-
31
-
32
-
33
-
34
-
35
-
36
-
37
-
38
-
39
-
40
-
41
-
42
-
43
-
44
-
45
-
46
-
47
-
48
-
49
-
50
-
51
-
52
-
53
-
54
-
55
-
56
-
57
-
58
-
59
-
60
-
61
-
62
-
63
-
64
-
65
-
 66
66 -
 67
67 -
 68
68 -
 69
69 -
 70
70 -
 71
71 -
 72
72 -
 73
73 -
 74
74 -
 75
75 -
 76
76 -
77
-
78
-
79
-
80
-
81
-
82
-
83
-
84
-
85
-
86
-
87
-
88
-
89
-
90
-
91
-
92
-
93
-
94
-
95
-
96
-
97
-
98
-
99
-
100
-
101
-
102
-
103
-
104
-
105
-
106
-
107
-
108
-
109
-
110
-
111
-
112
-
113
-
114
-
115
-
116
-
117
-
118
-
119
-
120
-
121
-
122
-
123
-
124
 |
 |
