Pfaff creative 7550 Owner's Manual - Page 170
Embroidering, cross, stitch, motifs, programs, starting, point
 |
View all Pfaff creative 7550 manuals
Add to My Manuals
Save this manual to your list of manuals |
Page 170 highlights
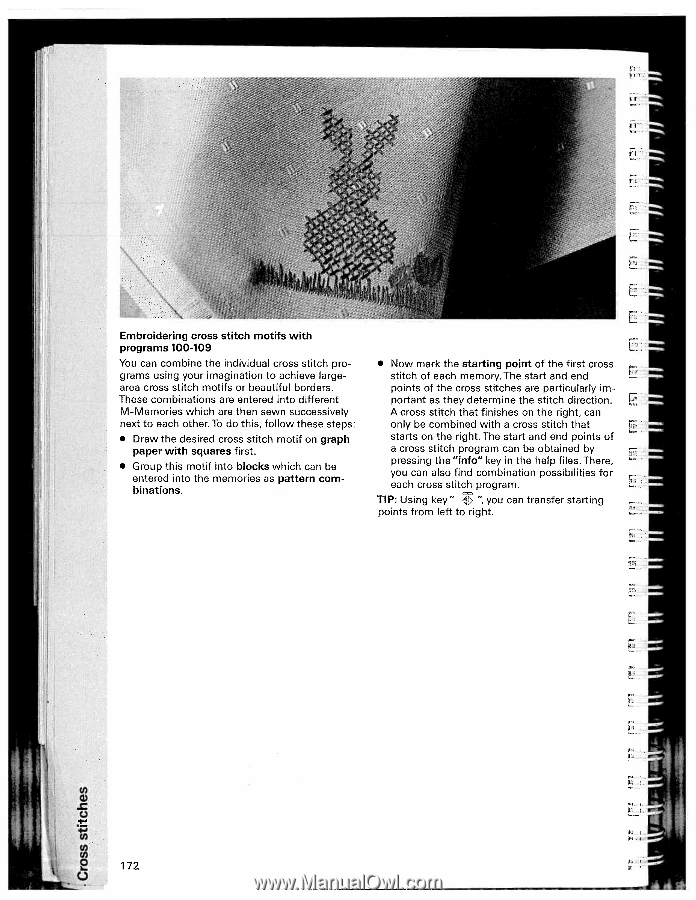
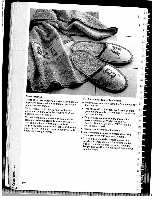
! - i ::i :i Li Embroidering cross stitch motifs with programs 100-109 You can combine the individual cross stitch pro grams using your imagination to achieve largearea cross stitch motifs or beautiful borders. These combinations are entered into different M-Memories which are then sewn successively next to each other. To do this, follow these steps: • Draw the desired cross stitch motif on graph paper with squares first. • Group this motif into blocks which can be entered into the memories as pattern com binations. :m Li Li • Now mark the starting point of the first cross stitch of each memory. The start and end points of the cross stitches are particularly im portant as they determine the stitch direction. A cross stitch that finishes on the right, can only be combined with a cross stitch that starts on the right. The start and end points of a cross stitch program can be obtained by pressing the "info" key in the help files. There, you can also find combination possibilities for each cross stitch program. TlP Using key" 'you can transfer starting points from left to right. j ! cI I I -i I:u Li I: ! I. Ua)) I - L C.) 1-' ' 't; U) U) I 172 'U i
-
 1
1 -
2
-
3
-
4
-
5
-
6
-
7
-
8
-
9
-
10
-
11
-
12
-
13
-
14
-
15
-
16
-
17
-
18
-
19
-
20
-
21
-
22
-
23
-
24
-
25
-
26
-
27
-
28
-
29
-
30
-
31
-
32
-
33
-
34
-
35
-
36
-
37
-
38
-
39
-
40
-
41
-
42
-
43
-
44
-
45
-
46
-
47
-
48
-
49
-
50
-
51
-
52
-
53
-
54
-
55
-
56
-
57
-
58
-
59
-
60
-
61
-
62
-
63
-
64
-
65
-
66
-
67
-
68
-
69
-
70
-
71
-
72
-
73
-
74
-
75
-
76
-
77
-
78
-
79
-
80
-
81
-
82
-
83
-
84
-
85
-
86
-
87
-
88
-
89
-
90
-
91
-
92
-
93
-
94
-
95
-
96
-
97
-
98
-
99
-
100
-
101
-
102
-
103
-
104
-
105
-
106
-
107
-
108
-
109
-
110
-
111
-
112
-
113
-
114
-
115
-
116
-
117
-
118
-
119
-
120
-
121
-
122
-
123
-
124
-
125
-
126
-
127
-
128
-
129
-
130
-
131
-
132
-
133
-
134
-
135
-
136
-
137
-
138
-
139
-
140
-
141
-
142
-
143
-
144
-
145
-
146
-
147
-
148
-
149
-
150
-
151
-
152
-
153
-
154
-
155
-
156
-
157
-
158
-
159
-
160
-
161
-
162
-
163
-
164
-
 165
165 -
 166
166 -
 167
167 -
 168
168 -
 169
169 -
 170
170 -
 171
171 -
 172
172 -
 173
173 -
 174
174 -
 175
175 -
176
-
177
-
178
-
179
-
180
-
181
-
182
-
183
 |
 |