Pfaff creative 7550 Owner's Manual - Page 92
see illustration
 |
View all Pfaff creative 7550 manuals
Add to My Manuals
Save this manual to your list of manuals |
Page 92 highlights
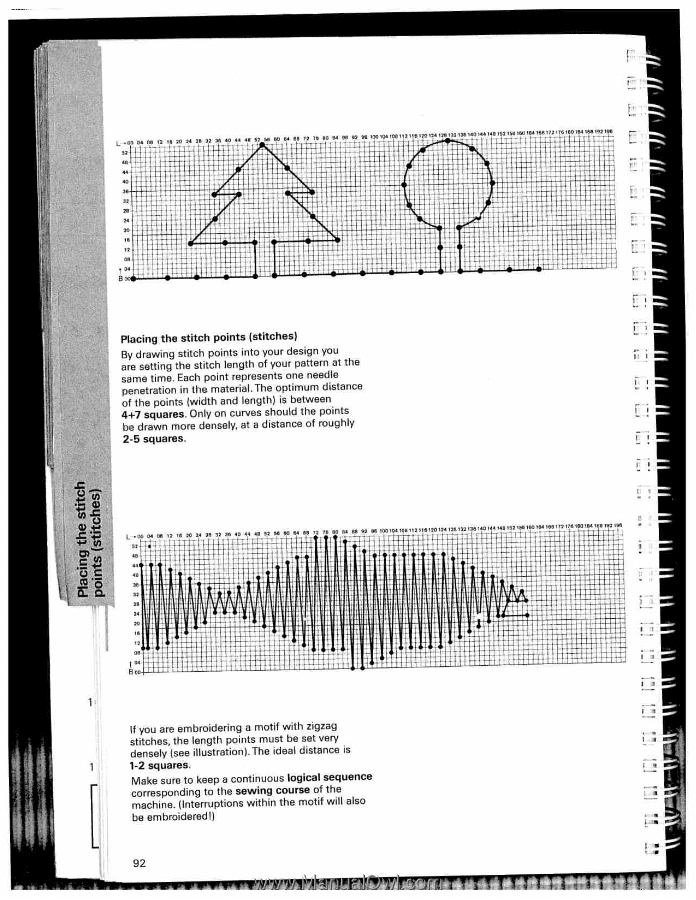
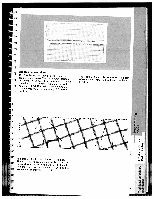
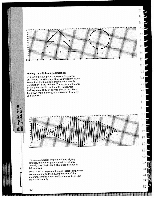
__ I i L 00 04 08 12 '6 20 24 28 32 38 48 44 48 52 56 60 64 68 72 76 80 84 88 82 96 100104108112116120124128132136140144148152156160164168172176100184108192196 i 32 28 24 20 16 L44 44 12 08 04 TTtTi 1 fj 4-f -L-f±-1 -f-t t 4 1 iTtH-1THTh Th. mTf r1T I Placing the stitch points (stitches) By drawing stitch points into your design you are setting the stitch length of your pattern at the same time. Each point represents one needle Ii penetration in the material. The optimum distance of the points (width and length) is between 4+7 squares. Only on curves should the points be drawn more densely, at a distance of roughly 2-5 squares. I t I L--00 04 08 12 16 20 24 28 32 36 40 44 48 02 56 60 64 68 72 76 05 94 89 92 96 100104108112116120124128132l36140144148152156160164168172176180184188192196 32 mL1. 20 + 16 12 08 04 r itJl1 U UT HtT t11 *fE tjH r -s--I-ti--I I -- ii I i H--1-1 L 4 1 ts_ -jI jr f H tt i-1i I 1' If you are embroidering a motif with zigzag stitches, the length points must be set very densely (see illustration), The ideal distance is 1-2 squares. Make sure to keep a continuous logical sequence [ corresponding to the sewing course of the machine. (Interruptions within the motif will also be embroidered!) 92 1t-i I -I IS I !t! t11
-
 1
1 -
2
-
3
-
4
-
5
-
6
-
7
-
8
-
9
-
10
-
11
-
12
-
13
-
14
-
15
-
16
-
17
-
18
-
19
-
20
-
21
-
22
-
23
-
24
-
25
-
26
-
27
-
28
-
29
-
30
-
31
-
32
-
33
-
34
-
35
-
36
-
37
-
38
-
39
-
40
-
41
-
42
-
43
-
44
-
45
-
46
-
47
-
48
-
49
-
50
-
51
-
52
-
53
-
54
-
55
-
56
-
57
-
58
-
59
-
60
-
61
-
62
-
63
-
64
-
65
-
66
-
67
-
68
-
69
-
70
-
71
-
72
-
73
-
74
-
75
-
76
-
77
-
78
-
79
-
80
-
81
-
82
-
83
-
84
-
85
-
86
-
 87
87 -
 88
88 -
 89
89 -
 90
90 -
 91
91 -
 92
92 -
 93
93 -
 94
94 -
 95
95 -
 96
96 -
 97
97 -
98
-
99
-
100
-
101
-
102
-
103
-
104
-
105
-
106
-
107
-
108
-
109
-
110
-
111
-
112
-
113
-
114
-
115
-
116
-
117
-
118
-
119
-
120
-
121
-
122
-
123
-
124
-
125
-
126
-
127
-
128
-
129
-
130
-
131
-
132
-
133
-
134
-
135
-
136
-
137
-
138
-
139
-
140
-
141
-
142
-
143
-
144
-
145
-
146
-
147
-
148
-
149
-
150
-
151
-
152
-
153
-
154
-
155
-
156
-
157
-
158
-
159
-
160
-
161
-
162
-
163
-
164
-
165
-
166
-
167
-
168
-
169
-
170
-
171
-
172
-
173
-
174
-
175
-
176
-
177
-
178
-
179
-
180
-
181
-
182
-
183
 |
 |