Pfaff creative vision Owner's Manual - Page 102
Embroidery stitch editor 24 - precise positioning
 |
View all Pfaff creative vision manuals
Add to My Manuals
Save this manual to your list of manuals |
Page 102 highlights
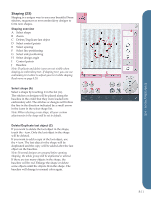
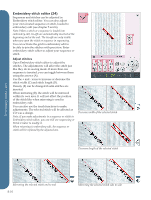
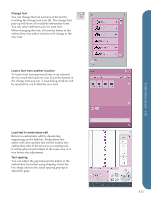
Embroidery stitch editor (24) 24 Sequences and stitches can be adjusted in Embroidery stitch editor. You can also adjust your own created sequence or stitch, loaded to embroidery edit (see chapter 5 and 6). Note: When a stitch or a sequence is loaded into embroidery edit, tie-offs are automatically inserted at the A beginning and at the end. The tie-offs are only visible when you open the stitch or sequence in sequencing. You can activate the grid in embroidery edit to be able to join the stitches with precision. Enter embroidery stitch editor to adjust your sequence or stitch. Adjust stitches Open Embroidery stitch editor to adjust the stitches. The adjustments will affect the stitch just like they do in sewing mode. If more than one sequence is inserted, you can toggle between them using the arrows (A). Use the + and - icons to increase or decrease the stitch width (C) and stitch length (D). Density (E) can be changed if satin stitches are inserted. When mirroring (B), the stitch will be mirrored within its own area. It will not affect the position of the stitch like when mirroring is used in embroidery edit. You can also use the touch functions to make adjustments. The selected stitch will be affected as if it was a design. Note: If you make adjustments to a sequence or stitch in Embroidery stitch editor, you can still use sequencing or Stitch Creator to modify it. When returning to embroidery edit, the sequence or stitch will be replaced by the adjusted one. BCDE Decrease width of the selected stitch Decrease length of the selected stitch Embroidery mode - edit Mirroring the selected stitch end to end 8:16 Mirroring the selected stitch side to side
-
 1
1 -
2
-
3
-
4
-
5
-
6
-
7
-
8
-
9
-
10
-
11
-
12
-
13
-
14
-
15
-
16
-
17
-
18
-
19
-
20
-
21
-
22
-
23
-
24
-
25
-
26
-
27
-
28
-
29
-
30
-
31
-
32
-
33
-
34
-
35
-
36
-
37
-
38
-
39
-
40
-
41
-
42
-
43
-
44
-
45
-
46
-
47
-
48
-
49
-
50
-
51
-
52
-
53
-
54
-
55
-
56
-
57
-
58
-
59
-
60
-
61
-
62
-
63
-
64
-
65
-
66
-
67
-
68
-
69
-
70
-
71
-
72
-
73
-
74
-
75
-
76
-
77
-
78
-
79
-
80
-
81
-
82
-
83
-
84
-
85
-
86
-
87
-
88
-
89
-
90
-
91
-
92
-
93
-
94
-
95
-
96
-
 97
97 -
 98
98 -
 99
99 -
 100
100 -
 101
101 -
 102
102 -
 103
103 -
 104
104 -
 105
105 -
 106
106 -
 107
107 -
108
-
109
-
110
-
111
-
112
-
113
-
114
-
115
-
116
-
117
-
118
-
119
-
120
-
121
-
122
-
123
-
124
-
125
-
126
-
127
-
128
-
129
-
130
-
131
-
132
-
133
-
134
-
135
-
136
-
137
-
138
-
139
-
140
-
141
-
142
 |
 |
